How to Install Discourse Forum on Ubuntu 14.04
November 4, 2015 by Editorial Team ( 450 ) under VPS Hosting
0 Comments
Verified and Tested 10/28/15
Introduction
This walkthrough is written to walk you through the base install of Discourse on an Ubuntu 14.04 LTS Server. Discourse is an Internet forum software application, that is fun and easy to use. To keep the installation process as simple and straightforward as we can, we will be using Git and the application Docker. The installation process will automatically install and configure base access for Nginx (Web Application) and PostgreSQL (Databases).
One of the best features of Discourse is that it is 100% open-source. Not only does the community help develop the forum software but it has a built-in API and is completely mobile friendly with plug-ins for CDN (Content Distribution Networks) and it has SEO built-in for your URLs. You can also, of course, customize the look and how Discourse functions for your needs.
Prerequisites
You will need a server running Ubuntu 14.04 LTS without a web service application installed. If you do not have a server, try Atlantic.Net’s cost-effective virtual private servers.
Minimum recommended system memory is 1GB of RAM.
Installing Discourse Forum
As the first step of install Discourse, you will want to install their Docker/Git application. You will want to connect to your server via SSH or VNC and run:
wget -qO- https://get.docker.com/ | sh
Once done, you will need to make a Discourse folder, and Git clone the Discourse Docker into the new directory:
mkdir /var/discourse
git clone https://github.com/discourse/discourse_docker.git /var/discourse
Following that, copy the standalone.yml from the samples directory to a container called app.yml. This will be our container we run Discourse in:
cp /var/discourse/samples/standalone.yml /var/discourse/containers/app.yml
Once copied, we will want to edit the app.yml with our settings, specifically administrative email. If you do not do this and do this with invalid information, Discourse will not build, and there is a possibility with incorrect information that you will be unable to create users. The spots to look for are in the picture below encased in red.
nano /var/discourse/containers/app.yml
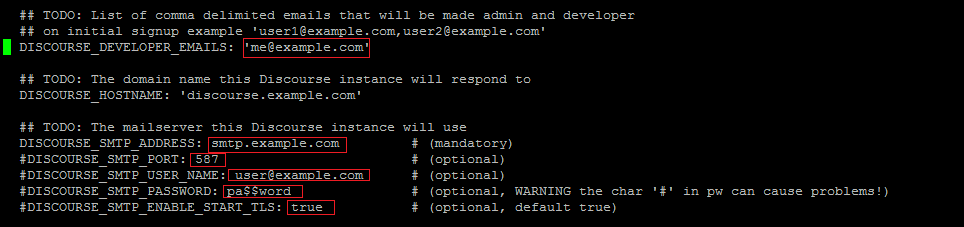
For the developer email address, make sure to use the email address that will belong to the administrator account. You can use more than one email for this, just make sure to separate them by a comma.
-The Discourse hostname will need to be the hostname for the server or for the forum itself. It is the hostname you want to type in the address bar in order to get to the forum.
SMTP_ADDRESS - the SMTP address Discourse will be using to send emails (required).
If this server requires additional information (such as a username and password) in order to relay/send mail, you will need to uncomment the lines after (remove the #) and edit:
SMTP Port - The port that SMTP responds to on your email server.
SMTP Username - The username for the email account that will be sending the emails.
SMTP Password - The password for said account.
SMTP Start TLS - If TLS has to be enabled, set this to true, otherwise set this to false.
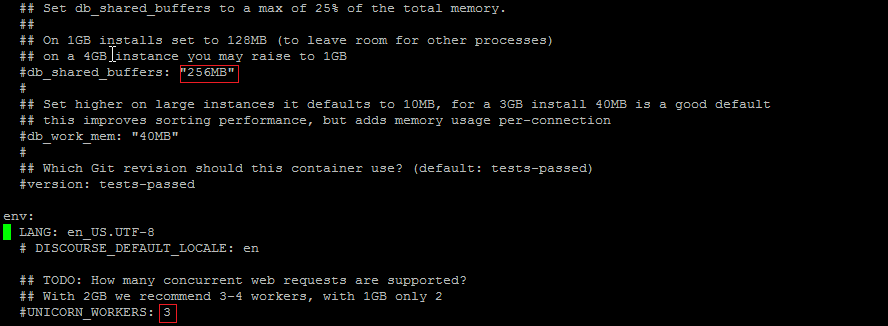
*Note* One major point outside of email is the basic configuration. If you have a 1 GB server (it is not recommended that you have anything lower than this) you will want to change the UNICORN_WORKERS field to be a value of 2 and db_shared_buffers to be 128MB.
Once this is done you can save and exit the file.
Now we simply run:
/var/discourse/launcher bootstrap app
This will cause Discourse to start building. This process can take some time. Once it’s finished building the below command to start Discourse. You may be prompted with a”Your system may not work properly” warning if you are performing this install on Atlantic.Net’s Cloud service. If there is an error, the build process will stop and tell you to scroll up to see the error. The most likely cause is that either the system hostname or email settings are not configured correctly; take a look at your /var/discourse/containers/app.yml file again to verify your settings.
/var/discourse/launcher start app
If this command runs with no errors, you now have Discourse running! Simply go to your configured hostname and you should see Discourse running. You may be prompted with a”Your system may not work properly” warning if you are performing this install on our Cloud service. If there is an error it will state so and refer you to scroll up to see it. You may simply hit Enter to continue.
Once Discourse is running, you will need to make your Administrator user. You will want to register a new user that will have the Developer email address. This will automatically make that user an Administrator.

If you cannot create the user (email doesn’t reach you) you can run the following to create the admin user. You may be prompted with a”Your system may not work properly” warning if you are performing this install on our Cloud service. If there is an error it will state so and refer you to scroll up to see it. You may simply hit Enter to continue.
/var/discourse/launcher enter app
rake admin:create
exit (once all done with the creation)
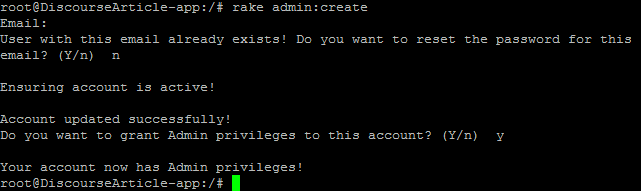
The create command will prompt for an email address. Once you put in the developer email address, it will prompt a user with that email already exists and if you want to reset the password. You can say ‘y’ if you want to or ‘n’ if you do not. After this, it will ask if you want to make the user an Admin. To this, you will hit ‘y’. You may now log in with the user you just previously tried to create. You will want to fix the email issue otherwise you will need to run this and go through these options for every user you plan to have.
That’s it. You can now log in as an admin and do anything on the admin side you want. Your forum is now running! Check back later for any additional articles about Discourse configuration.
Get a $250 Credit and Access to Our Free Tier!
Free Tier includes:
G3.2GB Cloud VPS a Free to Use for One Year
50 GB of Block Storage Free to Use for One Year
50 GB of Snapshots Free to Use for One Year