How to: Introduction to Programming – Flow Control
October 28, 2015 by Editorial Team ( 450 ) under VPS Hosting
0 Comments
How-To Series
This is part 4 of a 5 part series for Introduction To Programming
- Introduction To Programming: Getting Started
- Introduction To Programming: Your First Program
- Introduction To Programming: Variables, Types, And Manipulating Data
- Introduction To Programming: Flow Control
- Introduction To Programming: Object Oriented Programming
Welcome Back, Aspiring Programmers!
In this article, we’re going to explore control flow and how you can use conditions, branches, loops, and other mechanisms to determine what happens in your program.
If you have not read the previous articles in this series, I strongly suggest you do so. We’re building on top of previous knowledge in all these articles, so it is important for your understanding that you know what we have already covered.
We have a lot to cover in this article, so without further ceremony, let’s get down to business.
.
Handling Exceptions
When we last left our program, we had three lines of code and a problem. The code looks like this:
Console.WriteLine("Guess a number between 1 and 10:");
string text = Console.ReadLine();
int input = int.Parse(text);
However, if we run this program and enter anything except a number when prompted, the program crashes because the compiler doesn’t know how to turn non-numeric text into an integer.
If you recall from last time, we get what is called an exception, and it is one of the ways we can control the flow of a program in a very specific situation, namely when an exceptional situation occurs.
I wanted to start with exception handling because it is the most complex and possibly confusing topic in flow control, so if you can understand what we do here, you will likely find the remaining concepts much easier to understand.
For exception handling in programming, we have two important ideas you must understand. The first idea is that you can ask your program to try something. The second idea is that if the computer fails at what it is trying, you can catch the problem and handle it.
These two ideas together work a bit like a tightrope walker with a safety net. A tightrope walker (your program) can perform as normal along the tightrope, in most cases. But if something out-of-the-ordinary occurs, such as a misstep off the tightrope (an exception), there should be a safety net to prevent the performer from plummeting to the ground (a catch to handle the exception).
With an understanding of exception handling, we can now begin to see a solution to our problem. We can ask the computer to try to parse the text into an integer, and if it fails–rather than allowing the program to crash–we can catch the mistake, tell the user, and ask them to try again.
Let’s see what that might look like in our code.
Console.WriteLine("Guess a number between 1 and 10:");
string text = Console.ReadLine();
int input = 0;
try
{
    input = int.Parse(text);
}
catch
{
    Console.WriteLine("Whoops, you didn't enter a number");
}
Our first change is that we are initially setting the int input to zero before we try to set it to the result of the parsing of the text input from the user. There is a specific reason I first set the value to zero and then set it to something else later.
Note that after the try line, the code we want to try is surrounded by curly brackets like these:
{
}
In C# and many similar languages, we use curly brackets to encompass or limit the scope of certain actions, operations, or even variable life cycles. Generally, variables only survive inside these brackets. When our code execution exits a set of these brackets, any variables inside it go away (sometimes called going out-of-scope).
You see the same curly brackets after the catch line, too, which is an instruction that whatever is inside the curly brackets should be executed only if we catch a mistake or an exception. Code inside curly brackets is often called a code block.
What this means is that if we had created the int input inside the try code block, then the variable would just disappear once we had passed the try code block, and we could no longer access it to check if it matches our secret value. I’ll work up an example from our code to show you what I mean. Note in Figure 1 below how I do not define the int input until we are inside the curly brackets of our try statement.
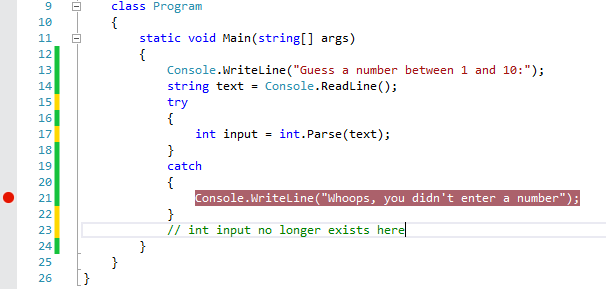
Figure 1: Variable Scope
Oh, and notice that I have one line that starts with
//. In C#, the double slashes indicate that whatever comes after that and until the end of the line is a comment that is not part of the program. The compiler will simply ignore such lines.
.
To try our program out, we can put a breakpoint inside the catch brackets on the Console.WriteLine line, and then execute our program. Enter a non-numeric input to check that rather than crashing, the program now steps into the catch code block, and then eventually displays the error message to the user, as you can see in Figure 2.
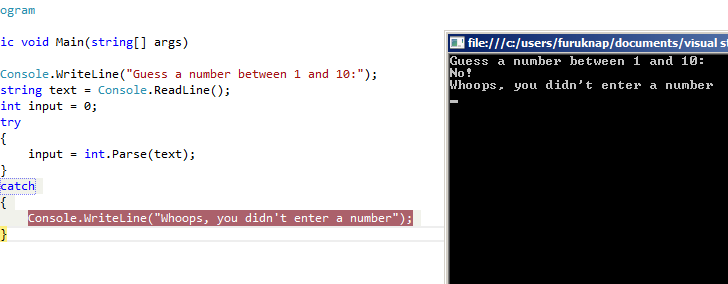
Figure 2: Exception caught!
.
Conditions
Now, this code is rather useless as currently written because we’re reading in a value, but–except for telling the user if they make a mistake–we are not using the value for anything. You can try this and see that if you enter a number, say 7, the breakpoint isn’t hit.
To make our code useful as a guessing game, we need to test whether we have guessed the correct number. Here, we need to introduce a new flow control concept called a condition.
A condition is a code block that executes only if a certain rule or set of rules are fulfilled. We start such conditions with the word if and follow it with the rule or set of rules we are checking in parentheses, which is then followed by the code block we want to execute.
if (condition is met)
{
    // execute this code block
}
There are, of course, very strict syntax rules for how we can format these conditions, and they aren’t necessarily as intuitive as they could be. For example, to compare values, you need to use two equal signs in C# and sometimes three in JavaScript. (Remember that using one equal sign is how you assign a value.)
if (value == other_value) // example value comparison
You can use a wide range of comparison operators and the rest are a bit more intuitive. For example, like in normal math, you can use greater than (>) and less than (<) and combine these with equal signs to create a greater than or equal (>=) or less than or equal (<=) conditions.
You can also create negative conditions. In many programming languages, you indicate a negative operator with the exclamation point (!), which is also often called a “bang”. For example, if you want to create a condition that executes if two values are not equal, you can write:
if (value != other_value)
You can also create multiple conditions by separating the different conditions using either && (double ampersands) for “AND” conditions or || (double pipes) for “OR” conditions.
if (value1 == other_value && value2 == other_value) …
//means both value1 and value2 must be equal to other_value

if (value1 == other_value || value2 == other_value) …
//means either value1 or value2 must be equal to other_value
Using a condition, we can now create a test to see whether the player has guessed the right number. Add the following lines after the last curly bracket of the catch code block:
if (input == 3)
{
    Console.WriteLine("Congratulations! You guessed correctly!");
}
This condition tests whether input (the value the user has entered) equals 3. If this condition is met, the game will display a congratulatory note, as shown in Figure 3.
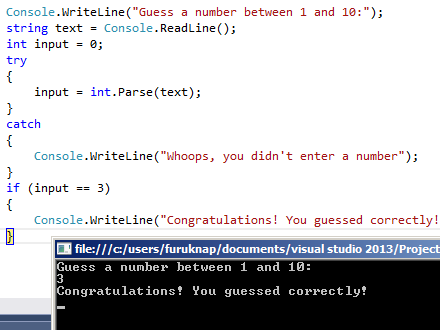
Figure 3: Condition Met, Congratulations Awarded
If the user doesn’t guess the number 3, our program displays nothing more, and the application quits.
Remember that you can put breakpoints anywhere in your code to stop execution and see the results of what you are doing. We’ll be doing just that to see the results of the changes we’ll be making to our code from here on out.
.
It would be nice, however, if we could display another message if the user did not guess the correct number. Fortunately, conditions also allow for this behavior through the else keyword.
The else keyword must come directly after an if code block and states what should happen if the condition in the parentheses of an if statement is not fulfilled. To try this out, add the following lines after the if block:
else
{
    Console.WriteLine("No, sorry, that wasn't it. Better luck next time!");
}
Your entire conditional code blocks should now look like Figure 4 below.
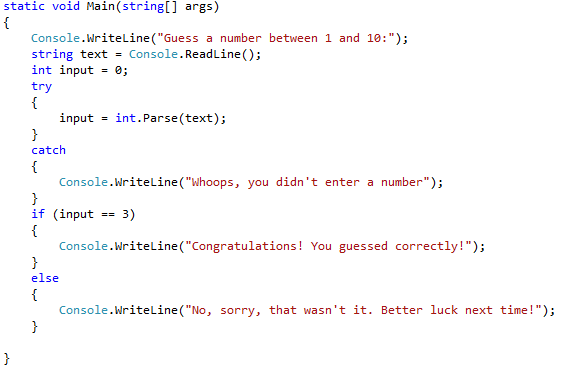
Figure 4: Guessing Game Program Code with Conditional Code Blocks
When you execute your program, depending on whether you guess 3, you will get either a congratulation or an encouragement to try again. We call this type of flow control conditional branching because the program goes into one or another branch depending on the conditions you put forth.
Let us increase the odds a bit for anyone who does not know that the magic number is always 3. We will allow multiple attempts at guessing if the player does not guess correctly.
.
Going For a Loop
To accomplish this new functionality, we need to implement something called a loop. In programming, a loop is a block of code that executes repeatedly. Two very common loop types are for loops and while loops.
The best use for for loops are when you have a specific number of times you want something to happen. Let us start with that in our code and see where it leads us.
In a for loop, you need the keyword for followed by a parenthetical block that contains three pieces of information.
First, we define the starting environment for our loop, which includes variables we want to use to keep track of how many times our code block has executed. Second, we want a condition that determines whether we should continue the loop. Finally, we have the changes that we want to make to the loop conditions each time we execute the loop. Let’s look at an example.
for (int i = 0; i < 3; i++)
{
    // This code block will execute three times.
}
The important bit here is the first line. Notice the semi-colons that separate the three parts I mentioned. Here’s how each part breaks down:
int i=0; // Initialization: Creates an integer variable called "i" and sets it to 0.
i<3; // Condition: Continue executing as long as "i" is less than 3.
i++ // Change happening during each loop: "i" increases by one each time the loop runs.
The i++ notation is shorthand for writing i=i+1, which sets i to the value of i plus one–in other words, it increases i by one. You could have written i=i+1 as well, but this particular pattern is very, very common in programming, so I show it as a useful example.
Whatever you put into the block that follows the for loop declaration will happen as long as the condition is fulfilled–in this case, three times. For example, you can add a Console.WriteLine() inside the code block, and it will repeat three times, as in Figure 5 below.
for (int i = 0; i < 3; i++)
{
    Console.WriteLine("I am in a loop!");
}
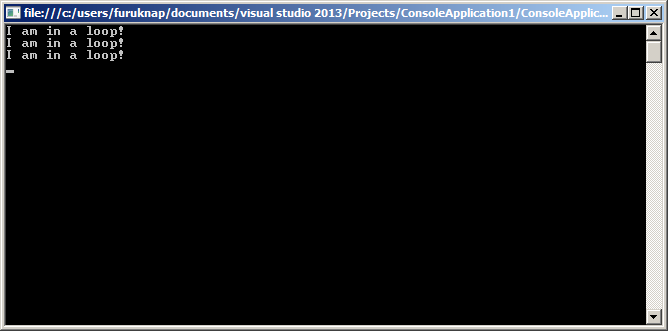
Figure 5: “I am in a loop!”
We want to use this sort of loop to allow the user to have multiple tries to guess the correct number. So, we can wrap the entire program we have already written inside a for loop as described above. The code should now look like Figure 6 below.
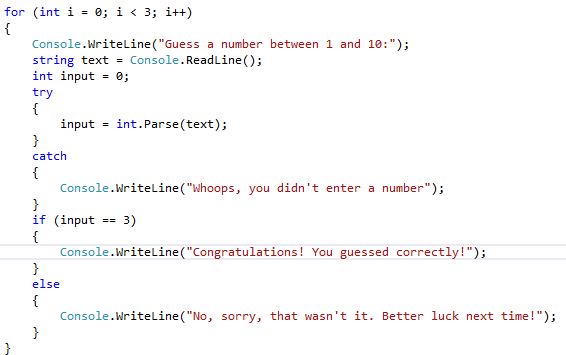
Figure 6: Guessing Loop
Of course, if you guess the correct number before you reach three tries, it makes no sense to keep guessing. As such, we’re about to do a very bad thing….
Remember that the condition for the continued execution is that i remains below 3. So, if we want to stop the loop, we can simply increase i to 3 or more to stop the loop. If you add i = 3 inside the block that executes if the user guesses correctly, as shown in Figure 7 below, the game will stop once the user guesses 3.
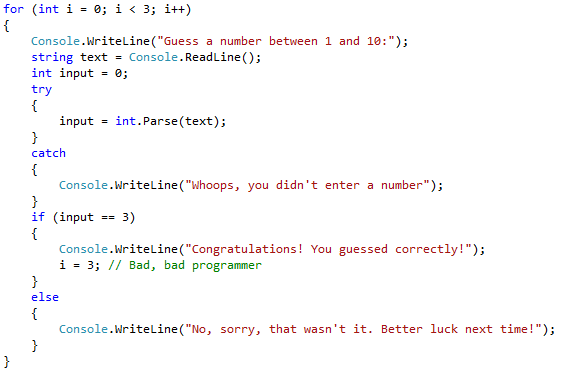
Figure 7: Short-Circuiting the For Loop
You may not understand why this is a bad idea, and really, it is more of a philosophical argument than a technical one. However, it is an important argument so let’s make it.
A for loop is designed to execute a specific number of times. If you do not know in advance how many times you are going to execute the loop, then a for loop is a poor choice. There are other loop forms that are better suited to this task so using a for loop is picking the wrong tool for the job.
This argument may seem insignificant and pedantic. The program works fine as it is and does exactly what you expect.
However, the programmer’s mind is one that should strive towards clarity, and this example certainly isn’t clear. Looking at the first line of our current code, you think this is a loop that runs three times, but then we “cheat” the loop in the middle so that the loop may run anywhere between one to three times; there is no way for us to know. We have broken the clarity of what will happen, and that’s a bad thing.
Even if you don’t care about anyone reading your code, remember that as programmers, we work with machines that are incapable of understanding intent. It understands exactly only what we say. If we are unclear, the chance that we get unexpected results increases. We risk creating problems for ourselves down the line when programs become more complex.
As such, we need to find a better approach, and that better approach is a while loop.
.
A While Loop
A while loop executes while a condition is true. It doesn’t matter how many times that is: as long as the condition is true, the loop continues.
A while loop is simpler in declaration than a for loop and comprises the keyword while followed by an open parenthesis, the conditions, and a closing parenthesis.
while (condition)
{
    // Code to execute
}
This execution can be very dangerous if you do not have clear conditions. If you make a mistake or do not properly account for all conditions and events, your program can run amok and grind your machine to a halt.
The danger lies in making sure that you invalidate the condition inside the code block when you want execution to stop. Otherwise, the loop will run forever.
Let’s change our for loop to a while loop and let it run as long as the user has not guessed three times. We can create this condition by declaring an int i=0; before the loop starts and then setting the value of i inside the loop. Update your code as such:
static void Main(string[] args)
{
    int i=0;
    while(i < 3)
    {
        Console.WriteLine("Guess a number between 1 and 10:");
        string text = Console.ReadLine();
        int input = 0;
        try
        {
            input = int.Parse(text);
        }
        catch
        {
            Console.WriteLine("Whoops, you didn't enter a number");
        }
        if (input == 3)
        {
            Console.WriteLine("Congratulations! You guessed correctly!");
            i = 3;
        }
        else
        {
            Console.WriteLine("No, sorry, that wasn't it. Better luck next time!");
        }
    }
}
Note that there is a mistake in this code, which shows how easy it is to create infinite loops. We are not increasing i unless we guess correctly! In other words, the player gets infinite tries, but there’s no way to stop guessing if they do not guess correctly!
Luckily, if you start this program, you know the answer is fixed to 3 so you can guess that, but barring that, you might have a huge problem on your hand.
I am saying this not to scare you from using while loops but rather to instill a sense of respect for their power. While loops are very powerful and useful but can also be dangerous if you do not take care.
To fix your issue, add i++; as the first line inside the while code block, immediately preceding Console.WriteLine("Guess a number between 1 and 10:"). Your code should now work as expected, be very clear, and give you a very basic but boring guessing game.
.
A Preview of Object Orientation
So what can we do to make this game even remotely interesting? I know, let’s make the secret number random!
I held back doing this because we need to introduce some new ideas to create random numbers. These ideas will become clear in the next article that deals with object orientation. For now, let me just give you the code and I will explain in detail what it does in the last article of this series.
static void Main(string[] args)
{
    Random random = new Random(); // Object orientation stuff
    int answer = random.Next(10)+1; // Give me a random number less than 10 and add one
    int i = 0;
    while (i < 3)
    {
        i++;
        Console.WriteLine("Guess a number between 1 and 10:");
        string text = Console.ReadLine();
        int input = 0;
        try
        {
            input = int.Parse(text);
        }
        catch
        {
            Console.WriteLine("Whoops, you didn't enter a number");
        }
        if (input == answer)
        {
            Console.WriteLine("Congratulations! You guessed correctly!");
            i = 3;
        }
        else
        {
            Console.WriteLine("No, sorry, that wasn't it. Better luck next time!");
        }
    }
}
There are two new lines now and one changed line. The new lines create a random integer answer between 1 and 10, and in the changed line we compare what the user guesses with that random answer.
Don’t worry about the random generation for now, I’ll explain that in the next article. But for now, congratulations, you are hereby officially a game developer in addition to being a programmer! Feel free to play the game now and see how you fare. You should beat the game, on average, 3 out of 10 times.
As an added exercise for yourself, why don’t you add a message after the game ends that tells the player what the secret number was? For now, though, let’s wrap up and go over what we’ve covered.
.
Wrap-Up
In this article, you have learned about program flow and how you can control the flow of your program. You have learned about exceptions for handling mistakes. You have learned about code blocks and conditional branching with if and else. You have also learned about loops with for and while.
In the next article, we will spend a little time polishing the game up, and we’ll also look into object orientation in more detail.
How-To Series
This is part 4 of a 5 part series for Introduction To Programming
Get a $250 Credit and Access to Our Free Tier!
Free Tier includes:
G3.2GB Cloud VPS a Free to Use for One Year
50 GB of Block Storage Free to Use for One Year
50 GB of Snapshots Free to Use for One Year