How to: Object-Oriented Programming – More with Classes and Objects
December 7, 2015 by Editorial Team ( 450 ) under VPS Hosting
0 Comments
Bonus Round
Welcome back to our Introduction to Object-Oriented Programming! Perhaps it would be more appropriate to say, “Welcome to the Bonus Round of our Introduction to Object-Oriented Programming!”. This article and the one that follows it are for those of you who want to learn a little more about some of the foundations of Object Orientation and who enjoy some bonus content!
To review, if you’ve followed along with some of the first five articles in this series, then you’ve learned quite a few things:
- How abstraction helps to simplify programming tasks.
- The basics of classes, methods, and properties of object orientation.
- The basics of working with variables and types and manipulating that data.
- How to deal with flow control with
forandwhileloops. - How to put all of this together to create a simple program.
This article and the next will take what you’ve learned from that introduction and show you more about how you can use some of the principles of object orientation (often abbreviated OO) to make efficient and well-organized code. We will start with a new program that will allow us to review some basic concepts and lead into some new concepts, such as constructors and inheritance.
Again, we’ll be programming in C# using Microsoft’s Visual Studio. If you’d like to follow along (and haven’t done so already) you can find the setup right here.
If you follow the setup in that article up until the “Under the Hood” section, you’ll be right where we’ll be starting. The only thing I will do differently from that article is that I will not be using the default project name “ConsoleApplication1”. Instead, I will call my project “PettingZoo” (in one word) because we will build a petting zoo as our example program.
Note: Object orientation is available in many languages and platforms, and the concepts are very similar. I have chosen C# because it is easy to get started and all the resources you need are free of charge. You may have other languages and platforms you want to use, and that’s fine, too. We’re here to learn object orientation, not any language or implementation in particular.
.
In This Article
Initial Setup
Before we begin, verify that you have a console application created in Visual Studio. It should look something like Figure 1.

Figure 1: Initial PettingZoo Program Setup
With this console application available in Visual Studio, we can start creating our first class. In C#, there are multiple ways to create a class. In some languages, such as Java, you need to create classes in specific ways using specific file name and folder patterns, but C# just cares that we say that something is a class.
Note that even in the default console application, you already have one class called Program. Using the keyword class followed by the name of the class is how you define a class in C#.
For our approach, we’ll create a new code file to hold our classes. Right-click on the PettingZoo node in the Solution Explorer pane, and then click Add->Class, as shown in Figure 2.
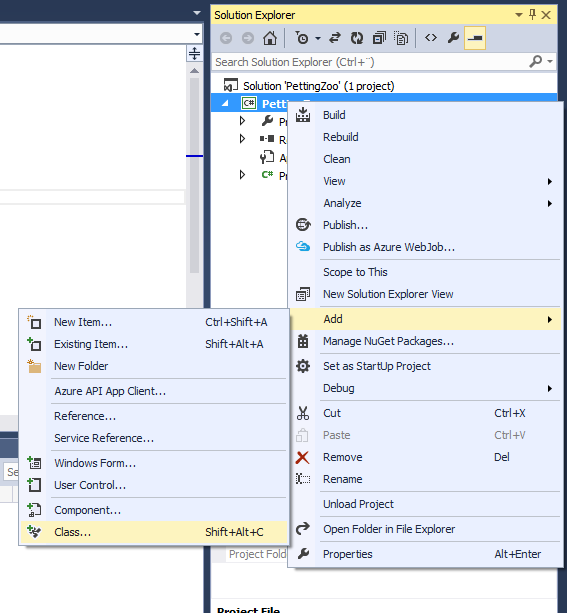
Figure 2: Adding a Class with Solution Explorer
In the dialog box that opens, find the Code element either by searching or navigating, and call your class file something like Animals.cs, as shown in Figure 3.
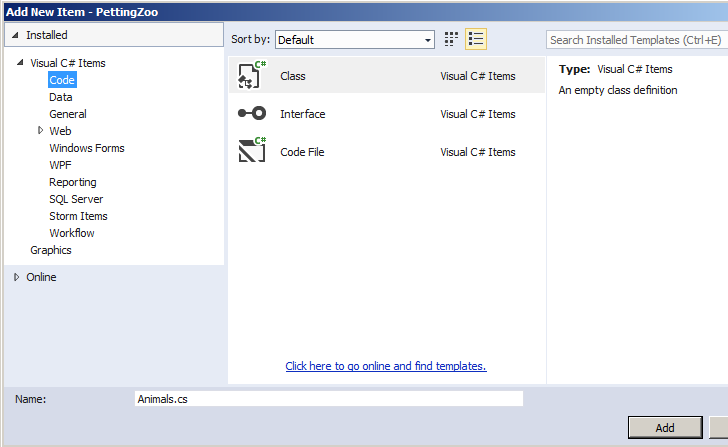
Figure 3: Adding Class File Dialog Box
You should now get a new class file created by Visual Studio that contains something like this:
using System;
using System.Collections.Generic;
using System.Linq;
using System.Text;
using System.Threading.Tasks;

namespace PettingZoo
{
    class Animals
    {
    }
}
Note that by default Visual Studio creates both a class file and a class definition within based on the file name you chose. In some languages–like Java–this structure is a requirement, but in C#, it’s not so strict. We will change the class name in a moment, but leave it for now.
In the file Visual Studio just created, you will notice a number of using statements as well as a namespace code block. These lines aren’t important to our class, but–in case you’re curious–a namespace in C# is a way to organize names in your project. You can have multiple classes with the same name, for example, organized under different namespaces.
As long as you work inside a single namespace, addressing classes is fairly straightforward. But if you need to organize your project into more complex divisions, you may need to utilize different namespaces, in which case the
usingstatements allow you to create shortcuts to those namespaces.
.
Classes and Objects
The file you now have contains a premade class with a name based on the filename you chose. We’re not going to have an Animals class, though, so let’s change that to something else. In a petting zoo, we need dogs, of course, so change the name of the class from Animals to Dog:
class Dog
{
}
Note the change from Animals (plural) to Dog (singular). We will create another class later called Animal, so be careful when you read the code that you pick up on nuances like that.
Before we start adding any content to the class, let’s examine the difference between classes and objects. Remember that a class is the template for how objects should be. A simplistic and not terribly accurate analogy is that of a recipe and a cake.
(This section is a review of classes and objects adapted from the explanation presented in the linked article above. If you want to skip this refresher and get straight to the programming, jump right to the next section! Otherwise, enjoy some cake!)
The recipe tells you how to make a cake and is thus–in OO terms–a class. A cake is the result of the recipe execution and–again, in OO terms–is an object. Another term used frequently is instance, to indicate that the cake is an instance of the execution of a recipe.
As with cakes and recipes, each cake is a unique cake. What you do to one cake does not affect any other cakes. Putting frosting on one cupcake doesn’t mean all cupcakes now have frosting. Similarly, if you eat one cupcake, you still have all the others left.
However, having a recipe and knowing it produces a cake isn’t enough. You also need a kitchen in which to bake the cake. In OO terms, this is the program where you create the object, and in our case, that would be the main Program.cs file.
.
Back to the PettingZoo
Let’s use our new class to create a Dog object, so open the Program.cs file and add the following line inside the static void main code block:
Dog myDog = new Dog();
This line will create a new Dog object from the Dog class and store it in the myDog variable. Let me break this line down into three parts so I can explain what goes on.
[1]Dog [2]myDog = [3]new Dog();
The first element [1], Dog, is the type of variable we want to create. In statically typed languages like C# and Java, we need to declare what type a variable is before we can assign values to it. Languages that are dynamically typed, like JavaScript or Perl, does not require this and puts the responsibility of tracking what type of data a variable contains on the developer.
The second element [2], myDog, is the variable name we use to access the object. This is not necessarily the name of the dog we create but rather what we use to reference this particular instance of a Dog class.
Note: For more on variables and data types like string, check out our introduction to programming article on variables and types.
.
Finally, the third element [3], new Dog(), tells us that we want to create–or instantiate–a new object based on the Dog class. Notice that there are parentheses after the class name, which means this is actually a method. We’ll get back to this method, which is a special method called a constructor (we’ll go deeper into constructors in the next article linked below).
With our program now creating a new object from the Dog class that it stores in the myDog variable, we can start accessing the properties and method of our object. Except, of course, that our class is completely empty and devoid of content! Let’s fix that.
.
Properties and Methods
Let’s go back to our Animals.cs file, where our Dog class has a name but nothing else. However, everything we put inside this code block will become part of the class definition. Remember, classes have properties and methods that define, respectively, what an object is and what it can do.
Let’s create both a property and a method, and then we’ll discuss what each does. Inside your code block’s curly brackets, {}, add the following two lines:
string Name;
void Speak() { Console.WriteLine("Woof"); }
The first line (string Name;) is a property or field. In object orientation, properties define what something is. In our case, we want our dog to have a name, so we have created a string property to hold the name of the dog.
Remember that object orientation seeks to create programmatic representations of real objects. Of course, a name alone does not make a dog, but OO does not seek to duplicate all properties of every object, just those we need. We will add more properties later.
The second line is a method definition (or method signature) and is a bit more complex, so, just like before, let me break it up a bit and show you what each element does.
[1]void [2]Speak() [3]{ Console.WriteLine("Woof"); }
Element [1], void, is the return type of the method, or the type of output that the method will yield when it is executed. In statically typed languages like C# and Java, in addition to declaring variable types, we must always declare what type of data we return from methods. Dynamically typed languages leave the responsibility of determining what comes out of a method to the developer.
In our case, at least initially, we just want the dog to say “Woof” when we ask it to speak, so we don’t need to return anything. This will change later, when we cover inheritance in the next article.
However, even though we don’t want to return any specific value, we still need to be explicit about it in the program. To do so, we can declare that the method returns a void value, which in C# and similar languages means that we’re not returning anything.
Element [2], Speak(), is the method name, and it is what we use to call or execute the method. Note that methods, like properties, belong to the object.
Element [3], the code block, is the code that the program will execute when we call the method. You may also see this sort of code block also called the method body. Right now, within this code block, we’ll just tell the console to write a line containing “Woof”.
.
Making Your Method Public
Now that we have a method, we can call or execute it from our program and have the dog bark. There’s a problem, however, which gives me a great opportunity to review another of the key concepts of object orientation.
Normally, to access properties and methods of an object, you would first write the name of the variable holding your object and then the name of your property or method. For example, to get the value of the Name string property, you could write:
string dogName = myDog.Name;
To execute the Speak() method, you could then write:
myDog.Speak();
However, if you do this in Program.cs, you will get an error message like shown in Figure 4.
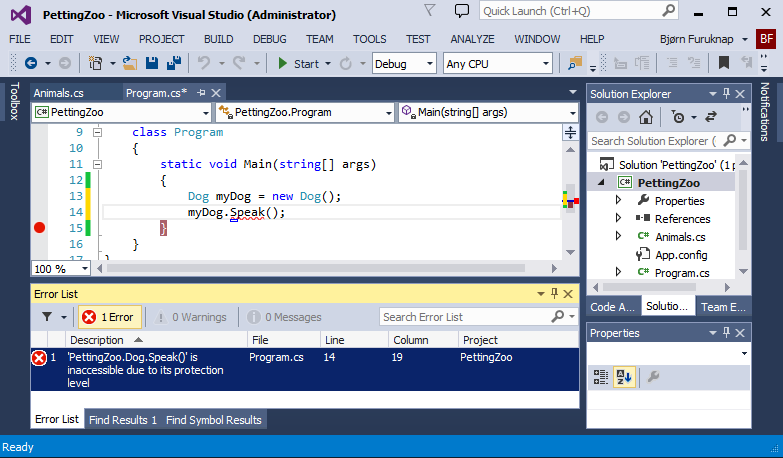
Figure 4: Protection Level Error
The error, stating “’PettingZoo.Dog.Speak()’ is inaccessible due to its protection level” happens because of a key concept in OO called abstraction.
In short, abstraction takes away the details of how something works when we don’t need to know those details. In our program, we only need to know that the dog can speak, but do not really care about how it does it.
Abstraction instead allows the class designer to come up with access points into the class through which they can work with the objects. Many languages enable this access through access modifiers.
C#, by default, hides properties and methods from outside of the class. The policy on this sort of separation differs in other languages, though, and some languages like JavaScript do not even offer this level of protection.
However, the principle remains that you make public what you want everyone to use and hide the rest. The making public part, in C# at least, simply means adding the keyword public in front of the properties and methods you want someone to access. So, if you update the Dog class to add public in front of the void Speak() line in Animals.cs, the red squigglies go away in Program.cs, as shown in Figure 5.
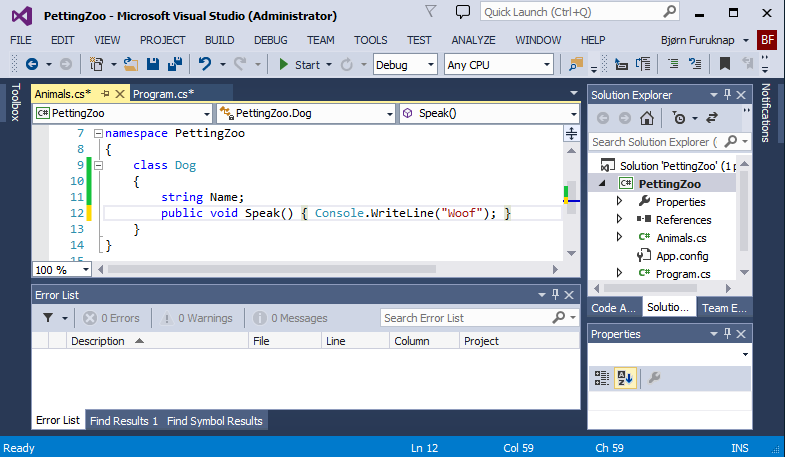
Figure 5: Public Method Declaration
As an added bonus, when you make your method public, Visual Studio will add the method to the available options through the IntelliSense autocomplete system. When you type myDog and hit the period, you get a list of all public properties and methods of that object, as shown in Figure 6.

Figure 6: Visual Studio Intellisense Auto-Complete with Our New Public Method
Other code editors have similar auto-complete systems. These auto-completes are one of the main benefits of these editors for programmers: you’ll learn to love these features as you evolve as a programmer!
.
Now that we have fixed all the errors, we should be able to run our program and see that the dog barks. You can place a breakpoint in your Program.cs by clicking in the left margin or placing your cursor on the bracket after myDog.Speak() and hitting F9. Then, hit F5 to run the program. You should see the console pop up, and the output from your dog barking should appear, as shown in Figure 7.
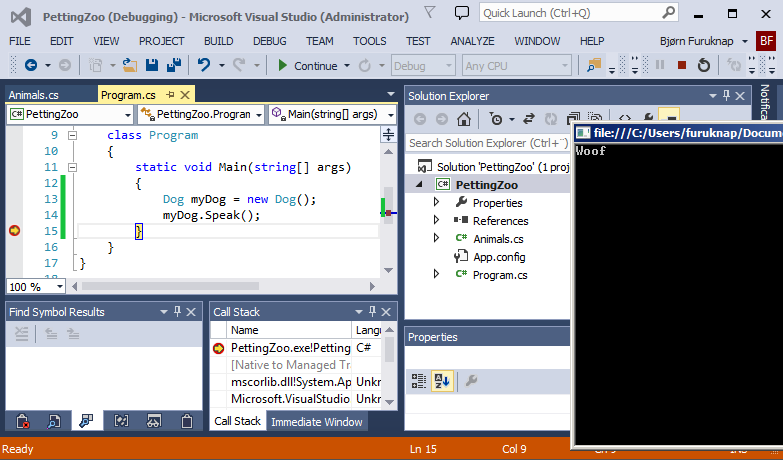
Figure 7: Our Dog Speaks!
Of course, now we can create a litter of dogs by creating multiple variables and instantiating objects into them. You can try something like Figure 8, for example:
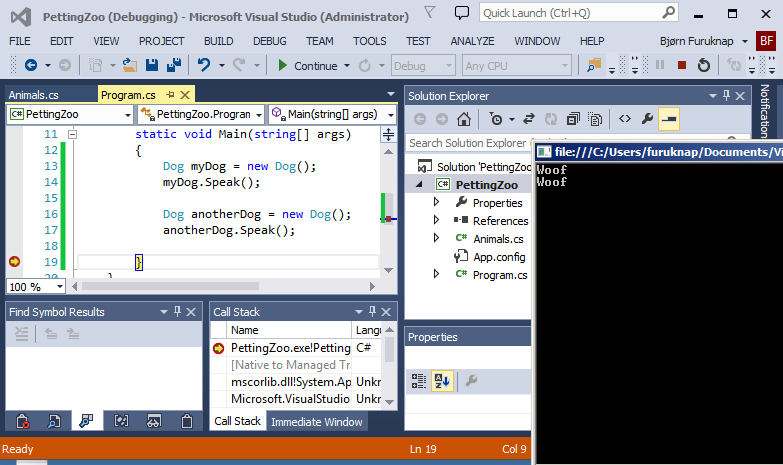
Figure 8: Two Dogs Speaking
Got a similar result? Great, pat yourself on the back, but only once, because we still have more work to do. After all, we’ve been promising that object orientation allows us to create unique objects, and all we’ve done is create two identical “dogs”. Next, we’ll show you how to use constructors to create separate and unique objects.
.
.
Get a $250 Credit and Access to Our Free Tier!
Free Tier includes:
G3.2GB Cloud VPS a Free to Use for One Year
50 GB of Block Storage Free to Use for One Year
50 GB of Snapshots Free to Use for One Year