Configuring Block Storage on Linux Servers
May 15, 2018 by Josh Simon ( 10 ) under VPS Hosting
0 Comments
Introduction
Secure Block Storage (SBS) volumes are easy to use, highly redundant, scalable, and secure block storage you can attach to Atlantic.Net Cloud Servers.
You can use Secure Block Storage volumes for your file, database, application, and backup storage needs. Designed for 99.999% availability, SBS is automatically replicated multiple times to protect your data from component failure. You can increase storage on-the-fly and move your SBS volumes between your Cloud Servers within the same region.
This guide will cover how to create, configure, format, and manage your SBS volumes on Linux Servers and assumes you are already connected to your Server via SSH.
What you will learn in this guide:
Creating a Block Storage Volume
Configuring a Block Storage Volume for Initial Use
Detaching a Block Storage Volume
Attaching a Previously Configured Block Storage Volume
Resizing a Block Storage Volume
Deleting a Block Storage Volume
Additional Steps Required if Running SELINUX
Creating a Volume
Step 1: Create the Volume in the Atlantic.Net Cloud Control Panel
In the Atlantic.Net Control Panel, click on "Block Storage", then click the "Add Volume" button. Next select the volume size, name, location, and server you wish to attach the Volume to.
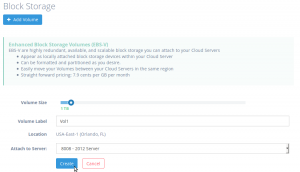
After the Volume is done creating, you should see that the Volume is attached to the server you chose.
Configuring a Volume for Initial Use
After creating a volume in the Atlantic.Net Cloud Control Panel, follow the steps below to configure your volume in your Linux Server for the first time.
Step 1: Locate the Volume
The easiest way to locate your volume in your Linux Server is to run the “ls” command on the “/dev/disk/by-id/” directory. The “/dev/disk/by-id/” directory provides persistent device names based on SCSI identifiers that won’t change across reboots or when you attach the Volume to different servers. All SBS volumes begin with the SCSI identifier “scsi-0AN_Volume_” followed by the name you gave your Volume. So, given that you named your Volume “Vol1”, the path to your Volume will be “/dev/disk/by-id/scsi-0AN_Volume_Vol1”
root@2012Server:~# ls /dev/disk/by-id/scsi-0AN_Volume_*
/dev/disk/by-id/scsi-0AN_Volume_Vol1
Step 2: Partition the Volume
It is highly recommended that you use a modern partitioning tool that supports GPT partitioning such as “gdisk” to partition your Volume. GPT formated Volumes supports larger sizes than older partitioning tools such as “fdisk”.
First let’s install gdisk
Note: You will need use the package manager for your operating system to install gdisk (ie. Ubuntu or Debian: apt-get install gdisk, CentOS or Fedora: yum install gdisk, etc).
apt-get install gdisk
To begin partitioning the Volume, start the “gdisk” program with the path of your Volume.
root@2012Server:~# gdisk /dev/disk/by-id/scsi-0AN_Volume_Vol1
The program will start, analyze the Volume, and provide a prompt for you to enter further commands
GPT fdisk (gdisk) version 1.0.1

Partition table scan:
  MBR: not present
  BSD: not present
  APM: not present
  GPT: not present

Creating new GPT entries.

Command (? for help):
Next we will create a new single partition on our Volume by entering the command “n” and then hitting enter to accept all of the defaults
Command (? for help): n
Partition number (1-128, default 1):
First sector (34-2097151966, default = 2048) or {+-}size{KMGTP}:
Last sector (2048-2097151966, default = 2097151966) or {+-}size{KMGTP}:
Current type is 'Linux filesystem'
Hex code or GUID (L to show codes, Enter = 8300):
Changed type of partition to 'Linux filesystem'

Command (? for help):
We can now enter the “p” command to print the partition table information before we write it to the disk
Command (? for help): p
Disk /dev/disk/by-id/scsi-0AN_Volume_Vol1: 2097152000 sectors, 1000.0 GiB
Logical sector size: 512 bytes
Disk identifier (GUID): ECCD068D-408F-43CA-AA2F-15F968E62F7D
Partition table holds up to 128 entries
First usable sector is 34, last usable sector is 2097151966
Partitions will be aligned on 2048-sector boundaries
Total free space is 2014 sectors (1007.0 KiB)

Number  Start (sector)    End (sector)  Size       Code  Name
   1            2048      2097151966   1000.0 GiB  8300  Linux filesystem

Command (? for help):
Above we can see that we have created a single partition in memory that utilizes all the space on our Volume. Now we have to write (save) the partition table to the Volume by using the “w” command. When prompted, answer “Y” to proceed.
Command (? for help): w

Final checks complete. About to write GPT data. THIS WILL OVERWRITE EXISTING
PARTITIONS!!

Do you want to proceed? (Y/N): Y
OK; writing new GUID partition table (GPT) to /dev/disk/by-id/scsi-0AN_Volume_Vol1.
The operation has completed successfully.
Step 3: Create a File System on the Volume
Now we have to create a files system to store data on the Volume. The most common file systems in Linux are ext4 and xfs. In this guide we will use ext4.
Let’s create an ext4 file system using the “mkfs.ext4” program on the partition we just created. Note we simply append “-part1” to the path to our Volume when calling the command.
root@2012Server:~# mkfs.ext4 /dev/disk/by-id/scsi-0AN_Volume_Vol1-part1
mke2fs 1.42.13 (17-May-2015)
Discarding device blocks: done
Creating filesystem with 262143739 4k blocks and 65536000 inodes
Filesystem UUID: 60bd3dd1-cb39-4a64-a015-771ae50bcc16
Superblock backups stored on blocks:
        32768, 98304, 163840, 229376, 294912, 819200, 884736, 1605632, 2654208,
        4096000, 7962624, 11239424, 20480000, 23887872, 71663616, 78675968,
        102400000, 214990848

Allocating group tables: done
Writing inode tables: done
Creating journal (32768 blocks): done
Writing superblocks and filesystem accounting information: done
Step 4: Mount the Volume
The last step before we can begin using our Volume is to mount it in a directory.
Let’s create a directory
root@2012Server:~# mkdir -p /mnt/Vol1
Now mount the volume partition in the directory using the mount command
root@2012Server:~# mount -o discard,defaults /dev/disk/by-id/scsi-0AN_Volume_Vol1-part1 /mnt/Vol1/
We can now view that our Volume is mounted and ready for use
root@2012Server:~# df -h /mnt/Vol1
Filesystem      Size  Used Avail Use% Mounted on
/dev/sdb1       985G   72M  935G   1% /mnt/Vol1
Optional: To have your volume mounted automatically after a reboot you need to add an entry to your /etc/fstab file
echo '/dev/disk/by-id/scsi-0AN_Volume_Vol1-part1 /mnt/Vol1 ext4 defaults,nofail,discard 0 0' | tee -a /etc/fstab
Your volume is now ready to use.
Detaching a Volume from a Cloud Server
When you no longer wish to use the volume on your Cloud Server, you should always unmount the volume in your Cloud Server before issuing a detach request in the Atlantic.Net Cloud Control Panel.
Step 1: Unmount the Volume
First we need to determine if the Volume is mounted. To do this we will use the list block command “lsblk” with the “mountpoint” flag and the path to our Volume.
Note: Remember the path to our volume is always “/dev/disk/by-id/scsi-0AN_Volume_” followed by the name name we gave our Volume. In the below example our Volume is named “Vol1”
root@2012Server:~# lsblk -o mountpoint /dev/disk/by-id/scsi-0AN_Volume_Vol1
MOUNTPOINT

/mnt/Vol1
The output shows us that our Volume is mounted on “/mnt/Vol1”. If you don’t see anything listed under “MOUNTPOINT”, then your Volume is not mounted and you can skip to Step 3 below.
Now we can unmount the Volume using the “umount” command
root@2012Server:~# umount /mnt/Vol1/
And we can confirm the Volume is no longer mounted by running the “lsblk” command with the “mountpoint” flag and the path to our Volume again.
root@2012Server:~# lsblk -o mountpoint /dev/disk/by-id/scsi-0AN_Volume_Vol1
MOUNTPOINT
You can now issue a detach command from the Atlantic.Net Control Panel
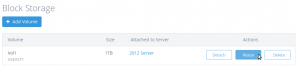
Step 3: Detach the Volume from the Cloud Server
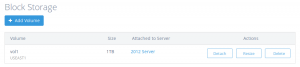
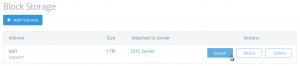
In the Atlantic.Net Control Panel, click on "Block Storage", then click the "Detach" button next to the Volume you wish to detach.
In the pop-up window, confirm you wish to detach the Volume from the Cloud Server by clicking the "Detach" button.

Attaching a Previously Configured Volume to a Cloud Server
If you previously configured a Volume in a Cloud Server and detached it from the Cloud Server and wish to attach it to the same or other Cloud Server, follow the directions below.
Step 1: Attach the Volume to the desired Cloud Server
In the Atlantic.Net Control Panel, click on "Block Storage", then click the "Attach" button next to the Volume you wish to attach.

In the pop-up window, select the server you wish to attach the volume to.
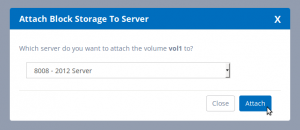
After the Volume is done attaching, you should see that the Volume is attached to the server you chose.

Step 2: Locate the Volume
The easiest way to locate your volume in your Linux Server is to run the “ls” command on the “/dev/disk/by-id/” directory. The “/dev/disk/by-id/” directory provides persistent device names based on SCSI identifiers that won’t change across reboots or when you attach the Volume to different servers. All SBS volumes begin with the SCSI identifier “scsi-0AN_Volume_” followed by the name you gave your Volume. So, given that you named your Volume “Vol1”, the path to your Volume will be “/dev/disk/by-id/scsi-0AN_Volume_Vol1”
root@2012Server:~# ls /dev/disk/by-id/scsi-0AN_Volume_*
/dev/disk/by-id/scsi-0AN_Volume_Vol1  /dev/disk/by-id/scsi-0AN_Volume_Vol1-part1
Step 3: Mount the Volume
The last step before we can begin using our Volume is to mount it in a directory.
Let’s create a directory
root@2012Server:~# mkdir -p /mnt/Vol1
Now mount the volume partition in the directory using the mount command
root@2012Server:~# mount -o discard,defaults /dev/disk/by-id/scsi-0AN_Volume_Vol1-part1 /mnt/Vol1/
We can now view that our Volume is mounted and ready for use
root@2012Server:~# df -h /mnt/Vol1
Filesystem      Size  Used Avail Use% Mounted on
/dev/sdb1       985G   72M  935G   1% /mnt/Vol1
Optional: To have your volume mounted automatically after a reboot you need to add an entry to your /etc/fstab file
echo '/dev/disk/by-id/scsi-0AN_Volume_Vol1-part1 /mnt/Vol1 ext4 defaults,nofail,discard 0 0' | tee -a /etc/fstab
Your volume is now ready to use.
Resizing a Volume
Running low on space? If you want to expand the storage size of a Volume, follow the steps below.
Step 1: Resize the Volume in the Atlantic.Net Cloud Control Panel
In the Atlantic.Net Control Panel, click on "Block Storage", then click the "Resize" button next to the Volume you wish to resize to a larger size.
In the pop-up window, select the size you wish to resize the Volume to and then press the "Resize" button.
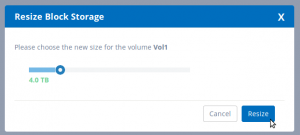
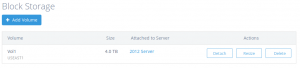
You should now see that the Volume has been resized in the Control Panel
Step 2: Locate the Volume
The easiest way to locate your volume in your Linux Server is to run the “ls” command on the “/dev/disk/by-id/” directory. The “/dev/disk/by-id/” directory provides persistent device names based on SCSI identifiers that won’t change across reboots or when you attach the Volume to different servers. All SBS volumes begin with the SCSI identifier “scsi-0AN_Volume_” followed by the name you gave your Volume. So, given that you named your Volume “Vol1”, the path to your Volume will be “/dev/disk/by-id/scsi-0AN_Volume_Vol1”
root@2012Server:~# ls /dev/disk/by-id/scsi-0AN_Volume_*
/dev/disk/by-id/scsi-0AN_Volume_Vol1  /dev/disk/by-id/scsi-0AN_Volume_Vol1-part1
Step 3: Backup the partition information
Before we resize the Volume’s partition to use the additional space, we will create a backup of our existing partition table using the “gdisk” command
To begin the process, start the “gdisk” program with the path of your Volume.
root@2012Server:~# gdisk /dev/disk/by-id/scsi-0AN_Volume_Vol1
The program will start, analyze the Volume, and provide a prompt for you to enter further commands
GPT fdisk (gdisk) version 1.0.1

Partition table scan:
  MBR: protective
  BSD: not present
  APM: not present
  GPT: present

Found valid GPT with protective MBR; using GPT.

Command (? for help):
Next, enter the “b” command to create a backup of the partition table and provide a name for the backup file.
Command (? for help): b
Enter backup filename to save: partition_table.backup
The operation has completed successfully.

Command (? for help):
Now we need to relocate the backup data structures of our partition table. This needs to be done because we have resized the volume.
Enter expert mode using command “x”
Command (? for help): x
Now relocate the backup data structures with command “e”
Expert command (? for help): e
Relocating backup data structures to the end of the disk
Now return to regular mode with command “m”
Expert command (? for help): m
Step 3: Resize the partition on the Volume
Before we resize the partition, let’s view the partition table information
Command (? for help): p
Disk /dev/disk/by-id/scsi-0AN_Volume_Vol1: 8388608000 sectors, 3.9 TiB
Logical sector size: 512 bytes
Disk identifier (GUID): ECCD068D-408F-43CA-AA2F-15F968E62F7D
Partition table holds up to 128 entries
First usable sector is 34, last usable sector is 8388607966
Partitions will be aligned on 2048-sector boundaries
Total free space is 6291458014 sectors (2.9 TiB)

Number  Start (sector)    End (sector)  Size       Code  Name
   1            2048      2097151966   1000.0 GiB  8300  Linux filesystem
Above we can see that the size of the partition has not changed yet and that we only have one partition on our Volume.
Next, we will replace the existing partition information by deleting it and recreating it with the new larger size our Volume offers.
First delete the partition information using the “d” command
Command (? for help): d
Using 1
Then, we create the partition again using the “n” command and hit enter to accept all of the defaults. This will create a single partition just like we had before, thus preserving our data and offering more available space to the partition.
Command (? for help): n
Partition number (1-128, default 1):
First sector (34-8388607966, default = 2048) or {+-}size{KMGTP}:
Last sector (2048-8388607966, default = 8388607966) or {+-}size{KMGTP}:
Current type is 'Linux filesystem'
Hex code or GUID (L to show codes, Enter = 8300):
Changed type of partition to 'Linux filesystem'
Next we can view the partition table information again:
Command (? for help): p
Disk /dev/disk/by-id/scsi-0AN_Volume_Vol1: 8388608000 sectors, 3.9 TiB
Logical sector size: 512 bytes
Disk identifier (GUID): ECCD068D-408F-43CA-AA2F-15F968E62F7D
Partition table holds up to 128 entries
First usable sector is 34, last usable sector is 8388607966
Partitions will be aligned on 2048-sector boundaries
Total free space is 2014 sectors (1007.0 KiB)

Number  Start (sector)    End (sector)  Size       Code  Name
   1            2048      8388607966   3.9 TiB     8300  Linux filesystem
Above we can see that the size of the partition is now reflects our additional space.
Now we have to write (save) the partition table to the Volume by using the “w” command. When prompted, answer “Y” to proceed.
Command (? for help): w

Final checks complete. About to write GPT data. THIS WILL OVERWRITE EXISTING
PARTITIONS!!

Do you want to proceed? (Y/N): Y
OK; writing new GUID partition table (GPT) to /dev/disk/by-id/scsi-0AN_Volume_Vol1.
Warning: The kernel is still using the old partition table.
The new table will be used at the next reboot or after you
run partprobe(8) or kpartx(8)
The operation has completed successfully.
Step 4: Inform Linux of the partition changes
The easiest tool to use to inform Linux of the partition change is “partprobe” which is part of the “parted package”
Install parted
Note: You will need use the package manager for your operating system to install parted (ie. Ubuntu or Debian: apt-get install parted, CentOS or Fedora: yum install parted, etc).
apt-get install parted
Once “parted” is installed, we can run the partprobe command with the path to our device
root@2012Server:~# partprobe /dev/disk/by-id/scsi-0AN_Volume_Vol1
Linux now nows about the partition changes
Step 5: Resize the file system
Since our volume was configured with the ext4 file system, we need to use the “resize2fs” command with the path to our device partition to resize the device. This can be done while the Volume is mounted.
Note: Using the resize2fs command on a mounted volume in CentOS 6 or Debian 7 can take a very long time to complete. It is recommend that if you are using either of those operating systems versions that you umount your Volume before proceeding.
Note: If your volume is using the XFS file system you would use the “xfs_growfs /path/to/mountpoint” to resize your file system.
root@2012Server:~# resize2fs /dev/disk/by-id/scsi-0AN_Volume_Vol1-part1
resize2fs 1.42.13 (17-May-2015)
Filesystem at /dev/disk/by-id/scsi-0AN_Volume_Vol1-part1 is mounted on /mnt/Vol1; on-line resizing required
old_desc_blocks = 63, new_desc_blocks = 250
The filesystem on /dev/disk/by-id/scsi-0AN_Volume_Vol1-part1 is now 1048575739 (4k) blocks long.
Your additional space is now ready for use.
Deleting a Volume
When you no longer want a Volume, follow the steps below.
Note: You should always unmount the volume in your Cloud Server before issuing a delete request in the Atlantic.Net Cloud Control Panel.
Step 1: Unmount the Volume
First we need to determine if the Volume is mounted. To do this we will use the list block command “lsblk” with the “mountpoint” flag and the path to our Volume.
Note: Remember the path to our volume is always “/dev/disk/by-id/scsi-0AN_Volume_” followed by the name name we gave our Volume. In the below example our Volume is named “Vol1”
root@2012Server:~# lsblk -o mountpoint /dev/disk/by-id/scsi-0AN_Volume_Vol1
MOUNTPOINT

/mnt/Vol1
The output shows us that our Volume is mounted on “/mnt/Vol1”. If you don’t see anything listed under “MOUNTPOINT”, then your Volume is not mounted and you can skip to Step 3 below.
Now we can unmount the Volume using the “umount” command
root@2012Server:~# umount /mnt/Vol1/
And we can confirm the Volume is no longer mounted by running the “lsblk” command with the “mountpoint” flag and the path to our Volume again.
root@2012Server:~# lsblk -o mountpoint /dev/disk/by-id/scsi-0AN_Volume_Vol1
MOUNTPOINT
Step 2: Delete the Volume in the Atlantic.Net Control Panel
In the Atlantic.Net Control Panel, click on "Block Storage", then click the "Delete" button next to the Volume you wish to delete.
![]()
In the pop-up window, carefully read the entire message, and click the "Delete" button to remove the Volume.
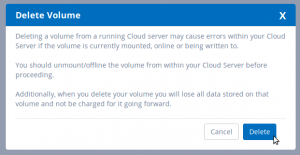
The Volume has now been deleted and you will no longer be charged for it going forward.
Additional Steps Required if Running SELINUX
SELINUX is a security enhancement built into most Linux distributions. It gives users more access control and should be enabled in production environments to greatly reduce the attack surface of your server.
If you use ACP SBS storage for application data, its possible SELINUX may prevent certain applications from accessing or writing files or directories.
In this example, our Apache folder /var/www/html is located on an SBS logical Volume.
We will use the chcon command to allow the Apache daemon read/write access to the SBS volume.
# chcon -Rv --type=httpd_sys_rw_content_t /var/www/html/
(if you want to allow full web root)
# chcon -Rv --type=httpd_sys_rw_content_t /var/www/html/uploads/
(or just uploads folder)
To give the Apache process ownership of the volume, you can use chown:
# chown apache:apache -R /var/www/html/
To distribute recursive file permissions, combine the find and chmod commands like so:
# find . -type f -exec chmod 0644 {} \;
Note – chmod 644 means only the owner is allowed to write/modify, read-only for others (group) included.
To distribute recursive folder permissions, combine the find and chmod commands like so:
# find . -type d -exec chmod 0755 {} \;
Note – 755 means read and execute access for everyone and also write access for the owner of the file.
Now set SELINUX to allow Apache to serve all files recursively:
# chcon -t httpd_sys_content_t /var/www/html/ -R
Or, if you would prefer to only allow Apache access to specific directories:
# chcon -t httpd_sys_rw_content_t /var/www/html/logs/ -R

# chcon -t httpd_sys_rw_content_t /var/www/html/uploads/ -R
For future reference, make note of these two SELINX parameters required for HTTP (Apache):
httpd_sys_content_t – allow Apache to serve contents

httpd_sys_rw_content_t – allow Apache to write to those path
Get a $250 Credit and Access to Our Free Tier!
Free Tier includes:
G3.2GB Cloud VPS a Free to Use for One Year
50 GB of Block Storage Free to Use for One Year
50 GB of Snapshots Free to Use for One Year