# How to Install HAProxy on Ubuntu 24.04
> URL: https://www.atlantic.net/dedicated-server-hosting/how-to-install-haproxy-on-ubuntu-24-04/ | Published: 2024-07-11 | Updated: 2025-05-14 | Author: Hitesh Jethva
HAProxy, which stands for High Availability Proxy, is a free, open-source software solution that provides a reliable, high-performance load balancer and proxy server for TCP and HTTP-based applications. It is commonly used to improve the performance and reliability of web applications by distributing incoming traffic across multiple servers.
In this tutorial, we will show you how to install HAProxy on Ubuntu 24.04.
## Step 1 – Setting Up Backend Servers
Before starting, you will need to set up Apache on both backend servers.
Log in to both your servers and install the Apache package using the following command.
```bash
apt-get install apache2 -y
```
Once the Apache package is installed, create an index.html file on both web servers.
`echo "This is my first Apache Server
" | tee /var/www/html/index.html`
`echo "This is my second Apache Server
" | tee /var/www/html/index.html`
## Step 2 – Install HAProxy
By default, the HAProxy package is included in the Ubuntu default repository. You can install it using the following command.
```bash
apt-get install haproxy -y
```
Next, check the installed version to verify that HAProxy is installed correctly.
```bash
haproxy -v
```
You should see an output showing the HAProxy version.
```bash
HAProxy version 2.8.5-1ubuntu3.3 2025/04/09 - https://haproxy.org/
```
Next, start and enable the HAProxy service.
```bash
systemctl start haproxy
systemctl enable haproxy
```
## Step 3 – Configure HAProxy
Edit the HAProxy configuration file to set up a basic configuration. The default configuration file is located at /etc/haproxy/haproxy.cfg.
```bash
nano /etc/haproxy/haproxy.cfg
```
Add the following lines:
```bash
frontend haproxy-main
bind *:80
option forwardfor
default_backend apache_webservers
backend apache_webservers
balance roundrobin
server websvr1 192.168.1.10:80 check
server websvr2 192.168.1.11:80 check
```
- The frontend section defines where HAProxy listens for incoming traffic (port 80 in this case).
- The backend section specifies the servers that the traffic should be distributed to.
**Note**: Replaced **192.168.1.10** and **192.168.1.11** with the IP address of your backend Apache web servers.
## Step 4 – Setup HAProxy Authentication
To configure authentication for the HAProxy statistics page on port 8800 and set up a backend for your Apache web servers, you can use the following configuration. This example includes the listen section for the stats page with basic authentication and a backend section for your Apache servers.
Edit the haproxy.cfg file.
```bash
nano /etc/haproxy/haproxy.cfg
```
Add the following lines:
```bash
listen stats
bind :8800
stats enable
stats uri /
stats hide-version
stats auth admin:password
default_backend apache_webservers
```
Save and close the file, then restart the HAProxy service to apply the changes.
```bash
systemctl restart haproxy
```
Now, verify the status of HAProxy using the command given below:
```bash
systemctl status haproxy
```
Output:
```bash
● haproxy.service - HAProxy Load Balancer
Loaded: loaded (/lib/systemd/system/haproxy.service; enabled; vendor preset: enabled)
Active: active (running) since Sat 2025-05-11 12:32:27 IST; 9s ago
Docs: man:haproxy(1)
file:/usr/share/doc/haproxy/configuration.txt.gz
Process: 44208 ExecStartPre=/usr/sbin/haproxy -Ws -f $CONFIG -c -q $EXTRAOPTS (code=exited, status=0/SUCCESS)
Main PID: 44210 (haproxy)
Tasks: 5 (limit: 9188)
Memory: 70.0M
CPU: 78ms
CGroup: /system.slice/haproxy.service
├─44210 /usr/sbin/haproxy -Ws -f /etc/haproxy/haproxy.cfg -p /run/haproxy.pid -S /run/haproxy-master.sock
└─44212 /usr/sbin/haproxy -Ws -f /etc/haproxy/haproxy.cfg -p /run/haproxy.pid -S /run/haproxy-master.sock
May 11 12:32:27 ubuntupc systemd[1]: Starting HAProxy Load Balancer...
May 11 12:32:27 ubuntupc haproxy[44210]: [NOTICE] (44210) : New worker #1 (44212) forked
May 11 12:32:27 ubuntupc systemd[1]: Started HAProxy Load Balancer.
```
## Step 5 – Test HAProxy
Open a web browser and navigate to your server’s IP address **http://your-haproxy-ip.** You should be able to see the Apache page if your backend servers are configured correctly.

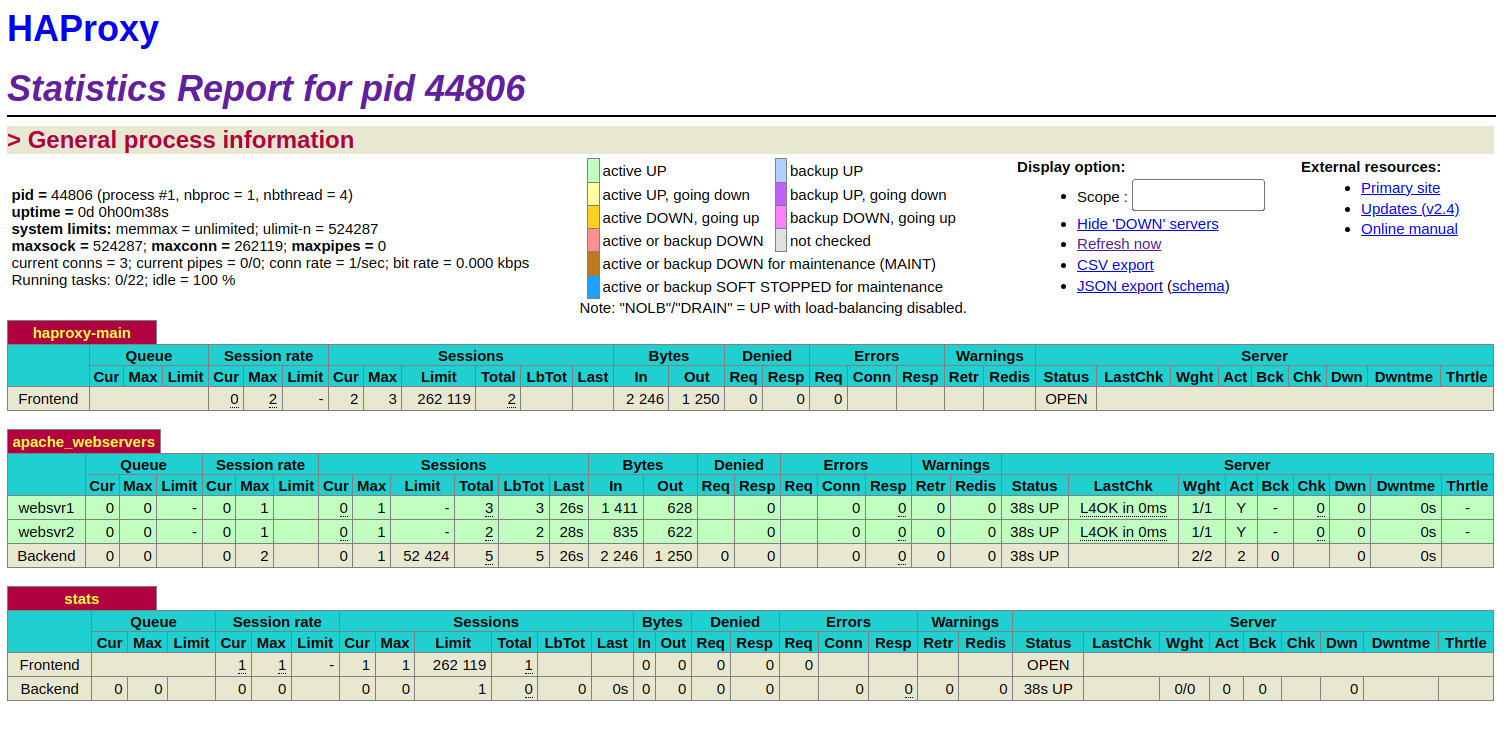
To view HAProxy statistics, navigate to **http://your_haproxy_ip:8080/** and log in with the credentials defined in the configuration file (admin:password in this example).
## Conclusion
HAProxy is a powerful and flexible tool for load balancing and improving the availability and performance of web applications and services. Its wide range of features and configurations makes it suitable for various use cases, from simple load balancing to complex routing and traffic management tasks. You can now deploy HAProxy on [dedicated server hosting](https://www.atlantic.net/dedicated-server-hosting/) from Atlantic.Net! to load balance your web server.