# Cartooning an Image using OpenCV on Ubuntu 24.04 GPU Server
> URL: https://www.atlantic.net/gpu-server-hosting/cartooning-an-image-using-opencv-on-ubuntu-24-04-gpu-server/ | Published: 2025-09-20 | Updated: 2025-09-23 | Author: Hitesh Jethva
Have you ever wanted to turn a regular photo into something that looks hand-drawn or animated? That’s exactly what cartoonification does — it transforms a real-world image into something that looks like it came from a comic book or a cartoon series.
In this tutorial, you’ll learn how to build a simple Cartoon Image Web App using OpenCV for image processing and Flask for the web interface.
## Prerequisites
- An Ubuntu 24.04 server with an NVIDIA GPU.
- A non-root user or a user with sudo privileges.
- NVIDIA drivers are installed on your server.
## Step 1: Update the System and Install Python Environment
Before we start coding, let’s prepare the Ubuntu 24.04 GPU server with the tools we need. We’ll update the package list and install Python-related packages required for our cartoonifier web app.
1. Start by updating your package list to ensure you have access to the latest versions.
```bash
apt update -y
```
2. Next, install Python 3 along with pip (Python’s package installer) and venv (used to create isolated virtual environments).
```bash
apt install -y python3 python3-pip python3-venv
```
3. Create and activate the virtual environment.
```bash
python3 -m venv cartoon-env
source cartoon-env/bin/activate
```
4. Install the necessary Python libraries.
```bash
pip install flask opencv-python
```
## Step 2: Create Project Structure
Let’s organize your files and folders before writing any code. This will make your project clean and easy to maintain.
1. Create the Main Project Folders.
```bash
mkdir static templates
```
- **static/:** This folder will hold uploaded and processed images.
- **templates/:** This will store HTML files for the Flask web app interface.
2. Here’s what your project directory will look like after you finish the app
```bash
cartoon-env/
├── app.py
├── cartoonizer.py
├── static/
│ ├── input.png
│ └── cartoon.png
├── templates/
│ └── index.html
```
## Step 3: Write the Cartoonizer Logic
Now it’s time to build the heart of the project, the image cartoonification script using OpenCV.
Create the cartoonizer.py file.
```bash
nano cartoonizer.py
```
Add the following code.
```bash
# cartoonizer.py
import cv2
import os
def cartoonify_image(image_path):
# Read and resize image
img = cv2.imread(image_path)
img = cv2.resize(img, (480, 480))
# Convert to grayscale
gray = cv2.cvtColor(img, cv2.COLOR_BGR2GRAY)
gray_blur = cv2.medianBlur(gray, 7)
# Detect edges
edges = cv2.adaptiveThreshold(
gray_blur, 255,
cv2.ADAPTIVE_THRESH_MEAN_C,
cv2.THRESH_BINARY,
blockSize=9,
C=9
)
# Apply bilateral filter for cartoon-like smoothing
color = cv2.bilateralFilter(img, d=9, sigmaColor=300, sigmaSpace=300)
# Combine edges with smoothed color image
cartoon = cv2.bitwise_and(color, color, mask=edges)
# Save cartoonified image
os.makedirs("static", exist_ok=True)
out_path = "static/cartoon.png"
cv2.imwrite(out_path, cartoon)
return out_path
```
This script takes an image path, processes it to give a cartoon effect, and saves the output to **static/cartoon.png.** In the next section, we’ll connect this logic to a web interface using Flask.
## Step 4: Build the Flask Web App
Now that we have our image processing logic in place, let’s create a Flask app to let users upload an image and view the cartoonified result in the browser.
Create the Flask App.
```bash
nano app.py
```
Add the following code.
```bash
# app.py
from flask import Flask, render_template, request
import os
from cartoonizer import cartoonify_image
app = Flask(__name__)
UPLOAD_FOLDER = 'static'
app.config['UPLOAD_FOLDER'] = UPLOAD_FOLDER
@app.route("/", methods=["GET", "POST"])
def index():
if request.method == "POST":
file = request.files.get('file')
if not file:
return "No file uploaded"
input_path = os.path.join(app.config['UPLOAD_FOLDER'], 'input.png')
file.save(input_path)
cartoon_path = cartoonify_image(input_path)
return render_template("index.html", cartoon_image=cartoon_path)
return render_template("index.html", cartoon_image=None)
if __name__ == "__main__":
app.run(host="0.0.0.0", port=5000)
```
Your Flask backend is now ready. Next, we’ll create the HTML interface that lets users upload images and view the results.
## Step 5: Design the HTML Frontend
Now, let’s create the web interface where users can upload an image and view the cartoonified output.
Create the HTML file.
```bash
nano templates/index.html
```
Add the following code.
```bash
Cartoonify Image
Upload an Image to Cartoonify 🎨
{% if cartoon_image %}
Output:
 {% endif %}
```
**Explanation:**
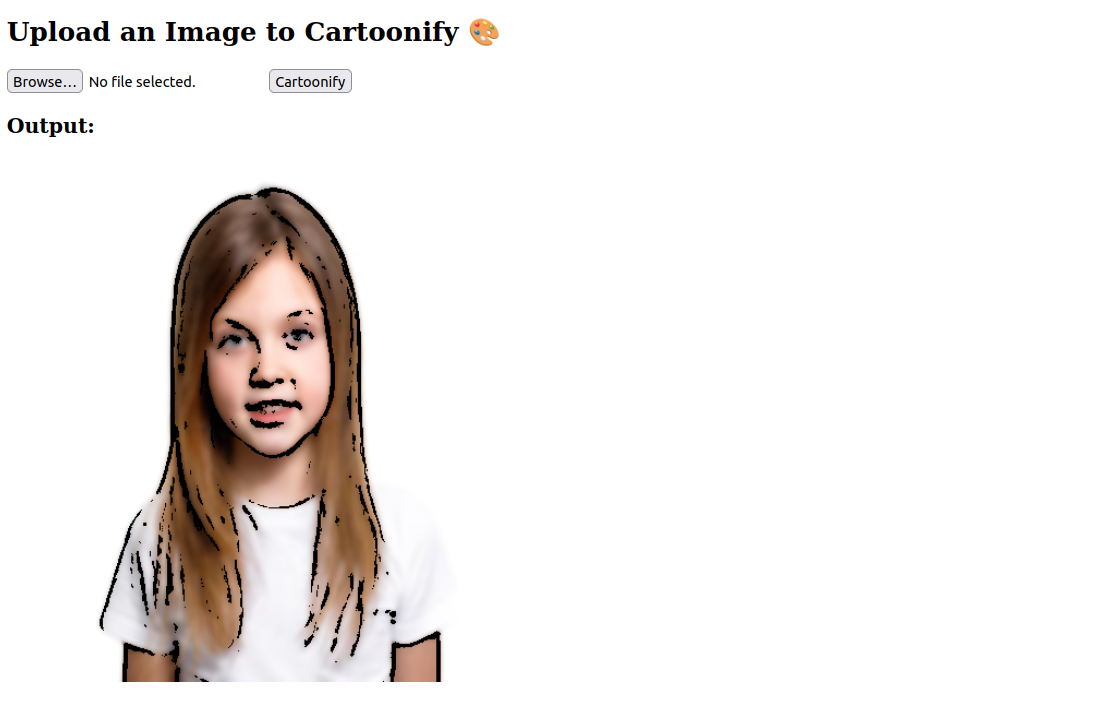
- Displays a simple form to upload an image.
- When the user clicks Cartoonify, it sends the image to the server.
- If a cartoon image is returned, it’s displayed right below the form.
## Step 6: Start the Flask App
You’ve written the cartoonizer logic, the Flask backend, and the HTML frontend. Now let’s run the app and test it in your browser.
1. Start the Flask server.
```bash
python3 app.py
```
Output.
```bash
* Running on all addresses (0.0.0.0)
* Running on http://127.0.0.1:5000
* Running on http://your-server-ip:5000
```
2. Access the Flask web interface using the URL **http://your-server-ip:5000.**
3. Click **Browse** to upload an image and click the **Cartoonify** button. The processed cartoon image will appear below the form.
## Conclusion
You’ve successfully built a cartoonifying web application using OpenCV and Flask on an Ubuntu 24.04 [GPU server](https://www.atlantic.net/gpu-server-hosting/). Throughout this tutorial, you created a Python virtual environment, installed the required libraries, and wrote a custom function to give any uploaded image a cartoon-like effect. You also developed a user-friendly HTML frontend and connected it to a Flask backend that handles image uploads and displays results in real time.
{% endif %}
```
**Explanation:**
- Displays a simple form to upload an image.
- When the user clicks Cartoonify, it sends the image to the server.
- If a cartoon image is returned, it’s displayed right below the form.
## Step 6: Start the Flask App
You’ve written the cartoonizer logic, the Flask backend, and the HTML frontend. Now let’s run the app and test it in your browser.
1. Start the Flask server.
```bash
python3 app.py
```
Output.
```bash
* Running on all addresses (0.0.0.0)
* Running on http://127.0.0.1:5000
* Running on http://your-server-ip:5000
```
2. Access the Flask web interface using the URL **http://your-server-ip:5000.**
3. Click **Browse** to upload an image and click the **Cartoonify** button. The processed cartoon image will appear below the form.

## Conclusion
You’ve successfully built a cartoonifying web application using OpenCV and Flask on an Ubuntu 24.04 [GPU server](https://www.atlantic.net/gpu-server-hosting/). Throughout this tutorial, you created a Python virtual environment, installed the required libraries, and wrote a custom function to give any uploaded image a cartoon-like effect. You also developed a user-friendly HTML frontend and connected it to a Flask backend that handles image uploads and displays results in real time.