# Convert Tokenizer into a Flask API with Frontend on Ubuntu 24.04 GPU Server

> URL: https://www.atlantic.net/gpu-server-hosting/convert-tokenizer-into-a-flask-api-with-frontend-on-ubuntu-24-04-gpu-server/ | Published: 2025-09-22 | Updated: 2025-09-23 | Author: Hitesh Jethva

Tokenization is the first and most critical step in any Natural Language Processing (NLP) task. It breaks down raw text into smaller units, called tokens, that a machine learning model can understand. These tokens could be words, subwords, or even characters, depending on the tokenizer being used. Without tokenization, models like BERT or GPT wouldn’t know where a sentence starts or ends, or how to differentiate words like “run” and “running.”

In this tutorial, you’ll learn how to convert a Hugging Face tokenizer (like bert-base-uncased) into a Flask API that can process both real-time JSON requests and serve a web-based UI for interactive use.

## Prerequisites

- An Ubuntu 24.04 server with an NVIDIA GPU.
- A non-root user or a user with sudo privileges.
- NVIDIA drivers are installed on your server.

## Step 1: Install Required Packages

To get started, you’ll first set up a virtual environment for your Flask tokenizer app. This helps keep dependencies isolated and makes your project easier to manage.

1. Update the package list and install dependencies.

```bash
apt update -y
apt install -y python3 python3-pip python3-venv git
```

2. Create a virtual environment.

```bash
python3 -m venv tokenizer-api-env
```

3. Activate the virtual environment.

```bash
source tokenizer-api-env/bin/activate
```

4. Install the required Python libraries.

```bash
pip install flask transformers torch
```

## Step 2: Create the Project Structure

Now that your environment is ready and the required packages are installed, it’s time to organize your project. You’ll create a new directory for the Flask app and set up folders for your HTML templates.

1. Create the main project folder.

```bash
mkdir -p tokenizer_flask/templates
cd tokenizer_flask
```

This will create a structure like:

```bash
tokenizer_flask/
└── templates/
```

2. Project File Structure Overview.

```bash
tokenizer_flask/
├── app.py                # Main Flask app
└── templates/
    └── index.html        # Frontend web interface
```

## Step 3: Create the Flask API

Now let’s write the core of your project: the Flask backend that handles both web form submissions and API requests. This backend loads the Hugging Face tokenizer and serves responses via two routes:

- **/** → Web UI using HTML form
- **/api/tokenize** → JSON API for programmatic access

1. Create and open the Flask app.

```bash
nano app.py
```

Add the following code.

```bash
from flask import Flask, request, jsonify, render_template
from transformers import AutoTokenizer

app = Flask(__name__)

# Load pretrained tokenizer
tokenizer = AutoTokenizer.from_pretrained("bert-base-uncased")

@app.route('/', methods=['GET'])
def index():
    return render_template('index.html')

@app.route('/tokenize', methods=['POST'])
def tokenize_text():
    text = request.form.get('text')

    if not text:
        return render_template('index.html', error="Please enter some text.")

    tokens = tokenizer(text, return_tensors="pt")
    input_ids = tokens['input_ids'].tolist()
    attention_mask = tokens['attention_mask'].tolist()

    return render_template('index.html',
                           text=text,
                           input_ids=input_ids,
                           attention_mask=attention_mask)

@app.route('/api/tokenize', methods=['POST'])
def api_tokenize():
    data = request.json
    if 'text' not in data:
        return jsonify({"error": "Missing 'text' field"}), 400

    text = data['text']
    tokens = tokenizer(text, return_tensors="pt")
    return jsonify({
        "input_ids": tokens['input_ids'].tolist(),
        "attention_mask": tokens['attention_mask'].tolist()
    })

if __name__ == '__main__':
    app.run(host='0.0.0.0', port=5000)
```

Now that your backend is ready, let’s build the web interface so you can test the tokenizer visually in your browser.

## Step 4: Design the Frontend

Now that your Flask backend is ready, let’s create a simple web interface where users can enter text and view the tokenized output. This will be served from the / route using Flask’s built-in templating system, Jinja2.

Create an index.html inside the templates directory.

```bash
nano templates/index.html
```

Add the following code.

```bash
<!DOCTYPE html>
<html lang="en">
<head>
  <meta charset="UTF-8">
  <title>Tokenizer Web Interface</title>
  <style>
    body { font-family: Arial, sans-serif; max-width: 800px; margin: auto; padding: 2em; }
    textarea { width: 100%; height: 100px; }
    .result { margin-top: 1em; padding: 1em; background: #f9f9f9; border-left: 4px solid #007BFF; }
    .error { color: red; }
  </style>
</head>
<body>
  <h1>Tokenizer Web Interface</h1>

  <form method="post" action="/tokenize">
    <label for="text">Enter text:</label><br>
    <textarea id="text" name="text">{{ text or '' }}</textarea><br><br>
    <button type="submit">Tokenize</button>
  </form>

  {% if error %}
    <p class="error">{{ error }}</p>
  {% endif %}

  {% if input_ids %}
    <div class="result">
      <h3>Tokenized Result</h3>
      <p><strong>Input IDs:</strong> {{ input_ids }}</p>
      <p><strong>Attention Mask:</strong> {{ attention_mask }}</p>
    </div>
  {% endif %}
</body>
</html>
```

With this frontend in place, you’re ready to start the server and test both the web UI and the API in the next section.

## Step 5: Run the Flask Server

You’ve written both the backend and the frontend—now it’s time to start your Flask application and make the tokenizer API accessible from your browser and command line.

Run the Flask server.

```bash
python3 app.py
```

## Step 6: Test the API via cURL

Now let’s test your tokenizer Flask API using curl, a command-line tool for sending HTTP requests. This is a great way to confirm that the **/api/tokenize** endpoint works as expected.

**Example** 1: **English Text**

```bash
curl -X POST http://45.76.22.55:5000/api/tokenize \
-H "Content-Type: application/json" \
-d '{"text": "I love using Transformers!"}'
```

Output.

```bash
{"attention_mask":[[1,1,1,1,1,1,1]],"input_ids":[[101,1045,2293,2478,19081,999,102]]}
```

**Example** **2: Text with Emoji**

```bash
curl -X POST http://45.76.22.55:5000/api/tokenize \
-H "Content-Type: application/json" \
-d '{"text": "Python is awesome 😎"}'
```

Output.

```bash
{"attention_mask":[[1,1,1,1,1,1]],"input_ids":[[101,18750,2003,12476,100,102]]}
```

**Note:** Emoji is treated as an unknown token (100) in BERT’s tokenizer.

**Example 3: French Input**

```bash
curl -X POST http://45.76.22.55:5000/api/tokenize \
-H "Content-Type: application/json" \
-d '{"text": "Bonjour! Je parle français."}'
```

Output.

```bash
{"attention_mask":[[1,1,1,1,1,1,1,1,1,1,1]],"input_ids":[[101,14753,23099,2099,999,15333,11968,2571,22357,1012,102]]}
```

## Step 7: Interact via Web Interface

Your Flask app also comes with a built-in web interface. This is perfect for testing and visualizing how the tokenizer processes text without using command-line tools.

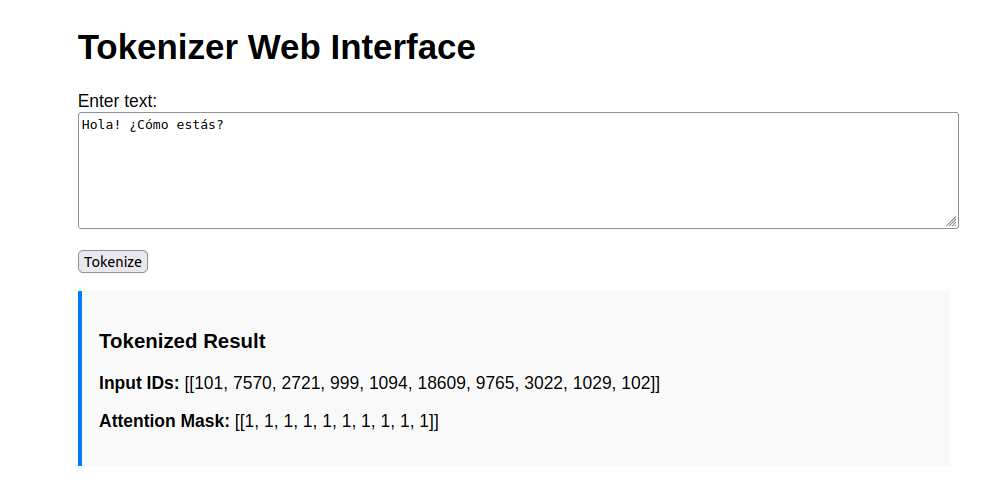
Open your web browser and access the Flask web UI using the URL **http://your-server-ip:5000.** You’ll see a simple page with a text area and a Tokenize button.

Try to enter the below texts and click **Tokenize,**the results will be displayed on the same page under the “Tokenized Result” section.

**Hello, how are you doing today?**
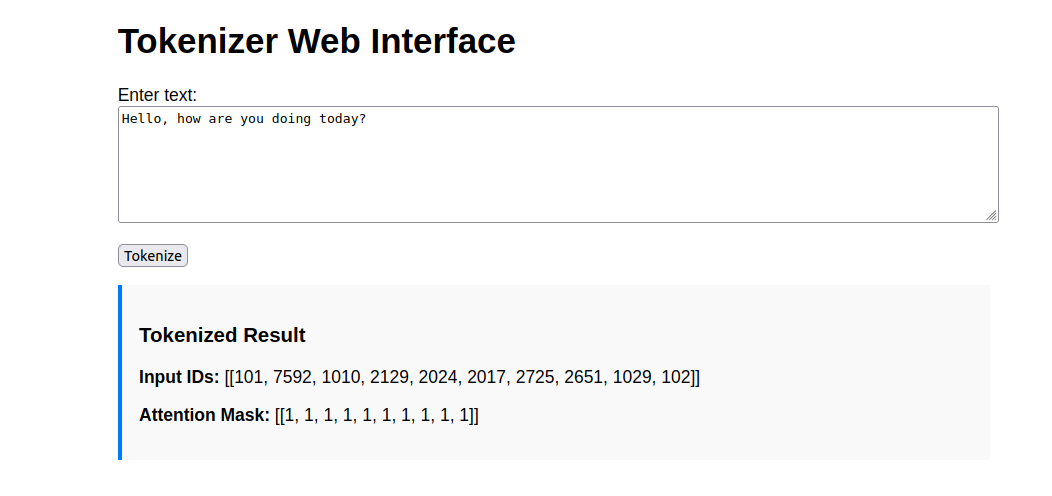
![](https://www.atlantic.net/wp-content/uploads/2025/08/p1.png)

**Hola! ¿Cómo estás?**

![](https://www.atlantic.net/wp-content/uploads/2025/08/p2.png)

**Let’s meet at 5:00 p.m. #calendar**
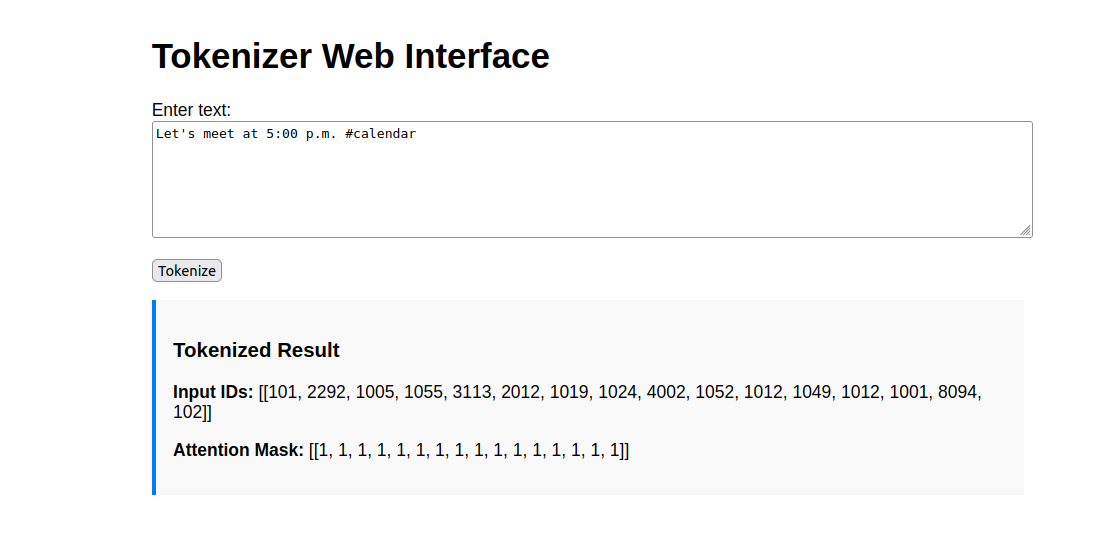
![](https://www.atlantic.net/wp-content/uploads/2025/08/p3.png)

## Conclusion

You’ve now built a fully functional tokenizer API with a clean web interface using Flask and Hugging Face Transformers—all running on an Ubuntu 24.04 [GPU server](https://www.atlantic.net/gpu-server-hosting/). The project supports both browser-based interaction and programmatic API access via JSON requests, making it flexible for a variety of use cases.