# Dog vs Cat Convolutional Neural Network Classifier on Ubuntu 24.04 GPU Server
> URL: https://www.atlantic.net/gpu-server-hosting/dog-vs-cat-convolutional-neural-network-classifier-on-ubuntu-24-04-gpu-server/ | Published: 2025-07-01 | Updated: 2026-05-04 | Author: Hitesh Jethva
Classifying images of dogs and cats is a classic deep learning problem that helps demonstrate the power of Convolutional Neural Networks (CNNs).
In this tutorial, we’ll build a CNN-based classifier using TensorFlow and Keras on an Ubuntu 24.04 server with GPU acceleration. We’ll also create a simple Flask-based web interface to upload images and get predictions.
## Prerequisites
Before starting, ensure you have:
- An Ubuntu 24.04 server with an [NVIDIA GPU](https://www.atlantic.net/gpu-server-hosting/top-10-nvidia-gpus-for-ai/).
- A root user or a user with sudo privileges.
- NVIDIA drivers are installed for GPU acceleration.
## Step 1: Install Required Packages
First, update your system and install the necessary Python packages:
```bash
apt update -y
apt install python3 python3-pip python3-venv
```
## Step 2: Set Up Python Environment
Now, you will create a Python environment for your project.
1. Create a virtual environment.
```bash
python3 -m venv ~/dogcat-cnn
```
2. Activate the virtual environment.
```bash
source ~/dogcat-cnn/bin/activate
```
3. Install the required Python packages.
```bash
pip install tensorflow keras flask pillow scipy kaggle
```
These packages include:
- **tensorflow** for machine learning with GPU support
- **pillow** for image processing
- **flask** for the web interface
- **kaggle** to download datasets
## Step 3: Set Up Kaggle API
We’ll use the Kaggle API to download the dataset.
1. Go to Kaggle and log in.
2. Click your profile **picture** => **Account**
3. Scroll down to the **API** section
4. Click **“Create New API Token”**
5. This will download **kaggle.json** to your computer
6. Create a Kaggle configuration directory on your server.
```bash
mkdir -p ~/.kaggle
```
7. Copy your downloaded **kaggle.json** file into the **~/.kaggle** folder.
8. Set appropriate permissions.
```bash
chmod 600 ~/.kaggle/kaggle.json
```
This step allows us to download the dataset directly from Kaggle without manual uploads programmatically.
## Step 4: Download and Prepare the Dataset
Now, we will use Kaggle to download the [Dogs vs Cats dataset](https://www.kaggle.com/c/dogs-vs-cats) from Kaggle and extract it.
1. Download the dataset.
```bash
kaggle datasets download -d salader/dogs-vs-cats
```
2. Unzip the dataset.
```bash
unzip dogs-vs-cats.zip
```
3. Verify the extracted directory.
```bash
ls dogs_vs_cats/train/
```
Output.
```bash
cats dogs
```
4. Create the required directories for your project.
```bash
mkdir templates
mkdir -p static/uploads
```
The dataset contains labeled images of dogs and cats, which we’ll use to train our CNN model.
## Step 5: Build and Train the CNN Model
We’ll define a CNN using TensorFlow/Keras and train it on the dataset.
```bash
nano dog_cat_classifier.py
```
Add the below code:
```bash
import os
from tensorflow.keras.models import Sequential
from tensorflow.keras.layers import Conv2D, MaxPooling2D, Flatten, Dense, Dropout
from tensorflow.keras.preprocessing.image import ImageDataGenerator
from tensorflow.keras.models import load_model
# Define paths
base_dir = 'dogs_vs_cats'
train_dir = os.path.join(base_dir, 'train')
test_dir = os.path.join(base_dir, 'test')
# Image parameters
img_width, img_height = 150, 150
batch_size = 32
# Data augmentation for training
train_datagen = ImageDataGenerator(
rescale=1./255,
rotation_range=40,
width_shift_range=0.2,
height_shift_range=0.2,
shear_range=0.2,
zoom_range=0.2,
horizontal_flip=True,
fill_mode='nearest')
# Only rescaling for testing
test_datagen = ImageDataGenerator(rescale=1./255)
# Generators
train_generator = train_datagen.flow_from_directory(
train_dir,
target_size=(img_width, img_height),
batch_size=batch_size,
class_mode='binary')
test_generator = test_datagen.flow_from_directory(
test_dir,
target_size=(img_width, img_height),
batch_size=batch_size,
class_mode='binary')
# Build the model
model = Sequential([
Conv2D(32, (3,3), activation='relu', input_shape=(img_width, img_height, 3)),
MaxPooling2D(2,2),
Conv2D(64, (3,3), activation='relu'),
MaxPooling2D(2,2),
Conv2D(128, (3,3), activation='relu'),
MaxPooling2D(2,2),
Flatten(),
Dropout(0.5),
Dense(512, activation='relu'),
Dense(1, activation='sigmoid')
])
# Compile the model
model.compile(loss='binary_crossentropy',
optimizer='adam',
metrics=['accuracy'])
# Train the model
epochs = 10
model.fit(
train_generator,
steps_per_epoch=train_generator.samples // batch_size,
epochs=epochs,
validation_data=test_generator,
validation_steps=test_generator.samples // batch_size)
# Evaluate the model
loss, accuracy = model.evaluate(test_generator)
print(f'Test Accuracy: {accuracy * 100:.2f}%')
# Save the model
model.save('dog_cat_classifier_model.h5')
```
This CNN model uses convolutional layers to extract features and dense layers for classification. Data augmentation helps improve generalization.
## Step 6: Create a Flask Web App for Predictions
We’ll build a simple web interface to upload images and get predictions.
Create a web application file.
```bash
nano web_app.py
```
Add the below code.
```bash
from flask import Flask, request, render_template, redirect, url_for
from tensorflow.keras.models import load_model
from tensorflow.keras.preprocessing.image import load_img, img_to_array
import numpy as np
import os
from PIL import Image
app = Flask(__name__)
model = load_model('dog_cat_classifier_model.h5')
UPLOAD_FOLDER = 'static/uploads'
app.config['UPLOAD_FOLDER'] = UPLOAD_FOLDER
def model_predict(img_path):
img = load_img(img_path, target_size=(150, 150))
img_array = img_to_array(img) / 255.0
img_array = np.expand_dims(img_array, axis=0)
prediction = model.predict(img_array)[0][0]
return 'Dog' if prediction > 0.5 else 'Cat'
@app.route('/', methods=['GET', 'POST'])
def index():
if request.method == 'POST':
file = request.files['file']
if file:
filepath = os.path.join(app.config['UPLOAD_FOLDER'], file.filename)
file.save(filepath)
prediction = model_predict(filepath)
return render_template('index.html', prediction=prediction, image_url=filepath)
return render_template('index.html')
if __name__ == '__main__':
app.run(host='0.0.0.0', port=5000)
```
Create an **index.html** file.
```bash
nano templates/index.html
```
Add the following code.
```bash
Dog vs Cat Classifier
Upload an image of a Dog or Cat
{% if prediction %}
Prediction: {{ prediction }}
 {% endif %}
```
The Flask app loads the trained model and provides an interface for uploading images and receiving real-time predictions.
## Step 7: Run the Web App
1. You can now start the Flask Web Application using the following command:
```bash
python3 web_app.py
```
2. Visit **http://your-server-ip:5000** in your browser to access the interface.
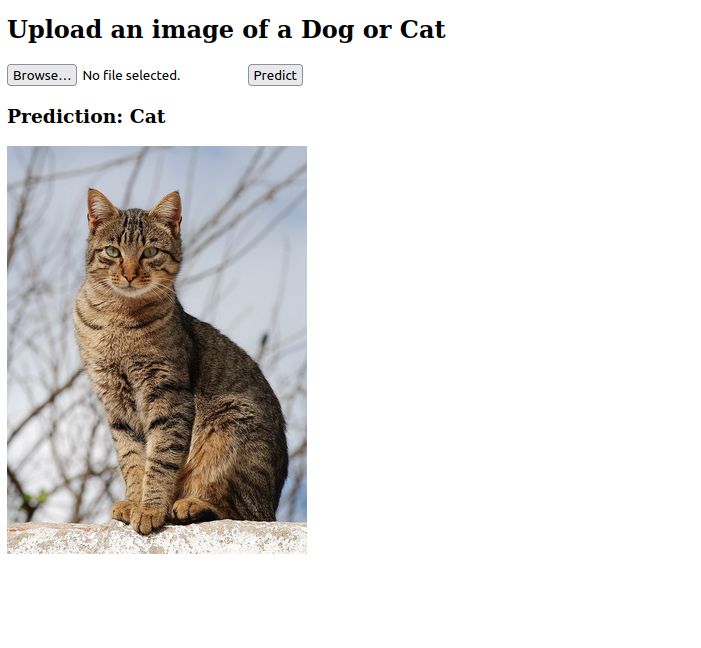
3. Click **Browse** and upload a cat image, then click on the **Predict** button. The web interface classifies the uploaded image with a pre-trained model and displays the result.
## Conclusion
We successfully built a Dog vs Cat CNN classifier on Ubuntu 24.04 with GPU support, trained it on a Kaggle dataset, and deployed it using Flask. This project demonstrates:
- CNN architecture for image classification.
- Data augmentation to improve model robustness.
- Flask integration for real-time predictions.
{% endif %}
```
The Flask app loads the trained model and provides an interface for uploading images and receiving real-time predictions.
## Step 7: Run the Web App
1. You can now start the Flask Web Application using the following command:
```bash
python3 web_app.py
```
2. Visit **http://your-server-ip:5000** in your browser to access the interface.
3. Click **Browse** and upload a cat image, then click on the **Predict** button. The web interface classifies the uploaded image with a pre-trained model and displays the result.

## Conclusion
We successfully built a Dog vs Cat CNN classifier on Ubuntu 24.04 with GPU support, trained it on a Kaggle dataset, and deployed it using Flask. This project demonstrates:
- CNN architecture for image classification.
- Data augmentation to improve model robustness.
- Flask integration for real-time predictions.