# How to Serve Ollama Models on GPU Server via REST API
> URL: https://www.atlantic.net/gpu-server-hosting/how-to-serve-ollama-models-on-gpu-server-via-rest-api/ | Published: 2025-07-06 | Updated: 2025-07-10 | Author: Hitesh Jethva
As demand for local, private, and GPU-accelerated AI solutions grows, developers and enterprises are looking for alternatives to cloud-based LLM APIs. Ollama is an open-source tool that allows you to run large language models like Mistral, LLaMA, and Code LLaMA entirely on your own hardware, including GPU-accelerated servers. This provides complete data privacy, faster inference, and zero ongoing API costs.
In this tutorial, you’ll learn how to set up Ollama on a [GPU server](https://www.atlantic.net/gpu-server-hosting/) running Ubuntu 24.04, serve models through a REST API, and build a simple web interface using FastAPI to query models from your browser.
## Prerequisites
- An Ubuntu 24.04 server with an NVIDIA GPU.
- A non-root user or a user with sudo privileges.
- NVIDIA drivers are installed on your server.
## Step 1: Set Up Ollama on the GPU Server
We’ll begin by installing Ollama and verifying that it runs correctly with GPU acceleration.
1. First, install Python and other required dependencies.
```bash
apt install python3 python3-venv python3-pip
```
2. Create and activate a Python virtual environment.
```bash
python3 -m venv venv
source venv/bin/activate
```
3. Install Ollama.
```bash
curl -fsSL https://ollama.com/install.sh | sh
```
Output.
```bash
>>> Installing ollama to /usr/local
>>> Downloading Linux amd64 bundle
############################################################################################################### 100.0%
>>> Creating ollama user...
>>> Adding ollama user to render group...
>>> Adding ollama user to video group...
>>> Adding current user to ollama group...
>>> Creating ollama systemd service...
>>> Enabling and starting ollama service...
Created symlink /etc/systemd/system/default.target.wants/ollama.service → /etc/systemd/system/ollama.service.
>>> NVIDIA GPU installed.
```
4. Start and enable the Ollama service.
```bash
systemctl enable ollama
systemctl start ollama
```
5. Verify that Ollama is running.
```bash
curl http://localhost:11434
```
Output.
```bash
Ollama is running
```
6. Download and runs the Mistral model locally. This model is optimized for instruction-following and text generation, and is runnable locally via the Ollama framework.
```bash
ollama run mistral
```
## Step 2: Test REST API via cURL
Verify that the REST API works correctly by querying a prompt.
```bash
curl -s http://localhost:11434/api/generate -d '{
"model": "mistral",
"prompt": "What is the most populous city in Germany?"
}' | jq -r '.response' | tr -d '\n'
```
You will see the generated response from the model.
```bash
The most populous city in Germany is Berlin. As of 2021, its estimated population is approximately 3.7 million people within its city limits, and over 6.5 million people in the Berlin-Brandenburg metropolitan area. However, if we consider the total urban agglomeration, which includes cities like Potsdam and Brandenburg an der Havel, the population exceeds 7 million inhabitants.
```
## Step 3: Create a Python Script to Call the API
Let’s write a Python script to send a request to the Ollama API and stream the output.
```bash
nano test_ollama_api.py
```
Add the following code.
```bash
import requests
import json
url = "http://localhost:11434/api/generate"
payload = {
"model": "mistral",
"prompt": "What is the most populous city in USA?"
}
response = requests.post(url, json=payload, stream=True)
# Collect streamed chunks and combine text
output = ""
for line in response.iter_lines():
if line:
chunk = json.loads(line.decode("utf-8"))
output += chunk.get("response", "")
print("Full response:\n", output)
```
Run the script.
```bash
python3 test_ollama_api.py
```
This streams the response in real-time.
```bash
Full response:
The most populous city in the United States is New York City, specifically its five boroughs: The Bronx, Brooklyn, Manhattan, Queens, and Staten Island. According to the U.S. Census Bureau's July 1, 2021 estimates, New York City has a population of approximately 8.4 million people.
```
## Step 4: Build a Web Interface with FastAPI
Now, let’s create a user-friendly chat interface using FastAPI and Jinja2.
Install the necessary Python modules.
```bash
pip install fastapi uvicorn requests jinja2 python-multipart
```
Create a FastAPI endpoint.
```bash
nano main.py
```
Add the following code.
```bash
from fastapi import FastAPI, Request, Form
from fastapi.responses import HTMLResponse
from fastapi.templating import Jinja2Templates
import requests
import json
app = FastAPI()
templates = Jinja2Templates(directory="templates")
OLLAMA_URL = "http://localhost:11434/api/generate"
@app.get("/", response_class=HTMLResponse)
def load_chat(request: Request):
return templates.TemplateResponse("index.html", {"request": request, "response": ""})
@app.post("/", response_class=HTMLResponse)
async def get_response(request: Request, prompt: str = Form(...)):
payload = {
"model": "mistral",
"prompt": prompt
}
# Collect response stream
response = requests.post(OLLAMA_URL, json=payload, stream=True)
output = ""
for line in response.iter_lines():
if line:
chunk = json.loads(line.decode("utf-8"))
output += chunk.get("response", "")
return templates.TemplateResponse("index.html", {
"request": request,
"response": output,
"prompt": prompt
})
```
Create a simple HTML form to interact with the model.
```bash
mkdir templates
nano templates/index.html
```
Add the following code.
```bash
Ollama Chat
Ollama Chat Interface
{% if response %}
{% endif %}
```
## Step 5: Run the Web App
Finally, start your FastAPI server.
```bash
uvicorn main:app --host 0.0.0.0 --port 8000
```
Output.
```bash
INFO: Started server process [41142]
INFO: Waiting for application startup.
INFO: Application startup complete.
INFO: Uvicorn running on http://0.0.0.0:8000 (Press CTRL+C to quit)
```
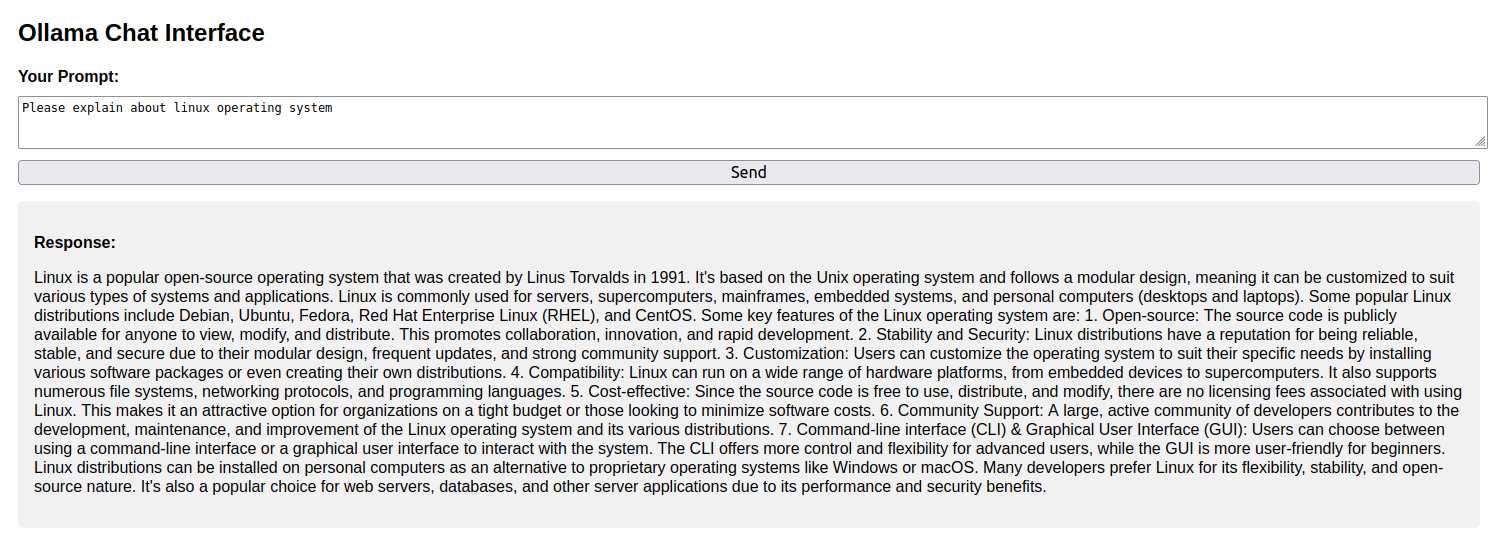
Now open **http://your-server-ip:8000** in your browser. You will see the FastAPI interface with a chat box.
Type “**Please explain about linux operating system**” and click on **Send.** You will see a real-time response from the Ollama model.
## Conclusion
You’ve now seen how to serve large language models like Mistral on your own GPU server using Ollama. Starting from setting up Python and the Ollama runtime to calling the model through a REST API, you also built a lightweight web interface with FastAPI and Jinja2 to send prompts and display streamed responses. This setup is ideal for creating private, low-latency LLM applications that run entirely on your infrastructure.