# Iris Flower Classification Using Machine Learning on Ubuntu 24.04 GPU Server
> URL: https://www.atlantic.net/gpu-server-hosting/iris-flower-classification-using-machine-learning-on-ubuntu-24-04-gpu-server/ | Published: 2025-06-12 | Updated: 2026-05-04 | Author: Hitesh Jethva
Classifying Iris flowers is a classic machine learning problem. It’s a perfect introduction to supervised learning, showcasing key machine learning techniques. Initially introduced by the renowned statistician Ronald Fisher, the Iris dataset has become a standard benchmark for testing new machine learning algorithms. It consists of different Iris species, each with distinct characteristics, making it an ideal dataset for understanding classification concepts.
In this guide, you’ll learn how to build a robust Iris flower classification model using a GPU-powered Ubuntu 24.04 server. We will also create a Flask web application that allows users to upload an image of an iris flower and display the predicted species name.
## Prerequisites
- An Ubuntu 24.04 server with an [NVIDIA GPU](https://www.atlantic.net/gpu-server-hosting/).
- A non-root user with sudo privileges.
- NVIDIA drivers installed.
## Step 1: Install Required Packages
First, let’s install the necessary system packages.
```bash
apt install python3-pip python3-venv unzip -y
```
## Step 2: Set Up Python Environment
Now, you will create a Python environment for your project.
1. Create a virtual environment.
```bash
python3 -m venv venv
```
2. Activate the virtual environment.
```bash
source venv/bin/activate
```
3. Install the required Python packages.
```bash
pip3 install tensorflow pillow flask kaggle
```
These packages include:
- **tensorflow** for machine learning with GPU support
- **pillow** for image processing
- **flask** for the web interface
- **kaggle** to download datasets
## Step 3: Set Up Kaggle API
To download our dataset, we need to configure the Kaggle API.
1. Go to [Kaggle](https://www.kaggle.com) and log in.
2. Click your **profile picture** => **Account**
3. Scroll down to **API** section
4. Click **“Create New API Token”**
5. This will download **kaggle.json** to your computer
6. Create a Kaggle configuration directory on your server.
```bash
mkdir -p ~/.kaggle
```
7. Copy your downloaded **kaggle.json** file into the **~/.kaggle** folder.
8. Set appropriate permissions.
```bash
chmod 600 ~/.kaggle/kaggle.json
```
## Step 4: Download and Prepare the Dataset
Now, we will use Kaggle to download and extract the dataset.
1. Download the flower dataset.
```bash
kaggle datasets download -d imsparsh/flowers-dataset
```
2. Unzip the dataset.
```bash
unzip flowers-dataset.zip
```
3. Rename the training folder for easier reference.
```bash
mv train flowers
```
## Step 5: Create the CNN Training Script
1. Create a file called train_cnn_model.py.
```bash
nano train_cnn_model.py
```
Add the following code.
```bash
# train_cnn_model.py
import tensorflow as tf
from tensorflow.keras.preprocessing.image import ImageDataGenerator
from tensorflow.keras.models import Sequential
from tensorflow.keras.layers import Conv2D, MaxPooling2D, Flatten, Dense
from tensorflow.keras.optimizers import Adam
# Define dataset path
data_dir = 'flowers' # folder created after unzip
model_path = 'flowers_cnn_model.h5'
# Image properties
img_width, img_height = 150, 150
batch_size = 32
epochs = 10
# Data loading and augmentation
datagen = ImageDataGenerator(rescale=1./255, validation_split=0.2)
train_generator = datagen.flow_from_directory(
data_dir,
target_size=(img_width, img_height),
batch_size=batch_size,
class_mode='categorical',
subset='training'
)
validation_generator = datagen.flow_from_directory(
data_dir,
target_size=(img_width, img_height),
batch_size=batch_size,
class_mode='categorical',
subset='validation'
)
# Build CNN Model
model = Sequential([
Conv2D(32, (3, 3), activation='relu', input_shape=(img_width, img_height, 3)),
MaxPooling2D(2, 2),
Conv2D(64, (3, 3), activation='relu'),
MaxPooling2D(2, 2),
Flatten(),
Dense(128, activation='relu'),
Dense(train_generator.num_classes, activation='softmax')
])
# Compile model
model.compile(optimizer=Adam(), loss='categorical_crossentropy', metrics=['accuracy'])
# Train the model
model.fit(train_generator, epochs=epochs, validation_data=validation_generator)
# Save the model
model.save(model_path)
print("✅ CNN model trained and saved as flowers_cnn_model.h5")
```
This will:
- Load and preprocess the flower images
- Create a convolutional neural network (CNN)
- Train the model for 10 epochs
- Save the trained model as flowers_cnn_model.h5
2. Run the training script.
```bash
python3 train_cnn_model.py
```
Output.
```bash
✅ CNN model trained and saved as flowers_cnn_model.h5
```
## Step 6: Create the Flask Application
1. Create the main application file.
```bash
nano app.py
```
Add the following code.
```bash
# app.py
import os
from flask import Flask, render_template, request
from tensorflow.keras.models import load_model
from tensorflow.keras.preprocessing import image
import numpy as np
app = Flask(__name__)
UPLOAD_FOLDER = 'static/uploads'
os.makedirs(UPLOAD_FOLDER, exist_ok=True)
app.config['UPLOAD_FOLDER'] = UPLOAD_FOLDER
# Load the trained model
model = load_model('flowers_cnn_model.h5')
# Class labels (based on folders in 'flowers' dataset)
class_labels = ['daisy', 'dandelion', 'rose', 'sunflower', 'tulip']
@app.route('/', methods=['GET', 'POST'])
def index():
prediction = None
image_url = None
if request.method == 'POST':
file = request.files['file']
if file:
filepath = os.path.join(app.config['UPLOAD_FOLDER'], file.filename)
file.save(filepath)
# Preprocess uploaded image
img = image.load_img(filepath, target_size=(150, 150))
img_array = image.img_to_array(img) / 255.0
img_array = np.expand_dims(img_array, axis=0)
# Predict class
pred = model.predict(img_array)
predicted_class = class_labels[np.argmax(pred)]
prediction = predicted_class
image_url = filepath
return render_template('index.html', prediction=prediction, image_url=image_url)
if __name__ == '__main__':
app.run(host='0.0.0.0', port=5000)
```
2. Create the templates directory and HTML file.
```bash
mkdir templates
nano templates/index.html
```
Add the following code.
```bash
Flower Image Classifier 🌸
Upload a Flower Image 🌻🌹🌼
{% if prediction %}
Predicted Flower Species: {{ prediction }}
 {% endif %}
```
## Step 7: Run the Application
Start the Flask development server.
```bash
python3 app.py
```
Output.
```bash
* Running on all addresses (0.0.0.0)
* Running on http://127.0.0.1:5000
* Running on http://server-ip:5000
INFO:werkzeug:Press CTRL+C to quit
```
## Step 8: Access the App
1. Open your web browser and access the app using the URL **http://server-ip:5000.**
2. Click the **“Browse”** button to upload a flower image from your local computer
3. Click **“Upload and Predict”.**
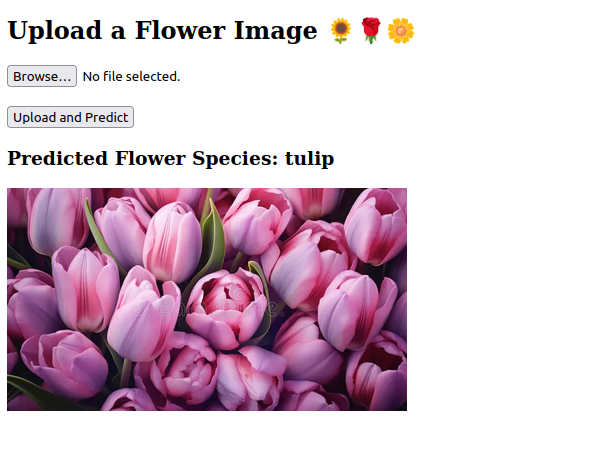4. The app will process the image and display:
- The predicted flower species (daisy, dandelion, rose, sunflower, or tulip)
- The uploaded image
## Conclusion
This tutorial has walked you through the complete process of building a flower classification system on an Ubuntu 24.04 GPU server. We have implemented a convolutional neural network using TensorFlow that can accurately classify five types of flowers (daisy, dandelion, rose, sunflower, and tulip). We then created a user-friendly web interface using Flask to make the model accessible.
{% endif %}
```
## Step 7: Run the Application
Start the Flask development server.
```bash
python3 app.py
```
Output.
```bash
* Running on all addresses (0.0.0.0)
* Running on http://127.0.0.1:5000
* Running on http://server-ip:5000
INFO:werkzeug:Press CTRL+C to quit
```
## Step 8: Access the App
1. Open your web browser and access the app using the URL **http://server-ip:5000.**
2. Click the **“Browse”** button to upload a flower image from your local computer
3. Click **“Upload and Predict”.**
4. The app will process the image and display:
- The predicted flower species (daisy, dandelion, rose, sunflower, or tulip)
- The uploaded image
## Conclusion
This tutorial has walked you through the complete process of building a flower classification system on an Ubuntu 24.04 GPU server. We have implemented a convolutional neural network using TensorFlow that can accurately classify five types of flowers (daisy, dandelion, rose, sunflower, and tulip). We then created a user-friendly web interface using Flask to make the model accessible.