# Lane Line Detection with OpenCV and Flask on Ubuntu 24.04 GPU Server
> URL: https://www.atlantic.net/gpu-server-hosting/lane-line-detection-with-opencv-and-flask-on-ubuntu-24-04-gpu-server/ | Published: 2025-06-30 | Updated: 2025-07-10 | Author: Hitesh Jethva
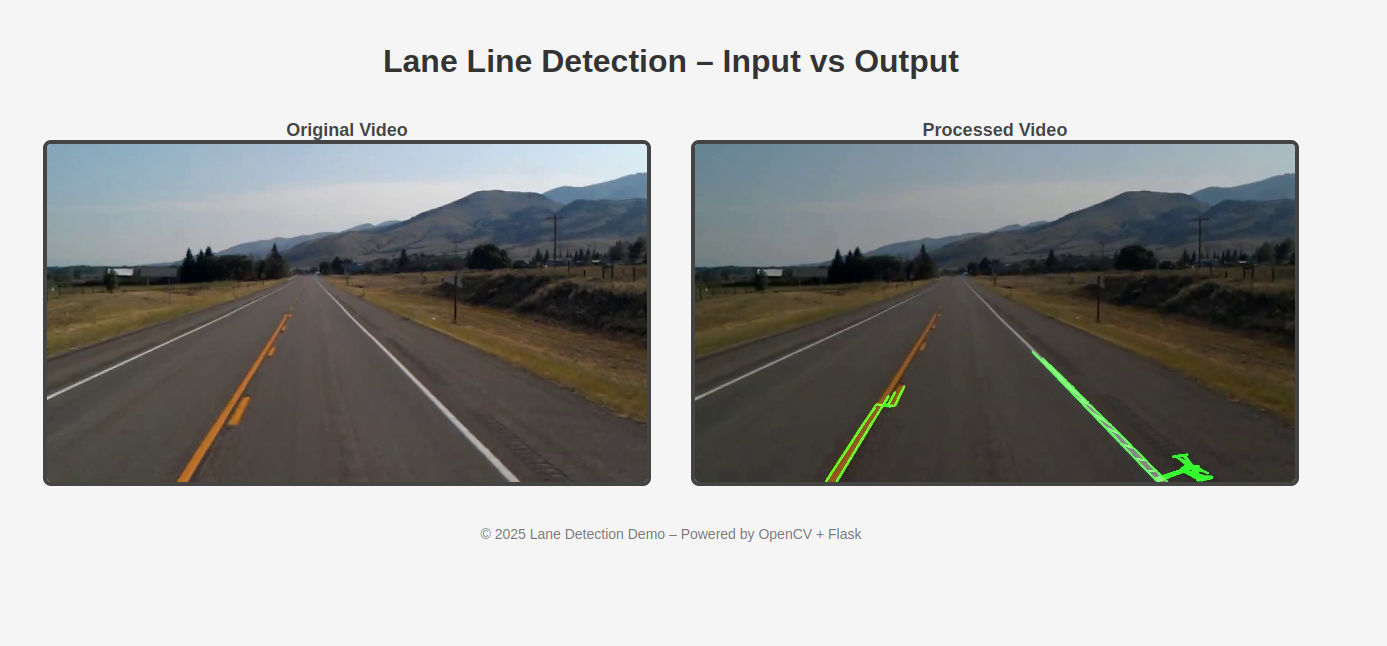
Lane detection is a key element in autonomous driving systems and driver-assistance technologies. In this article, we’ll walk through implementing lane line detection using OpenCV and Python on an Ubuntu 24.04 [GPU server](https://www.atlantic.net/gpu-server-hosting/). This real-time solution processes a video stream to identify lane lines using computer vision techniques like edge detection, region masking, and Hough transforms. We’ll also create a web interface to display both original and processed videos side-by-side.
## What You’ll Build
We’ll use a video of a car driving on a highway, apply computer vision techniques to detect lane lines, and visualize both the original and processed outputs in a web app. The lane detection is powered by OpenCV, and Flask delivers the interface.
## Prerequisites
- An Ubuntu 24.04 server with an NVIDIA GPU.
- A root user or a user with sudo privileges.
- NVIDIA drivers installed.
## Step 1: Set Up the Python Environment
To ensure a clean setup with all necessary packages, we’ll create a virtual environment and install dependencies.
First, install all necessary dependencies:
```bash
apt install python3 python3-dev python3-venv -y
```
Next, create and activate a virtual environment.
```bash
python3 -m venv venv
source venv/bin/activate
```
Next, update pip to the latest version.
```bash
pip install --upgrade pip
```
Next, install all required packages for this project.
```bash
python3 -m pip install opencv-python numpy matplotlib pillow flask kaggle
```
## Step 2: Download the Video Dataset
We’ll use the Kaggle lane detection dataset for this project. Follow the below steps to download the Kaggle dataset.
1. Go to Kaggle and log in.
2. Click your **profile picture** => **Account**
3. Scroll down to the **API** section
4. Click **“Create New API Token”**
5. This will download **kaggle.json** to your computer
6. Create a Kaggle configuration directory on your server.
```bash
mkdir -p ~/.kaggle
```
7. Copy your downloaded **kaggle.json** file into the **~/.kaggle** folder.
8. Set appropriate permissions.
```bash
chmod 600 ~/.kaggle/kaggle.json
```
9. Download the [dataset](https://www.kaggle.com/datasets/dpamgautam/video-file-for-lane-detection-project) using the command below.
```bash
kaggle datasets download -d dpamgautam/video-file-for-lane-detection-project
```
10. Unzip the downloaded file.
```bash
unzip video-file-for-lane-detection-project.zip
```
11. This command will extract the **test_video.mp4** file from the downloaded zip file.
## Step 3: Process the Video with OpenCV
We’ll write a Python script that reads each frame, detects edges, isolates the region of interest, and applies the Hough Line Transform to detect lanes on **test_video.mp4**.
1. Create a file.
```bash
nano main.py
```
Add the below code.
```bash
import cv2
import numpy as np
import os
# Global variables
first_frame = True
cache = np.zeros(8)
frame_counter = 0
def interested_region(img, vertices):
mask = np.zeros_like(img)
mask_color = (255,) * img.shape[2] if len(img.shape) > 2 else 255
cv2.fillPoly(mask, vertices, mask_color)
return cv2.bitwise_and(img, mask)
def hough_lines(img, rho, theta, threshold, min_line_len, max_line_gap):
lines = cv2.HoughLinesP(img, rho, theta, threshold, np.array([]),
minLineLength=min_line_len, maxLineGap=max_line_gap)
if lines is None:
print("⚠️ No Hough lines found.")
else:
print(f"✅ Detected {len(lines)} line(s).")
line_img = np.zeros((img.shape[0], img.shape[1], 3), dtype=np.uint8)
lines_drawn(line_img, lines)
return line_img
def lines_drawn(img, lines, color=[0, 255, 0], thickness=3):
if lines is None:
return
for line in lines:
for x1, y1, x2, y2 in line:
cv2.line(img, (x1, y1), (x2, y2), color, thickness)
def weighted_img(img, initial_img, α=0.8, β=1., λ=0.):
return cv2.addWeighted(initial_img, α, img, β, λ)
def process_frame(image):
global frame_counter
# Use full grayscale image (no masking)
gray = cv2.cvtColor(image, cv2.COLOR_BGR2GRAY)
# Gaussian blur
blurred = cv2.GaussianBlur(gray, (5, 5), 0)
# Canny edge detection - more sensitive
edges = cv2.Canny(blurred, 5, 50)
# Region of interest
height, width = image.shape[:2]
roi_vertices = np.array([[
(width * 0.1, height),
(width * 0.45, height * 0.6),
(width * 0.55, height * 0.6),
(width * 0.9, height)
]], dtype=np.int32)
roi = interested_region(edges, roi_vertices)
# Save debug images for the first few frames
if frame_counter < 3:
os.makedirs("debug", exist_ok=True)
cv2.imwrite(f"debug/edges_{frame_counter}.jpg", edges)
cv2.imwrite(f"debug/roi_{frame_counter}.jpg", roi)
# Run relaxed Hough Transform
line_img = hough_lines(roi, 2, np.pi / 180, 10, 20, 50)
result = weighted_img(line_img, image)
frame_counter += 1
return result
if __name__ == "__main__":
cap = cv2.VideoCapture("test_video.mp4")
if not cap.isOpened():
print("❌ Error: Cannot open input video.")
exit(1)
width = int(cap.get(cv2.CAP_PROP_FRAME_WIDTH))
height = int(cap.get(cv2.CAP_PROP_FRAME_HEIGHT))
fps = cap.get(cv2.CAP_PROP_FPS)
fourcc = cv2.VideoWriter_fourcc(*'mp4v')
out = cv2.VideoWriter("output.mp4", fourcc, fps, (width, height))
print("🚀 Processing video...")
while cap.isOpened():
ret, frame = cap.read()
if not ret:
break
processed = process_frame(frame)
out.write(processed)
if frame_counter % 10 == 0:
print(f"📦 Processed {frame_counter} frames...")
cap.release()
out.release()
print("✅ Done. Output saved as output.mp4.")
print("🛠️ Debug edge/ROI images saved to ./debug/")
```
This code reads each frame, applies edge detection and region masking, then uses HoughLinesP to detect line segments. It overlays the detected lines on the original video and writes the output.
Now, run the above code.
```bash
python3 main.py
```
## Step 4: Create the Flask Web App
Now we’ll set up a web server that streams both the original and processed videos.
Create a Flask application file.
```bash
nano app.py
```
Add the following code.
```bash
from flask import Flask, render_template, Response
import cv2
app = Flask(__name__)
# Video file paths
video_original = cv2.VideoCapture("test_video.mp4")
video_processed = cv2.VideoCapture("output.mp4")
def generate_frames(video):
while True:
success, frame = video.read()
if not success:
video.set(cv2.CAP_PROP_POS_FRAMES, 0)
continue
_, buffer = cv2.imencode('.jpg', frame)
frame_bytes = buffer.tobytes()
yield (b'--frame\r\n'
b'Content-Type: image/jpeg\r\n\r\n' + frame_bytes + b'\r\n')
@app.route('/')
def index():
return render_template('index.html')
@app.route('/video_original')
def stream_original():
return Response(generate_frames(video_original),
mimetype='multipart/x-mixed-replace; boundary=frame')
@app.route('/video_processed')
def stream_processed():
return Response(generate_frames(video_processed),
mimetype='multipart/x-mixed-replace; boundary=frame')
if __name__ == "__main__":
app.run(host='0.0.0.0', port=5000, debug=False)
```
This Flask app defines routes to stream both video files as MJPEG streams. The **generate_frames()** function encodes each video frame into JPEG and streams it continuously.
## Step 5: Build the Web Interface
We’ll now create an HTML page to display the input and output video feeds side-by-side.
First, create a templates directory and create an HTML page.
```bash
mkdir templates
nano templates/index.html
```
Add the below code.
```bash
Lane Line Detection – Viewer
Lane Line Detection – Input vs Output
Original Video
Processed Video
```
The HTML page renders both video streams with labels using the routes defined in the Flask app.
## Step 6: Run the Flask App
Now, start the Flask server using the command below.
```bash
python3 app.py
```
Open your web browser and access the Flask web interface using the URL **http://your-server-ip:5000.** You should see both the original and processed videos playing side by side.
## Conclusion
You have successfully implemented a full lane detection system using OpenCV and served it with Flask. By leveraging the parallel processing capabilities of GPUs, you can achieve real-time performance essential for critical applications like autonomous navigation. This solution can be extended to use live camera input, real-time overlays, or integration with machine learning models.