# Language Translation with Machine Learning on Ubuntu 24.04 GPU Server
> URL: https://www.atlantic.net/gpu-server-hosting/language-translation-with-machine-learning-on-ubuntu-24-04-gpu-server/ | Published: 2025-04-25 | Updated: 2025-05-01 | Author: Hitesh Jethva
In this machine learning project, we’ll develop a Language Translator application using a many-to-many encoder-decoder sequence model on an Ubuntu 24.04 [GPU server](https://www.atlantic.net/gpu-server-hosting/). Our model will use LSTM (Long Short-Term Memory) networks to translate English text to French. This implementation leverages the power of GPU acceleration to achieve faster training and improved performance.
## Prerequisites
- An Ubuntu 24.04 server with an NVIDIA GPU.
- A non-root user with sudo privileges.
- NVIDIA drivers installed.
## Step 1: Setting Up the Environment
1. First, let’s install the necessary packages.
```bash
apt install python3-pip python3-tk python3-venv graphviz
```
2. Create a virtual environment and activate it.
```bash
python3 -m venv lang-env
source lang-env/bin/activate
```
3. Install Tensorflow and other packages.
```bash
pip3 install tensorflow scikit-learn numpy pydot graphviz flask
```
## Step 2: Downloading the Dataset
A quality dataset is the foundation of any machine learning project. We’ll use an English-French parallel corpus that contains aligned sentence pairs for training our translation model.
You can download it with the following command.
```bash
wget https://raw.githubusercontent.com/hitjethva/linuxbuz/master/eng-french.txt
```
## Step 3: Building the Translation Model
The model architecture is the heart of our translation system. We’ll implement an encoder-decoder LSTM network that can learn the complex patterns between English and French sentences.
1. Create a new Python file named **LangTraining.py.**
```bash
nano LangTraining.py
```
Add the following code.
```bash
# LangTraining.py
#Load all the required modules.
from tensorflow.keras.models import Model
from tensorflow.keras import models
from tensorflow.keras.utils import plot_model
from tensorflow.keras.layers import Input,LSTM,Dense
from sklearn.feature_extraction.text import CountVectorizer
import numpy as np
import pickle
#initialize all variables
input_texts=[]
target_texts=[]
input_characters=set()
target_characters=set()
#read dataset file
with open('eng-french.txt','r',encoding='utf-8') as f:
rows=f.read().split('\n')
#read first 10,000 rows from dataset
for row in rows[:10000]:
#split input and target by '\t'=tab
input_text,target_text = row.split('\t')
#add '\t' at start and '\n' at end of text.
target_text='\t' + target_text + '\n'
input_texts.append(input_text.lower())
target_texts.append(target_text.lower())
#split character from text and add in respective sets
input_characters.update(list(input_text.lower()))
target_characters.update(list(target_text.lower()))
#sort input and target characters
input_characters = sorted(list(input_characters))
target_characters = sorted(list(target_characters))
#get the total length of input and target characters
num_en_chars = len(input_characters)
num_dec_chars = len(target_characters)
#get the maximum length of input and target text.
max_input_length = max([len(i) for i in input_texts])
max_target_length = max([len(i) for i in target_texts])
def bagofcharacters(input_texts,target_texts):
#inintialize encoder , decoder input and target data.
en_in_data=[] ; dec_in_data=[] ; dec_tr_data=[]
#padding variable with first character as 1 as rest all 0.
pad_en=[1]+[0]*(len(input_characters)-1)
pad_dec=[0]*(len(target_characters)) ; pad_dec[2]=1
#countvectorizer for one hot encoding as we want to tokenize character so
#anlyzer is true and None the stopwords action.
cv=CountVectorizer(binary=True,tokenizer=lambda txt: txt.split(),stop_words=None,analyzer='char')
for i,(input_t,target_t) in enumerate(zip(input_texts,target_texts)):
#fit the input characters into the CountVectorizer function
cv_inp= cv.fit(input_characters)
#transform the input text from the help of CountVectorizer fit.
#it character present than put 1 and 0 otherwise.
en_in_data.append(cv_inp.transform(list(input_t)).toarray().tolist())
cv_tar= cv.fit(target_characters)
dec_in_data.append(cv_tar.transform(list(target_t)).toarray().tolist())
#decoder target will be one timestep ahead because it will not consider
#the first character i.e. '\t'.
dec_tr_data.append(cv_tar.transform(list(target_t)[1:]).toarray().tolist())
#add padding variable if the length of the input or target text is smaller
#than their respective maximum input or target length.
if len(input_t) < max_input_length:
for _ in range(max_input_length-len(input_t)):
en_in_data[i].append(pad_en)
if len(target_t) < max_target_length:
for _ in range(max_target_length-len(target_t)):
dec_in_data[i].append(pad_dec)
if (len(target_t)-1) < max_target_length:
for _ in range(max_target_length-len(target_t)+1):
dec_tr_data[i].append(pad_dec)
#convert list to numpy array with data type float32
en_in_data=np.array(en_in_data,dtype="float32")
dec_in_data=np.array(dec_in_data,dtype="float32")
dec_tr_data=np.array(dec_tr_data,dtype="float32")
return en_in_data,dec_in_data,dec_tr_data
#create input object of total number of encoder characters
en_inputs = Input(shape=(None, num_en_chars))
#create LSTM with the hidden dimension of 256
#return state=True as we don't want output sequence.
encoder = LSTM(256, return_state=True)
#discard encoder output and store hidden and cell state.
en_outputs, state_h, state_c = encoder(en_inputs)
en_states = [state_h, state_c]
#create input object of total number of decoder characters
dec_inputs = Input(shape=(None, num_dec_chars))
#create LSTM with the hidden dimension of 256
#return state and return sequences as we want output sequence.
dec_lstm = LSTM(256, return_sequences=True, return_state=True)
#initialize the decoder model with the states on encoder.
dec_outputs, _, _ = dec_lstm(dec_inputs, initial_state=en_states)
#Output layer with shape of total number of decoder characters
dec_dense = Dense(num_dec_chars, activation="softmax")
dec_outputs = dec_dense(dec_outputs)
#create Model and store all variables
model = Model([en_inputs, dec_inputs], dec_outputs)
pickle.dump({'input_characters':input_characters,'target_characters':target_characters,
'max_input_length':max_input_length,'max_target_length':max_target_length,
'num_en_chars':num_en_chars,'num_dec_chars':num_dec_chars},open("training_data.pkl","wb"))
#load the data and train the model
en_in_data,dec_in_data,dec_tr_data = bagofcharacters(input_texts,target_texts)
model.compile(
optimizer="adam", loss="categorical_crossentropy", metrics=["accuracy"]
)
model.fit(
[en_in_data, dec_in_data],
dec_tr_data,
batch_size=64,
epochs=200,
validation_split=0.2,
)
# Save model
model.save("s2s.keras")
#summary and model plot
model.summary()
plot_model(model, to_file='model_plot.png', show_shapes=True, show_layer_names=True)
```
2. Run the training script.
```bash
python3 LangTraining.py
```
Once training is completed, you will see the following output.
**Please note the training will take several minutes to complete.**
```bash
Model: "functional"
┏━━━━━━━━━━━━━━━━━━━━━━━━━━━━━━━┳━━━━━━━━━━━━━━━━━━━━━━━━━━━┳━━━━━━━━━━━━━━━━━┳━━━━━━━━━━━━━━━━━━━━━━━━━━━━┓
┃ Layer (type) ┃ Output Shape ┃ Param # ┃ Connected to ┃
┡━━━━━━━━━━━━━━━━━━━━━━━━━━━━━━━╇━━━━━━━━━━━━━━━━━━━━━━━━━━━╇━━━━━━━━━━━━━━━━━╇━━━━━━━━━━━━━━━━━━━━━━━━━━━━┩
│ input_layer (InputLayer) │ (None, None, 47) │ 0 │ - │
├───────────────────────────────┼───────────────────────────┼─────────────────┼────────────────────────────┤
│ input_layer_1 (InputLayer) │ (None, None, 67) │ 0 │ - │
├───────────────────────────────┼───────────────────────────┼─────────────────┼────────────────────────────┤
│ lstm (LSTM) │ [(None, 256), (None, │ 311,296 │ input_layer[0][0] │
│ │ 256), (None, 256)] │ │ │
├───────────────────────────────┼───────────────────────────┼─────────────────┼────────────────────────────┤
│ lstm_1 (LSTM) │ [(None, None, 256), │ 331,776 │ input_layer_1[0][0], │
│ │ (None, 256), (None, 256)] │ │ lstm[0][1], lstm[0][2] │
├───────────────────────────────┼───────────────────────────┼─────────────────┼────────────────────────────┤
│ dense (Dense) │ (None, None, 67) │ 17,219 │ lstm_1[0][0] │
└───────────────────────────────┴───────────────────────────┴─────────────────┴────────────────────────────┘
Total params: 1,980,875 (7.56 MB)
Trainable params: 660,291 (2.52 MB)
Non-trainable params: 0 (0.00 B)
Optimizer params: 1,320,584 (5.04 MB)
```
## Step 4: Creating the GUI Application
A user-friendly interface makes our translation system accessible to end-users. We’ll build a web-based interface using Flask that allows users to input English text and receive French translations.
1. Create a new file named **LangTransGui.py.**
```bash
nano LangTransGui.py
```
Add the following code.
```bash
# LangTransWeb.py
from flask import Flask, render_template, request
import pickle
import numpy as np
from sklearn.feature_extraction.text import CountVectorizer
from tensorflow.keras.models import load_model, Model
from tensorflow.keras.layers import Input
app = Flask(__name__)
# Load preprocessed data
data = pickle.load(open("training_data.pkl", "rb"))
input_characters = data['input_characters']
target_characters = data['target_characters']
max_input_length = data['max_input_length']
max_target_length = data['max_target_length']
num_en_chars = data['num_en_chars']
num_dec_chars = data['num_dec_chars']
# Prepare CountVectorizer
cv = CountVectorizer(binary=True, tokenizer=lambda txt: txt.split(), stop_words=None, analyzer='char')
# Load the trained model
model = load_model("s2s.keras")
# Build encoder model
encoder_outputs, state_h_enc, state_c_enc = model.layers[2].output
encoder_model = Model(model.input[0], [state_h_enc, state_c_enc])
# Decoder setup
decoder_state_input_h = Input(shape=(256,), name="input_3")
decoder_state_input_c = Input(shape=(256,), name="input_4")
decoder_states_inputs = [decoder_state_input_h, decoder_state_input_c]
decoder_lstm = model.layers[3]
decoder_outputs, state_h_dec, state_c_dec = decoder_lstm(
model.input[1], initial_state=decoder_states_inputs
)
decoder_states = [state_h_dec, state_c_dec]
decoder_dense = model.layers[4]
decoder_outputs = decoder_dense(decoder_outputs)
decoder_model = Model(
[model.input[1]] + decoder_states_inputs,
[decoder_outputs] + decoder_states
)
reverse_target_char_index = dict(enumerate(target_characters))
# Function to vectorize input
def vectorize_input(input_text):
en_in_data = []
pad_en = [1] + [0] * (len(input_characters) - 1)
cv_inp = cv.fit(input_characters)
en_in_data.append(cv_inp.transform(list(input_text)).toarray().tolist())
if len(input_text) < max_input_length: for _ in range(max_input_length - len(input_text)): en_in_data[0].append(pad_en) return np.array(en_in_data, dtype="float32") # Decode sequence using trained model def decode_sequence(input_seq): states_value = encoder_model.predict(input_seq) co = cv.fit(target_characters) target_seq = np.array([co.transform(list("\t")).toarray().tolist()], dtype="float32") decoded_sentence = "" stop_condition = False while not stop_condition: output_tokens, h, c = decoder_model.predict([target_seq] + states_value) sampled_token_index = np.argmax(output_tokens[0, -1, :]) sampled_char = reverse_target_char_index[sampled_token_index] decoded_sentence += sampled_char if sampled_char == "\n" or len(decoded_sentence) > max_target_length:
stop_condition = True
target_seq = np.zeros((1, 1, num_dec_chars))
target_seq[0, 0, sampled_token_index] = 1.0
states_value = [h, c]
return decoded_sentence.strip()
# Route: Home Page
@app.route("/", methods=["GET", "POST"])
def home():
translation = ""
if request.method == "POST":
input_text = request.form["input_text"]
vectorized_input = vectorize_input(input_text.lower())
translation = decode_sequence(vectorized_input)
return render_template("index.html", translation=translation)
if __name__ == "__main__":
app.run(host="0.0.0.0", port=5000, debug=True)
```
2. Create a templates directory and create a file inside it.
```bash
mkdir templates
nano templates/index.html
```
Add the below code.
```bash
Language Translator
Language Translator: English to French
{% if translation %}
Translation:
{{ translation }}
{% endif %}
```
## Step 5: Running the Application
With all components ready, we can launch our translation service. The Flask application will serve our model through a web interface.
Run the GUI application using the command below.
```bash
python3 LangTransGui.py
```
You will see the following output.
```bash
* Running on all addresses (0.0.0.0)
* Running on http://127.0.0.1:5000
* Running on http://your-server-ip:5000
Press CTRL+C to quit
```
## Step 6: Access and Test the Application
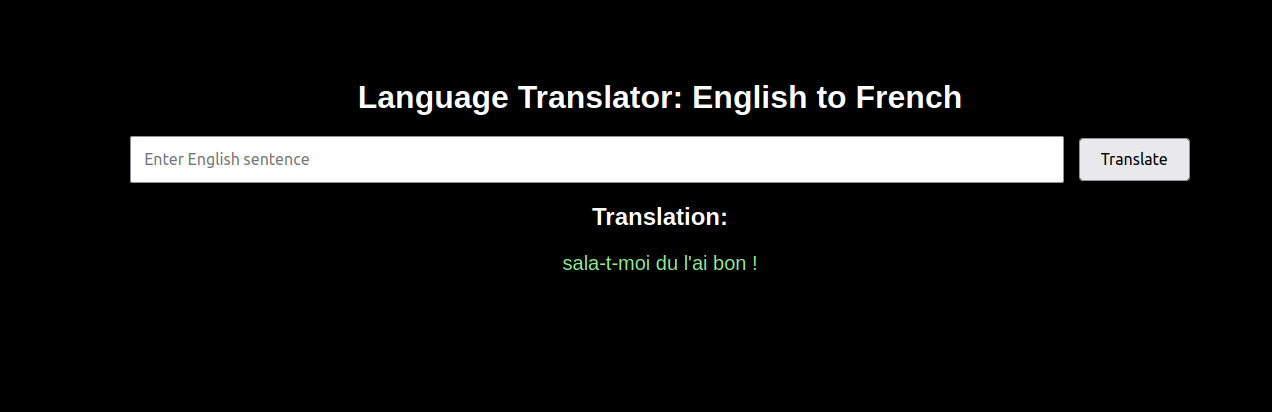
1. Now that our translation service is running. Now, open your web browser and access it using the URL **http://your-server-ip:5000.** You’ll see a clean interface with an input field.
2. Type an English sentence like **“Hello, How Are You”** and click **Translate.**
3. The system will process your input and display the French translation.
## Conclusion
This article demonstrates how to build a comprehensive English-to-French translation system using Long Short-Term Memory (LSTM) networks on Ubuntu 24.04. By leveraging GPU acceleration, we achieved efficient training of our sequence-to-sequence model, while the Flask web interface makes the technology accessible to end users.