How to Expand a VM Hard Disk in Hyper-V on Windows Server 2012
March 30, 2015 by Jose Velazquez ( 38 ) under Dedicated Server Hosting
0 Comments
Verified and Tested 03/31/2015
Introduction
We often find ourselves running out of hard drive space, and now in Hyper-V 2012, we can expand our virtual hard drives. We are used to seeing that when we add storage space or anything that increases, we’ll see it immediately. That is not the case when we choose to expand your virtual server’s hard disk in Hyper-V 2012. The amount of space that you have added will not be available for you to use right away. We need to use our windows disk management tool to expand/combine the existing Partition with the partition space created. With that being said, in this how-to, we will walk you through Expanding a VM Hard Disk in Hyper-V 2012.
Prerequisites
– A server with Windows Server 2012.
– Hyper-V Role installed
– An existing VM (Virtual Machine)
Expanding a VM Hard Disk in Hyper-V 2012
Before we begin, we must make sure that your VM is completely turned off. Open your server manager/select Hyper-V/Right click your host server, and select Hyper-V Manager. Your Host server will be available, and when you click on it, you will see your VM or VM’s also available. Right-click your VM and select “Turn Off.”
Expand your VM’s Hard Disk
To expand the Hard Disk, Right Click on your Virtual Machine/ click “Settings“/ Select SCSI/Select the Virtual Hard Drive that you want to extend and click Edit.
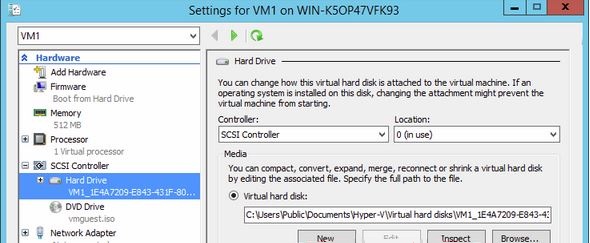
This is the virtual Hard Drive settings while Expanding a VM Hard Disk in Hyper-V 2012
You will then be taken to the “Edit Virtual Hard Disk” wizard to locate the Virtual Hard disk. Click next to continue.
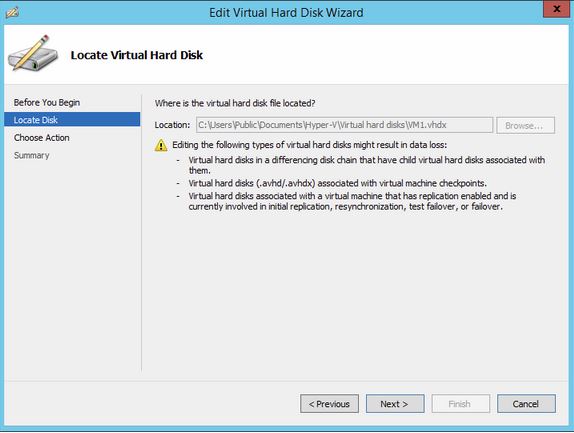
This is the virtual Hard Drive Wizard screen while Expanding a VM Hard Disk in Hyper-V 2012
Following that, you will be asked to “Choose Action.” There are three choices to choose from, Compact, Expand, and Shrink. Select “Expand,” then Click Next to proceed.
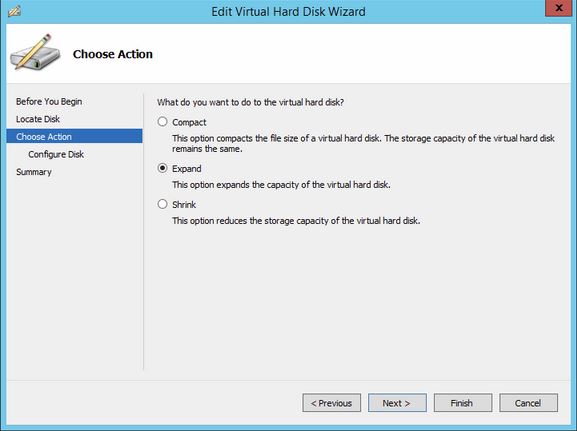
Selecting the Expand option Wizard screen while on the Actions options to Expand a VM Hard Disk in Hyper-V 2012
Finally, you will be asked to “Expand Virtual Hard Disk.” This is where you Specify the size of your virtual hard drive. Do so and then click “Finish” to complete the expansion.
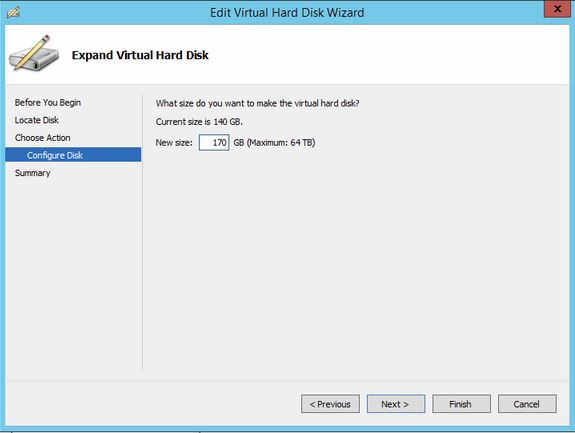
Configuring your Disk while Expanding a VM Hard Disk in Hyper-V 2012
Extend your VM’s Hard Disk
Once you have successfully expanded your Virtual Hard Disk, you will need to turn on your VM following the previous process to turn off your VM and log into the server.
Open your server manager/Select “Local Server”/Click “Tools” and select “Computer Management.” Now, Open “Disk Manager” on your Virtual Machine. You will see your current C: Drive Partition and along with an Unallocated Partition with the amount of hard disk space that you created earlier.

This is the output of the expanded size as Unallocated space while Expanding a VM Hard Disk in Hyper-V 2012
In conclusion, to finalize your expansion, you will need to complete your expansion with the following:
Right-click on the volume you want to extend (in this case, C:\ Partition) and select “Extend Volume.” This will open up the Wizard screen for your extended volume and follow the on-screen instructions to complete the process.
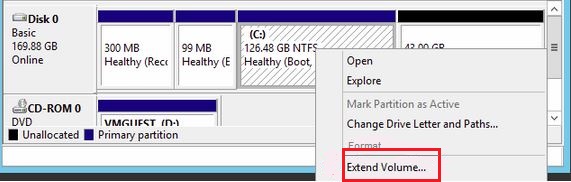
Select the Extend option while
Expanding a VM Hard Disk in Hyper-V 2012
Congratulations! You have just extended your VM’s Hard Disks in Hyper-V 2012. Thank you for following along in this How-To, and feel free to check back with us for any new updates or take a look at the many services we offer, including VPS hosting and dedicated server hosting.
Get a $250 Credit and Access to Our Free Tier!
Free Tier includes:
G3.2GB Cloud VPS a Free to Use for One Year
50 GB of Block Storage Free to Use for One Year
50 GB of Snapshots Free to Use for One Year