How to Multi-Master MySQL with Percona and Keepalived
September 21, 2015 by Editorial Team ( 450 ) under VPS Hosting
0 Comments
Introduction
This how-to article will walk you through the procedures for installing and maintaining a single-site multi-master MySQL cluster solution with load-balancing services. We will use Percona XtraDB Cluster Server as our base MySQL database platform, as it has all the necessary components and built-in support for an active/active, high-availability, and high-scalability open-source solution for MySQL clustering. It integrates Percona Server and Percona XtraBackup with the Galera library of MySQL high availability solutions in a single package, which enables you to create a cost-effective MySQL high availability cluster. We will be using Keepalived to handle the load-balancing.
Percona provides yum and apt repositories for Red Hat/CentOS and Ubuntu/Debian. These repositories include Percona Server, Percona XtraDB, Percona XtraBackup, and Percona Toolkit.
Keepalived is open-source routing software that provides load-balancing via LVS (Linux Virtual Server) and high availability via VRRP (Virtual Router Redundancy Protocol).
In This Article
- Prerequisites
- Outline of Packages and Configuration Steps
- Setup Diagram
- Step 1 - Basic Percona Server Preparation (Nodes #1 and #2)
- Step 2 - MySQL Node #1: Configuration
- Step 3 - MySQL Node #2: Configuration
- Step 4 - Keepalived Node #3: Installation from Repository
- Keepalived Node #3: (Optional) Compiling from Source
- Atlantic.Net
Prerequisites
Before we begin, we will need to have the following in place first.
- Three CentOS 6. x servers, all on the same local area network (LAN). (Two MySQL nodes and one load-balancing node.)
- MySQL servers should have at least 2GB of RAM to enable sync services.
- Three unique, secure passwords for the following MySQL users:
- MySQL root user
- SST (State Snapshot Transfer) services sync user (“sst-sync-user”)
- Keepalived user (“keepalived”)
- Secured CentOS 6. x firewall configuration (This item is a best practice recommendation and not strictly required. We use iptables in this guide, so if you use an alternate solution, adjust as necessary.)
Outline of Packages and Configuration Steps
- Essential Percona Server Preparation (Nodes #1 and #2)
- MySQL Node #1: Configuration
- MySQL Node #2: Configuration
- Keepalived Node #3: Installation from Repository
- Keepalived Node #3: (Optional) Compiling from Source
.
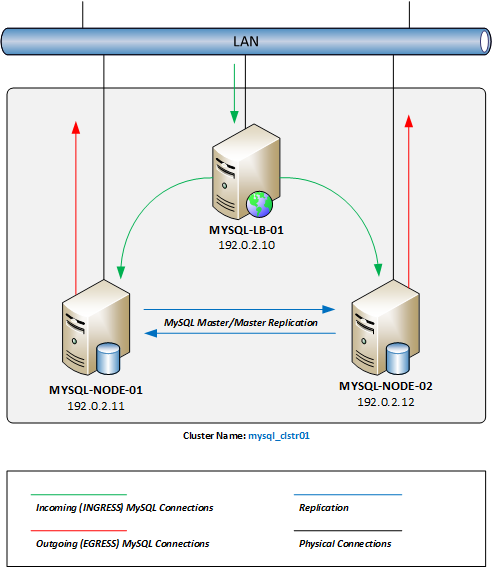
Setup Diagram
Below is a diagram of the expected results once we complete this article. Please remember that all IP addresses used within this article and the diagram are RFC 5737 – IPv4 Address Blocks Reserved for Documentation Purposes Only.
Step 1 – Basic Percona Server Preparation (Nodes #1 and #2)
First, we will ensure we are logged into your web server as the root user account.
sudo su -
Next, we will install the required Yum repositories to install and keep the Percona software packages updated easily.
yum install -y http://linux.mirrors.es.net/fedora-epel/6/i386/epel-release-6-8.noarch.rpm
yum install -y http://www.percona.com/downloads/percona-release/redhat/0.1-3/percona-release-0.1-3.noarch.rpm
yum clean all
yum update
- EPEL: Extra Packages for Enterprise Linux is a Fedora Special Interest Group that creates, maintains, and manages a high quality set of additional packages for Enterprise Linux.
- Percona: Percona XtraDB Software Repository.
.
We will disable SELinux (Security-Enhanced Linux kernel) since it conflicts with the Percona XtraDB cluster services. First, open the /etc/selinux/config configuration file with your text editor of choice (we’ll use Nano throughout this article).
nano /etc/selinux/config
Next, change the configuration variable SELINUX=enforcing to SELINUX=disabled, as below.
# This file controls the state of SELinux on the system.
# SELINUX= can take one of these three values:
#     enforcing - SELinux security policy is enforced.
#     permissive - SELinux prints warnings instead of enforcing.
#     disabled - No SELinux policy is loaded.
SELINUX=disabled
# SELINUXTYPE= can take one of these two values:
#     targeted - Targeted processes are protected,
#     mls - Multi Level Security protection.
SELINUXTYPE=targeted
Reboot your server for the change to take effect.
Suppose you are running the iptables firewall services (enabled by default on most CentOS 6. x installations). In that case, you must enable the required service ports on each node server to allow MySQL connectivity and sync services between the clustered nodes.
iptables -I INPUT 5 -m state --state NEW -m tcp -p tcp -m multiport --dports 4567:4568 -j ACCEPT
iptables -I INPUT 5 -m state --state NEW -m tcp -p tcp --dport 4444 -j ACCEPT
iptables -I INPUT 5 -m state --state NEW -m tcp -p tcp --dport 3306 -j ACCEPT
service iptables save
Note: These commands will insert each of these firewall rules right after the default INPUT rules, at line number 5. If you have made any changes to your iptables rules before this step, be sure to adjust these commands with the line numbers relevant to your iptables configuration. See our article on Basic IPTables if you need help or a refresher.
.
We are ready to install the Percona XtraDB Cluster packages on each MySQL server node.
yum install -y Percona-XtraDB-Cluster-56
Step 2 – MySQL Node #1: Configuration
First, be sure you have the MySQL user passwords (mentioned above in the prerequisites section) handy in the following steps.
Now, we will need to create the /etc/my.cnf configuration file with the clustering configuration settings.
nano /etc/my.cnf
Next, copy and paste these base configuration settings into our configuration file.
Note: In the “CLUSTER CONFIGURATION” and “STATE SNAPSHOT TRANSFER” sections below, you’ll need to substitute the values relevant to your network/configuration:
- wsrep_cluster_name – the cluster name must be the same across all nodes, but you may substitute your own naming convention.
- wsrep_cluster_address – use the IP addresses of each participating node (including this host). It must be preceded by “gcomm://”.)
- wsrep_node_address – use the IP address for this host.
- wsrep_node_name – you may substitute your own naming convention.
- wsrep_sst_auth – substitute the SST user account password from above after the username and colon in this field. You may also substitute your own naming convention for the SST user–just be sure to update the same username when adding the users to MySQL below.
.
[mysqld]

# GENERAL #
datadir	= /var/lib/mysql
user = mysql

# LOGGING #
# log-error = /var/log/mysql/error.log
# log-queries-not-using-indexes = 1
# slow-query-log = 1
# slow-query-log-file = /var/log/mysql/mysql-slow.log

# DATA STORAGE #
default_storage_engine = InnoDB
binlog_format = ROW

# CLUSTER CONFIGURATION #
wsrep_cluster_name = mysql_clstr01
wsrep_cluster_address = gcomm://192.0.2.11,192.0.2.12
wsrep_node_address = 192.0.2.11
wsrep_node_name = mysql-node-01
wsrep_provider = /usr/lib64/libgalera_smm.so

# STATE SNAPSHOT TRANSFER #
wsrep_sst_method = xtrabackup-v2
wsrep_sst_auth = "sst-sync-user:<%sst generated password%>"

# MyISAM Database Replication #
# MyISAM storage engine has only experimental support at this time. #
# wsrep_replicate_myisam = 1

# Settings / Tunning Options #
innodb_locks_unsafe_for_binlog = 1
innodb_autoinc_lock_mode = 2
# innodb_flush_log_at_trx_commit = 2
# innodb_flush_method = O_DIRECT
# innodb_file_per_table = 1
# innodb_buffer_pool_size = 1386971136
# innodb_buffer_pool_size = 6G
# innodb_log_file_size = 256M

# key_buffer = 208045670
# max_allowed_packet = 67108864
# thread_stack = 192K
# thread_cache_size = 10

# query_cache_limit = 1M
# query_cache_size = 16M
Many of these configuration settings are commented out. They are included if you want to tweak and debug database performance. When done, save the file and exit.
We are now ready to “bootstrap” the primary node in the cluster.
Bootstrapping refers to getting the initial cluster node initialized and running. By bootstrapping, we are defining which node has the initial information and which one all the other nodes should synchronize to (via SST). In the event of a cluster-wide crash (or shutdown), bootstrapping the primary node functions the same way. By picking the initial node, we decide which cluster node contains the database we want to proceed with.
Cluster membership is not defined by this setting, but is defined by the nodes that join the cluster with the proper
wsrep_cluster_namevariable setting.
.
/etc/init.d/mysql bootstrap-pxc
We will also want to ensure that we set the MySQL services to auto-start upon a server reboot.
chkconfig mysql on
Our first node database service is now operational.
We are now ready to secure your MySQL database installation. An initial MySQL database installation is not secured with a password by default. We will run the following command and follow the inline prompts to ensure our MySQL installation. During this process, we will be asked to enter a root password. Use the MySQL root password from above during this process. We can press Enter to accept the defaults for the remaining prompts to complete the secure installation.
/usr/bin/mysql_secure_installation
Now that we have secured our database server, we must set up several user accounts. The first account will be used for the SST synchronization services, and the second account will be used for the Keepalived service check script.
Log in to the MySQL CLI console.
mysql -u root -p
Next, we will need to create the user accounts and grant security permissions to the accounts.
CREATE USER 'sst-sync-user'@'localhost' IDENTIFIED BY '<%sst generated password%>';
GRANT RELOAD, LOCK TABLES, REPLICATION CLIENT ON *.* TO 'sst-sync-user'@'localhost';

CREATE USER 'keepalived'@'%' IDENTIFIED BY '<%keepalived generated password%>';
FLUSH PRIVILEGES;
We are now ready to set up this node to directly respond to MySQL connections received from the Keepalived load-balancing server. In a direct routing Linux Virtual Server (LVS) setup, the LVS router (your Keepalived server) must receive the incoming MySQL connection requests and then send them to the proper real server for processing. The actual servers will then need to communicate the response data directly to the client requesting the data. To configure direct routing, each real server must have the VIP (virtual IP) address configured on the host but not respond to ARP requests on the local network.
First, we will set up the server not to respond to any ARP requests for the VIP address.
echo "net.ipv4.conf.lo.arp_ignore = 1" >> /etc/sysctl.conf
echo "net.ipv4.conf.lo.arp_announce = 2" >> /etc/sysctl.conf

sysctl -p
Next, create a VIP address on the Loopback adapter. We’ll make the lo:1 interface configuration file and set it to auto-start on boot.
nano /etc/sysconfig/network-scripts/ifcfg-lo:1
Paste the following configuration into the interface configuration. Make sure to replace the example VIP address with the address you’ll be using.
DEVICE=lo:1
BOOTPROTO=static
ONBOOT=yes
IPADDR=192.0.2.10
NETMASK=255.255.255.255
We can bring up the VIP address once we have saved the configuration file.
ifup lo:1
Our first MySQL Cluster node is now completed.
Step 3 – MySQL Node #2: Configuration
Again, be sure you have the MySQL user passwords (mentioned above in the prerequisites section) handy in the following steps.
Now, we will need to create the /etc/my.cnf configuration file with the clustering configuration settings.
nano /etc/my.cnf
Next, copy and paste these base configuration settings into our configuration file.
Note: In the “CLUSTER CONFIGURATION” and “STATE SNAPSHOT TRANSFER” sections below, you’ll need to substitute the values relevant to your network/configuration:
- wsrep_cluster_name – the cluster name must be the same across all nodes, but you may substitute your own naming convention.
- wsrep_cluster_address – use the IP addresses of each participating node (including this host). It must be preceded by “gcomm://”.)
- wsrep_node_address – use the IP address for this host.
- wsrep_node_name – you may substitute your own naming convention.
- wsrep_sst_auth – substitute the SST user account password from above after the username and colon in this field. You may also substitute your own naming convention for the SST user–just be sure to update the same username when adding the users to MySQL below.
.
[mysqld]

# GENERAL #
datadir	= /var/lib/mysql
user = mysql

# LOGGING #
# log-error = /var/log/mysql/error.log
# log-queries-not-using-indexes = 1
# slow-query-log = 1
# slow-query-log-file = /var/log/mysql/mysql-slow.log

# DATA STORAGE #
default_storage_engine = InnoDB
binlog_format = ROW

# CLUSTER CONFIGURATION #
wsrep_cluster_name = mysql_clstr01
wsrep_cluster_address = gcomm://192.0.2.11,192.0.2.12
wsrep_node_address = 192.0.2.12
wsrep_node_name = mysql-node-02
wsrep_provider = /usr/lib64/libgalera_smm.so

# STATE SNAPSHOT TRANSFER #
wsrep_sst_method = xtrabackup-v2
wsrep_sst_auth = "sst-sync-user:<%sst generated password%>"

# MyISAM Database Replication #
# MyISAM storage engine has only experimental support at this time. #
# wsrep_replicate_myisam = 1

# Settings / Tunning Options #
innodb_locks_unsafe_for_binlog = 1
innodb_autoinc_lock_mode = 2
# innodb_flush_log_at_trx_commit = 2
# innodb_flush_method = O_DIRECT
# innodb_file_per_table = 1
# innodb_buffer_pool_size = 1386971136
# innodb_buffer_pool_size = 6G
# innodb_log_file_size = 256M

# key_buffer = 208045670
# max_allowed_packet = 67108864
# thread_stack = 192K
# thread_cache_size = 10

# query_cache_limit = 1M
# query_cache_size = 16M
Many of these configuration settings are commented out. They are included if you want to tweak and debug database performance. When done, save the file and exit.
We are now ready to start the second node in the cluster. We will also want to ensure that we set the MySQL services to auto-start upon a server reboot.
service mysql start
chkconfig mysql on
The second server starts synchronizing with the primary node during the initial startup. After a few minutes, our second node’s MySQL services will be operational.
As with the primary node, we will now set up this node to directly respond to MySQL connections received from the Keepalived load balancing server. First, we will set up the server not to respond to any ARP requests for the VIP address.
echo "net.ipv4.conf.lo.arp_ignore = 1" >> /etc/sysctl.conf
echo "net.ipv4.conf.lo.arp_announce = 2" >> /etc/sysctl.conf

sysctl -p
Next, we will create a VIP address on the Loopback adapter. Create the lo:1 interface configuration file and set it to auto-start on boot.
nano /etc/sysconfig/network-scripts/ifcfg-lo:1
Paste the following configuration into the interface configuration file. Make sure to replace the example VIP address with the address you’ll be using.
DEVICE=lo:1
BOOTPROTO=static
ONBOOT=yes
IPADDR=192.0.2.10
NETMASK=255.255.255.255
We can bring up the VIP address once we have saved the configuration file.
ifup lo:1
Our second MySQL Cluster node is now completed.
We are now going to validate that both servers are operational and synchronized. From each node, execute the following command (we’ll need our MySQL root password):
mysql -h localhost -u root -p -e "SHOW STATUS;" | grep "wsrep_ready"
We should receive the response “ON”. The node is not a cluster member if we receive any other answer.
Step 4 – Keepalived Node #3: Installation from Repository
This section covers installing Keepalived from the CentOS repository. This version of Keepalived trails several iterations behind the most recent version. While it will work for simple deployments, if you think you might need the latest version and the support fixes it offers (such as improved support for IPv6 and VRRPv3, for example), look at their changelog. Instructions for compiling the latest version from the source are included below.
First, you must allow MySQL connectivity if you are running the iptables firewall services (enabled by default on most CentOS 6. x installations).
iptables -I INPUT 5 -m state --state NEW -m tcp -p tcp --dport 3306 -j ACCEPT
service iptables save
Note: These commands will insert each of these firewall rules right after the default INPUT rules, at line number 5. If you have made any changes to your iptables rules before this step, be sure to adjust these commands with the line numbers relevant to your iptables configuration. See our article on Basic IPTables if you need help or a refresher.
.
Now, we can install the Keepalived package.
yum install keepalived
Next, we are going to create a new /etc/keepalived/keepalived.conf configuration file. You can delete the default configuration that is installed, or you can move it to a backup file for later reference if you would like. In this example, we will be moving it to a backup file.
mv /etc/keepalived/keepalived.conf /etc/keepalived/keepalived.conf.bak
nano /etc/keepalived/keepalived.conf
Now copy and paste the below configuration into the keepalived.conf file.
Be sure to replace the example IP addresses below with the virtual and real IP addresses you configured in the steps above. Also, you’ll need to add your keepalived user password from above where indicated.
.
! Configuration File for keepalived

global_defs {
   router_id LVS_MYSQL_CLSTR1
}

### VRRP Virtual IP Configuration
vrrp_instance VI_1 {
    state MASTER
    interface eth0
    virtual_router_id 51
    priority 100
    advert_int 1
    authentication {
        auth_type PASS
        auth_pass keepalived
    }
    virtual_ipaddress {
        192.0.2.10
    }
}

### LVS Configuration
virtual_server 192.0.2.10 3306 {
  delay_loop 2

  ## LB Mode : Round-Robin
  lb_algo rr

  ## Direct Routing Response
  lb_kind DR

  protocol TCP

 # Real Server to add when all real_servers are down
 # sorry_server <IPADDR> <PORT>

  real_server 192.0.2.11 3306 {
    weight 10
        MISC_CHECK {
                misc_path "/etc/keepalived/check_scripts/check_db 192.0.2.11 keepalived <%keepalived password%>"
                misc_timeout 5
                misc_dynamic
        }
  }

  real_server 192.0.2.12 3306 {
    weight 10
        MISC_CHECK {
                misc_path "/etc/keepalived/check_scripts/check_db 192.0.2.12 keepalived <%keepalived password%>"
                misc_timeout 5
                misc_dynamic
        }
  }
}
We are now going to create the MISC_CHECK script this configuration invokes (it does not exist by default). First, we will make the directory, then the script file, and set the file mode to executable.
mkdir -p /etc/keepalived/check_scripts
touch /etc/keepalived/check_scripts/check_db
chmod +x /etc/keepalived/check_scripts/check_db

nano /etc/keepalived/check_scripts/check_db
Now, copy and paste the bash code below into the file. check_db.
#!/bin/bash

mysql_host="${1}";
mysql_user="${2}";
mysql_pass="${3}";

node_response=$(mysql -h ${mysql_host} -u ${mysql_user} -p${mysql_pass} -e "SHOW GLOBAL VARIABLES;" | grep "wsrep_node_address" | awk '{ print $2 }');

if [ "${node_response}" == "${mysql_host}" ]
then
        # echo "Hostname matched";
        exit 0;
else
        # echo "Hostname not matched";
        exit 1;
fi
Save the file and exit.
We are now ready to start the Keepalived services. We’ll also set them to auto-start upon a system reboot.
chkconfig keepalived on
/etc/init.d/keepalived start
Our Keepalived server is now operational. Please review the user guide for in-depth instructions on customizing your Keepalived configuration.
We should now have a fully functional Multi-Master MySQL Cluster with a single VIP for connectivity. We can point client connections to our VIP address (192.0.2.10), and the connection will be passed to each real server in our cluster in round-robin mode.
Because we used Keepalived with a VRRP VIP configuration, you can easily add a second Keepalived server to the network to provide full redundancy of your Load-Balancer setup and MySQL Cluster.
Keepalived Node #3: (Optional) Compiling from Source
If we want the latest version of Keepalived, we must install the necessary tools to build the Keepalived package from the source.
yum install -y kernel-headers kernel-devel gcc make popt-devel openssl-devel ipvsadm net-snmp-devel git mysql;
- popt-devel : Used for command line parsing
- OpenSSL : This library is needed for MD5 and SSL Support
- ipvsadm : Used to maintain or inspect the virtual server table in the Linux kernel
- net-snmp : Provides SNMP monitoring
.
With the dependencies now in place, we must download the most recent version of the source code. We can find the most current version on the Keepalived.org download page or use the GIT Repository to download the latest build. We will be using the GIT repository for this installation.
mkdir -p /tmp/keepalived
git clone https://github.com/acassen/keepalived.git /tmp/keepalived
cd /tmp/keepalived
Now that the source code is downloaded and extracted, we are ready to compile the Keepalived package for our Linux kernel.
./configure --enable-snmp
make
make install
After each command, we should double-check the output to ensure no errors during each process. Once everything compiles correctly, we will create the necessary symlinks.
ln -s /usr/local/etc/sysconfig/keepalived /etc/sysconfig/
ln -s /usr/local/etc/rc.d/init.d/keepalived /etc/init.d/
ln -s /usr/local/etc/keepalived/ /etc/keepalived
Next, we need to update the /etc/init.d/keepalived startup script to call the correct path for the daemon.
nano /etc/init.d/keepalived
Replace the application call line daemon keepalived with the full way to the application, as below.
#!/bin/sh
#
# Startup script for the Keepalived daemon
#
...
start() {
    echo -n $"Starting $prog: "
    daemon /usr/local/sbin/keepalived ${KEEPALIVED_OPTIONS}
    RETVAL=$?
    echo
    [ $RETVAL -eq 0 ] && touch /var/lock/subsys/$prog
}
...
Now, we should be able to start the Keepalived daemon and resume configuration as above.
Atlantic.Net
Atlantic.Net offers VPS hosting and managed server hosting services, including a layer of business-essential managed services to your hosting packages. Contact us today for more information.
Get a $250 Credit and Access to Our Free Tier!
Free Tier includes:
G3.2GB Cloud VPS a Free to Use for One Year
50 GB of Block Storage Free to Use for One Year
50 GB of Snapshots Free to Use for One Year