# How to Install OpenNMS on Fedora
> URL: https://www.atlantic.net/vps-hosting/how-to-install-opennms-on-fedora/ | Published: 2023-06-30 | Updated: 2023-11-18 | Author: Hitesh Jethva
OpenNMS, also called “Open Network Management System,” is a free and cross-platform network management platform for Linux and Windows-based operating systems. It is a Java-based tool designed to monitor critical services on remote machines via SNMP and JMX. OpenNMS comes with a web-based console that helps you to monitor and administer networks and applications.
In this tutorial, we will show you how to install OpenNMS on Fedora.
## Step 1 – Install Java JDK
OpenNMS is based on Java, so you will need to install the Java JDK on your server. You can install it with the following command.
```
dnf install java-11-openjdk
```
After the successful installation, you can verify the Java installation with the following command.
```
java --version
```
Output.
```
openjdk 11.0.15 2022-04-19
OpenJDK Runtime Environment 18.9 (build 11.0.15+10)
OpenJDK 64-Bit Server VM 18.9 (build 11.0.15+10, mixed mode, sharing)
```
## Step 2 – Install and Configure PostgreSQL Database
OpenNMS uses PostgreSQL as a database backend, so you will need to install and configure PostgreSQL to your server.
First, disable the default PostgreSQL repo and enable the PostgreSQL 14 repo with the following command.
```
dnf module reset postgresql -y
dnf module enable postgresql:14
```
Next, install the PostgreSQL server with the following command.
```
dnf install postgresql-server postgresql
```
Next, initialize the PostgreSQL database using the following command.
```
postgresql-setup --initdb
```
Next, start and enable the PostgreSQL service with the following command.
```
systemctl enable --now postgresql
```
Next, log in to PostgreSQL:
```
su - postgres
psql
```
Create a database and user for OpenNMS with the following command.
```
create user opennms;
create database opennms owner opennms;
grant all privileges on database opennms to opennms;
```
Next, set OpenNMS and Postgres password with the following command.
```
ALTER USER opennms WITH ENCRYPTED password 'secure_password';
ALTER USER postgres WITH PASSWORD 'secure_password';
```
Finally, exit from the PostgreSQL shell with the following command.
```
\q
exit
```
Next, edit the PostgreSQL configuration file.
```
nano /var/lib/pgsql/data/pg_hba.conf
```
Find the following lines:
```
host all all 127.0.0.1/32 ident
host all all ::1/128 ident
```
And replace them with the following lines:
```
host all all 127.0.0.1/32 md5
host all all ::1/128 md5
```
Save and close the file, then reload PostgreSQL to implement the changes.
```
systemctl reload postgresql
```
## Step 3 – Install and Configure OpenNMS
First, add the OpenNMS repo and import the GPG key using the following command.
```
dnf -y install https://yum.opennms.org/repofiles/opennms-repo-stable-rhel8.noarch.rpm
rpm --import https://yum.opennms.org/OPENNMS-GPG-KEY
```
Next, install the OpenNMS package with the following command.
```
dnf install opennms -y
```
Next, edit the OpenNMS database configuration file.
```
nano /opt/opennms/etc/opennms-datasources.xml
```
Define your database details as shown below.
```
```
Save and close the file, then run the following command to detect the Java environment.
```
/opt/opennms/bin/runjava -s
```
Output:
```
runjava: Looking for an appropriate JVM...
runjava: Checking for an appropriate JVM in JAVA_HOME...
runjava: Skipping... JAVA_HOME not set.
runjava: Checking JVM in the PATH: "/usr/lib/jvm/java-11-openjdk-11.0.15.0.10-1.fc34.x86_64/bin/java"...
runjava: Found an appropriate JVM in the PATH: "/usr/lib/jvm/java-11-openjdk-11.0.15.0.10-1.fc34.x86_64/bin/java"
runjava: Value of "/usr/lib/jvm/java-11-openjdk-11.0.15.0.10-1.fc34.x86_64/bin/java" stored in configuration file.
```
Next, complete the OpenNMS setup using the following command.
```
/opt/opennms/bin/install -dis
```
Output:
```
Processing SystemIDMigratorOffline: Updates OpenNMS system ID to a random UUID.
- Running pre-execution phase
- Running execution phase
- Saving the execution state
- Running post-execution phase
Finished in 0 seconds
Upgrade completed successfully!
Start OpenNMS Service
```
Now, start the OpenNMS service and enable it to start at system reboot with the following command.
```
systemctl start opennms
systemctl enable opennms
```
You can now check the status of OpenNMS with the following command.
```
systemctl status opennms
```
Output:
```
● opennms.service - OpenNMS server
Loaded: loaded (/usr/lib/systemd/system/opennms.service; disabled; vendor preset: disabled)
Active: active (running) since Sat 2023-05-20 00:44:49 EDT; 2s ago
Process: 6347 ExecStart=/opt/opennms/bin/opennms -s start (code=exited, status=0/SUCCESS)
Process: 7330 ExecStartPost=/bin/sleep 3 (code=exited, status=0/SUCCESS)
Main PID: 7329 (java)
Tasks: 44 (limit: 4666)
Memory: 313.7M
CPU: 21.271s
CGroup: /system.slice/opennms.service
├─7328 bash /opt/opennms/bin/opennms -s start
└─7329 /usr/lib/jvm/java-11-openjdk-11.0.15.0.10-1.fc34.x86_64/bin/java --add-modules=java.base,java.compiler,java.datatransfer,java.desktop,java.instrume>
```
## Step 4 – Access OpenNMS Web UI
At this point, OpenNMS is started and listening on port 8980. You can verify it with the following command.
```
ss -antpl | grep 8980
```
Output.
```
LISTEN 0 50 *:8980 *:* users:(("java",pid=7329,fd=1197))
```
Now, open your web browser and access the OpenNMS web interface using the URL **http://your-server-ip:8980/opennms.** You should see the OpenNMS login page.

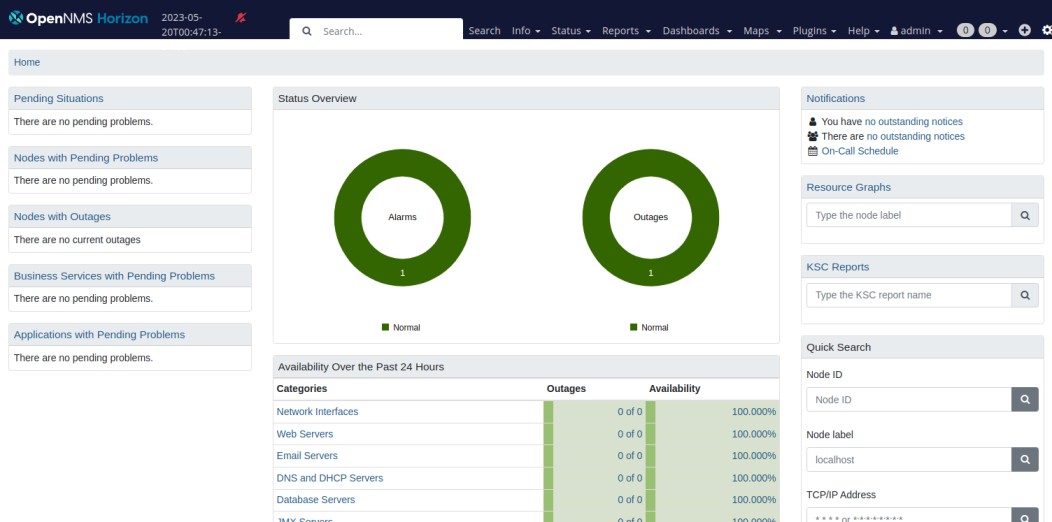
Provide the default username and password as **admin/admin** then click on the **LOGIN** button. You should see the OpenNMS dashboard on the following screen.
## Conclusion
In this post, we explained how to install OpenNMS on Fedora. I hope you have now enough knowledge to install and set up OpenNMS in your environment easily. You can now install OpenNMS on [VPS hosting](https://www.atlantic.net/vps-hosting/) from Atlantic.Net!