OpenShift is an open-source PaaS platform that allows you to deploy an application on the cloud. It supports many programming languages including, Python, PHP, Perl, Node.js, Ruby, and Java. It is extensible so you can add support for other languages. It is specially designed for a high-availability and scalable application platform. It provides an easy way to scale your application as per your demand with zero downtime. It provides a powerful web UI that helps you to monitor container resources, container health, and the IP address of nodes.
In this post, we will show you how to set up a local OpenShift Origin (OKD) cluster on CentOS 7.
Step 1 – Install Docker
First, you will need to install Docker on the host system to run the OpenShift container. By default, the latest version of Docker is not included in CentOS 7, so you will need to add the Docker repo to your system.
First, install the required dependencies using the following command:
yum install yum-utils device-mapper-persistent-data lvm2 -y
Once all the dependencies are installed, add a Docker repo with the following command:
yum-config-manager --add-repo https://download.docker.com/linux/centos/docker-ce.repo
Once the Docker repo is added, you can install the Docker using the following command:
yum install docker-ce docker-ce-cli containerd.io -y
Once Docker is installed, verify the Docker version with the following command:
docker -v
Output:
Docker version 20.10.5, build 55c4c88
Step 2 – Configure Docker
Next, you will need to configure the Docker daemon with an insecure registry parameter.
First, create required directories using the following command:
mkdir /etc/docker /etc/containers
Next, create a registry file with the following command:
nano /etc/containers/registries.conf
Add the following lines:
[registries.insecure]
registries = ['172.30.0.0/16']
Next, create a daemon file:
nano /etc/docker/daemon.json
Add the following lines:
{
   "insecure-registries": [
     "172.30.0.0/16"
   ]
}
Save and close the file, then reload the systemd daemon and start the Docker service with the following command:
systemctl daemon-reload
systemctl start docker
Next, enable the IP forwarding with the following command:
echo "net.ipv4.ip_forward = 1" | tee -a /etc/sysctl.conf
sysctl -p
Step 3 – Install OpenShift
First, download the latest version of OpenShift with the following command:
wget https://github.com/openshift/origin/releases/download/v3.11.0/openshift-origin-client-tools-v3.11.0-0cbc58b-linux-64bit.tar.gz
Once the download is completed, extract the downloaded file with the following command:
tar xvf openshift-origin-client-tools*.tar.gz
Next, change the directory to the extracted directory and copy the required binaries with the following command:
cd openshift-origin-client*/
mv  oc kubectl  /usr/local/bin/
Next, verify the version of OpenShift client utility.
oc version
Output:
oc v3.11.0+0cbc58b
kubernetes v1.11.0+d4cacc0
features: Basic-Auth GSSAPI Kerberos SPNEGO
Step 4 – Start OpenShift Origin Cluster
Next, start the OpenShift cluster using the following command:
oc cluster up --public-hostname=your-server-ip --routing-suffix=your-server-ip.nip.io
Once the installation has been completed, you should get the following output:
OpenShift server started.

The server is accessible via web console at:
    https://your-server-ip:8443

You are logged in as:
    User:     developer
    Password:

To login as administrator:
    oc login -u system:admin
Step 5 – Working with OpenShift Origin Cluster
You can log in to the OpenShift cluster using the following command:
oc login -u system:admin
You should get the following output:
Logged into "https://your-server-ip:8443" as "system:admin" using existing credentials.


You have access to the following projects and can switch between them with 'oc project ':

    default
    kube-dns
    kube-proxy
    kube-public
    kube-system
  * myproject
    openshift
    openshift-apiserver
    openshift-controller-manager
    openshift-core-operators
    openshift-infra
    openshift-node
    openshift-service-cert-signer
    openshift-web-console

Using project "myproject".
You can now check the node status using the following command:
oc get nodes -o wide
You should get the following output:
NAME        STATUS    ROLES     AGE       VERSION           INTERNAL-IP    EXTERNAL-IP   OS-IMAGE                KERNEL-VERSION                CONTAINER-RUNTIME
localhost   Ready         3m        v1.11.0+d4cacc0   your-server-ip           CentOS Linux 7 (Core)   3.10.0-1127.10.1.el7.x86_64   docker://20.10.5
Step 6 – Create a New Project
Next, you will need to create a new project on OpenShift cluster. First, log in to the cluster with the following command:
oc login
Provide your developer login credentials as shown below:
Authentication required for https://your-server-ip:8443 (openshift)
Username: developer
Password:
Login successful.

You have one project on this server: "myproject"

Using project "myproject".
Next, create a new project with the following command:
oc new-project dev --display-name="MyProject - Dev" --description="My-Project"
You should see the following output:
Now using project "dev" on server "https://your-server-ip:8443".

You can add applications to this project with the 'new-app' command. For example, try:

    oc new-app centos/ruby-25-centos7~https://github.com/sclorg/ruby-ex.git

to build a new example application in Ruby.
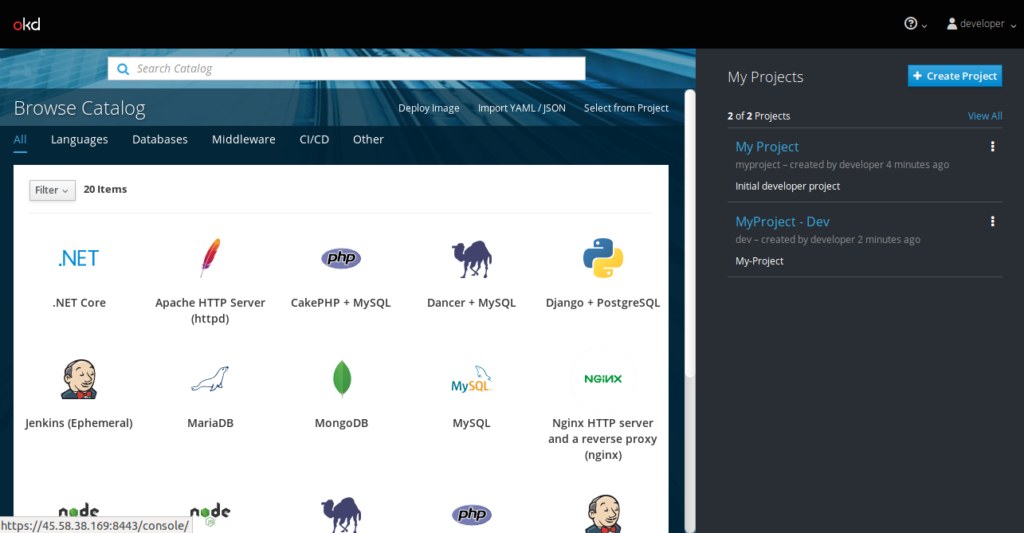
Step 7 – Access OpenShift Cluster
At this point, the OpenShift cluster is running and listening on port 8443. You can access it using the URL https://your-server-ip:8443/console/. You will be redirected to the login page:

Provide the username as “developer” and the password as “developer,” then click on the Login button. You should see the OpenShift cluster dashboard on the following page:
Conclusion
In the above guide, you learned how to set up an OpenShift Cluster on CentOS 7. You can now deploy and scale your application on the OpenShift cluster on your dedicated server from Atlantic.Net.