Table of Contents
- OpenClaw (ClawdBot): Open-Source AI Agent — and How to Deploy It on Atlantic.Net Cloud
- What is OpenClaw?
- From ClawdBot to MoltBot to OpenClaw
- Why Deploy OpenClaw on Atlantic.Net Cloud?
- Supported AI Models
- Supported Communication Channels
- Tutorial: Deploying OpenClaw on Atlantic.Net Cloud
- Going Pro: 3 Neat Tricks to Try Immediately
- Final Thoughts
OpenClaw (ClawdBot): Open-Source AI Agent — and How to Deploy It on Atlantic.Net Cloud
OpenClaw is an AI agent gaining extensive attention across the technology sector. Over the past year, autonomous, task-executing assistants have gained popularity, including tools like Cursor and Codex. OpenClaw(formerly known as Moltbot and ClawdBot) serves as a primary example of this trend. What began as a niche, self-hosted tool has changed into the widely discussed open-source project in 2026.
In this guide, we’ll explore why OpenClaw (Clawdbot) is going viral and walk through how to deploy it securely on Atlantic.Net Cloud.
What is OpenClaw?
OpenClaw is an open-source autonomous agent framework designed to execute complex tasks through simple chat interfaces. Unlike standard chatbots that only provide text responses, OpenClaw can interact with your file system, execute code, and manage external APIs to act as a persistent digital helper. It serves as a bridge between high-level AI reasoning and practical, technical execution.
From ClawdBot to MoltBot to OpenClaw
OpenClaw originally entered the scene under the name ClawdBot. Just to confuse matters, it was called MoltBolt for about 1 week in January 2026. It was initially developed as a specialized wrapper for the Anthropic Claude models, designed to give the AI more “agency” over local environments. As the project grew to support various models and sophisticated integrations, the developers rebranded it to OpenClaw in late 2025 to reflect its ability to “molt” or shed its original limitations and change into a model-agnostic powerhouse.
Why Deploy OpenClaw on Atlantic.Net Cloud?
Running an always-on AI agent requires stability and connectivity that a home laptop can’t provide. Atlantic.Net is the ideal environment because:
- Always-On Availability: Your agent needs to be awake 24/7 to answer your commands.
- Performance: Our G3 instances handle the Node.js runtime and API handling effortlessly.
- Privacy: You retain full control. Unlike SaaS AI, OpenClaw runs on your server.
Supported AI Models
OpenClaw is “model agnostic,” meaning it can connect to almost any major AI provider, as well as run local models for privacy. For OpenClaw to work, it’s recommended that you have a subscription to an AI provider.
Major Cloud Providers:
- OpenAI: Supports GPT-4o, o1, and Codex (often used for the “Code” capabilities).
- Anthropic: Deep integration with Claude 3.5 Sonnet and Opus (OpenClaw “personality” is often optimized for Claude).
- AWS Bedrock: Access to models hosted on Amazon’s infrastructure.
- Google Cloud: via Vertex AI or Gemini models (often routed through open gateways).
Local & Open Source (Privacy-Focused):
- Ollama: Run models like Llama 3 or Mistral locally on your Atlantic.Net cloud server. This ensures the logic remains on your hardware, requiring internet access only for the interface.
- Local Inference: Supports other local backends compatible with OpenAI-like APIs.
Supported Communication Channels
OpenClaw can live inside almost any app you use to chat.
Primary (Best Support):
- Telegram: The most stable and recommended experience. Supports rich media, voice notes, and easy setup via API tokens.
- WhatsApp: Supports QR-code-based login (Multi-Device). Great for daily use, though slightly less stable than Telegram.
- Discord: Runs as a bot user; excellent for community management or group usage.
- Slack: Integrates as a workspace app.
Additional Integrations:
- iMessage: Requires a bridge running on macOS hardware.
- Signal: Prioritizes encrypted, privacy-first communication.
- Microsoft Teams: Designed for enterprise and corporate environments.
- Matrix: Built for decentralized, federated chat protocols.
- Mattermost: An open-source, self-hosted Slack alternative.
- Google Chat: Ideal for users deep in the Google Workspace ecosystem.
- Line: The dominant messenger in Japan and Southeast Asia; great for personal use in those regions.
- Zalo: The leading chat platform in Asia, fully supported for regional connectivity.
Tutorial: Deploying OpenClaw on Atlantic.Net Cloud
Prerequisites:
- An Atlantic.Net Cloud Account.
- An AI API Key – In this example, I will be using OpenAI Codex/GPT.
- A Telegram account (or any other account from the Supported Channels).
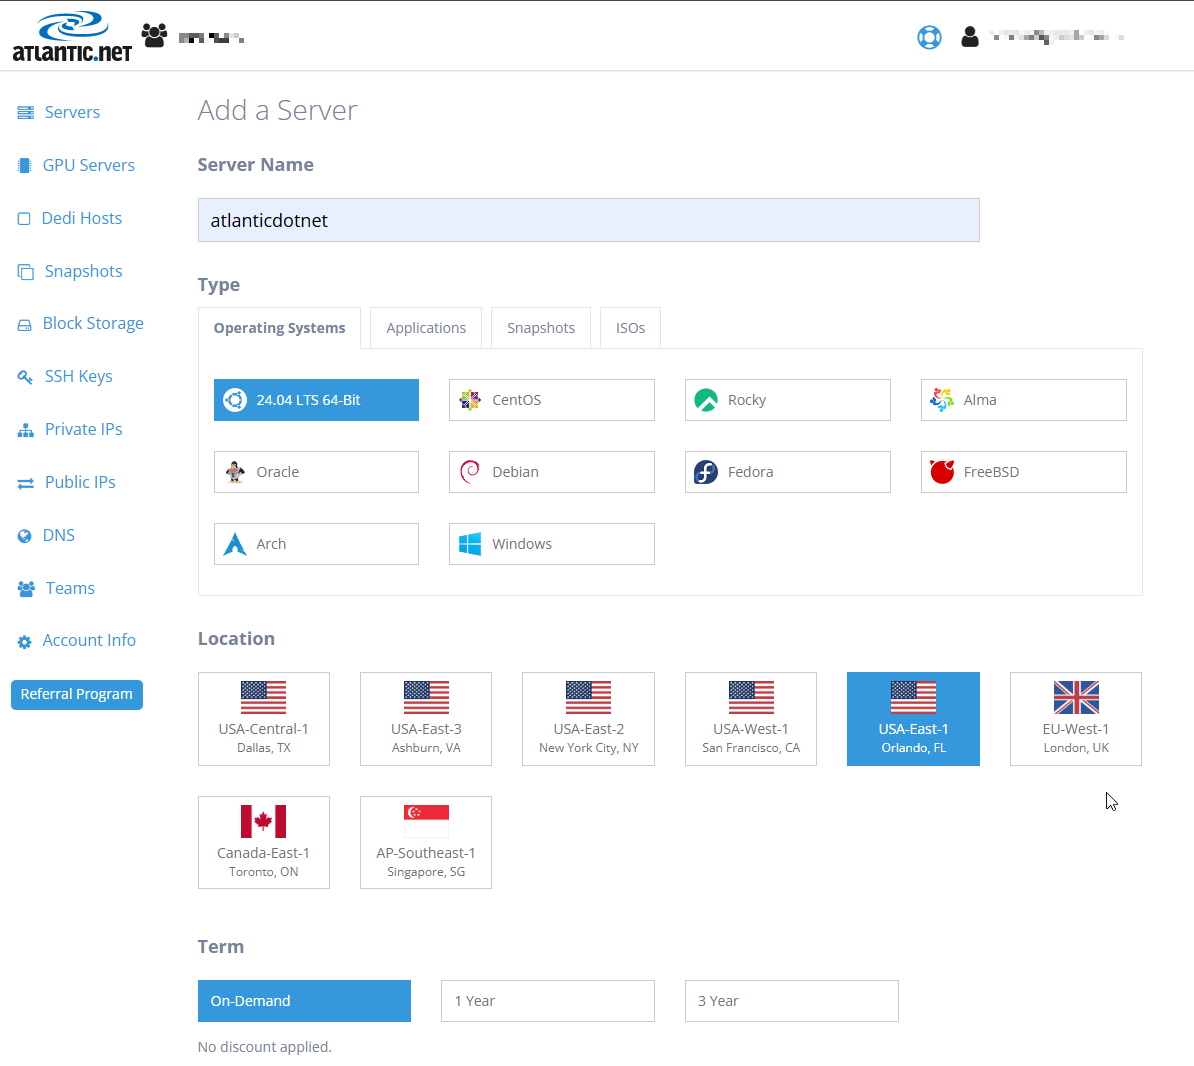
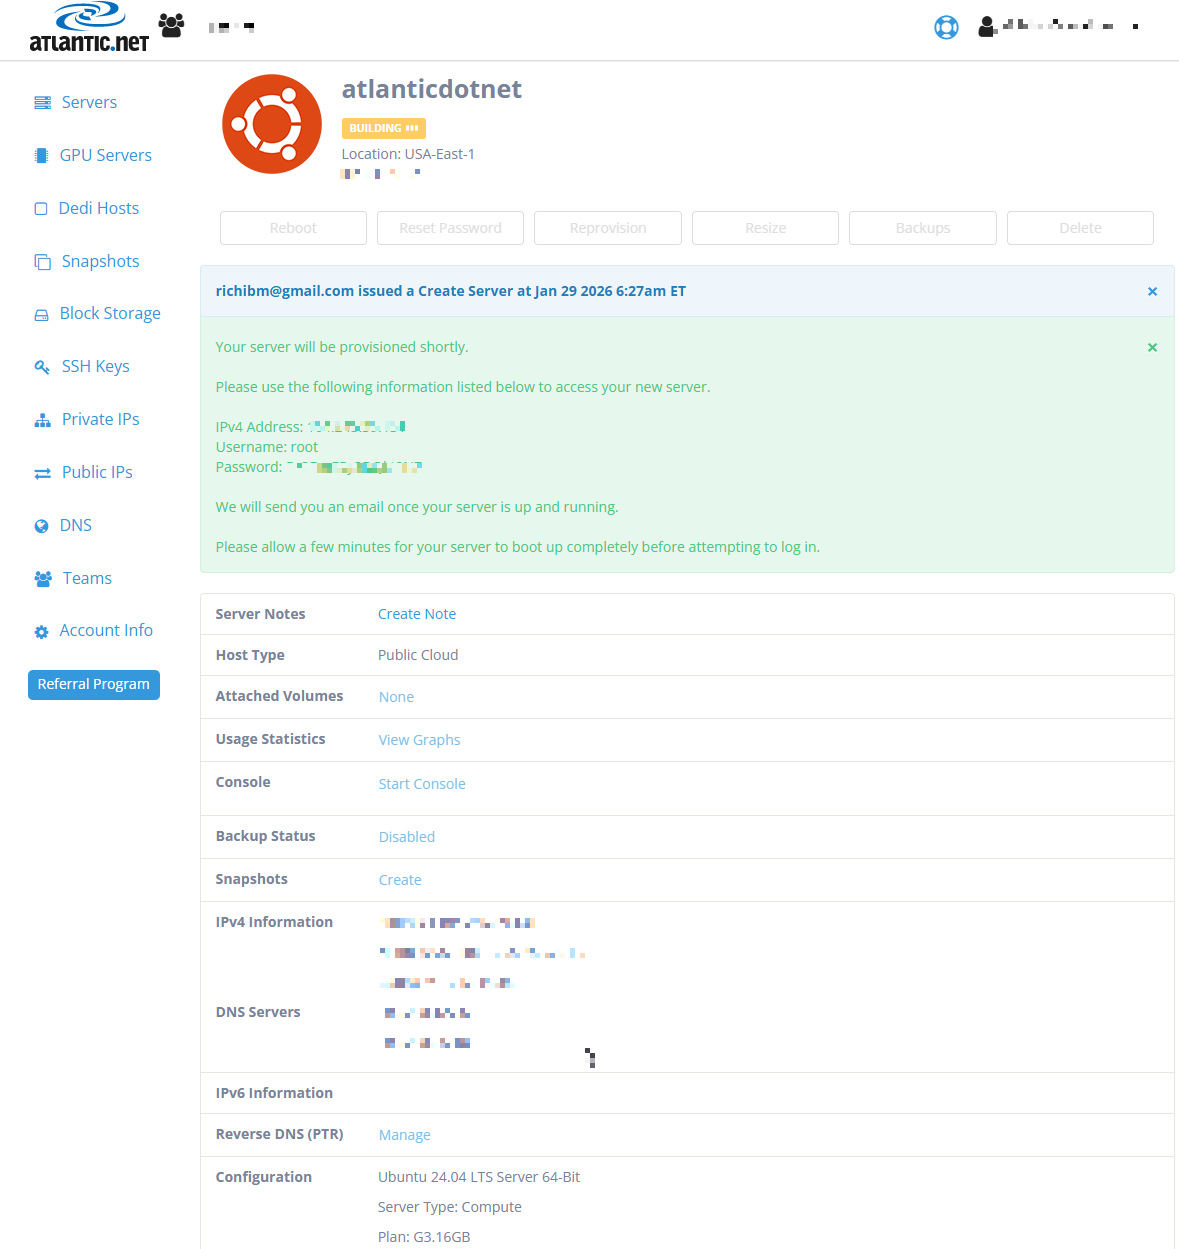
Step 1: Create a Cloud Server
- Log in to the Atlantic.Net Cloud Portal.
- Click Add Server.
- Location: Choose a region close to you (e.g., USA-East).
- Image: Select Ubuntu 24.04 LTS.
- Plan: The G3.4GB plan (2 vCPU, 4GB RAM) or higher is recommended.
- Click Create Server.
Step 2: Create a Secure User (Important)
Once connected via SSH (ssh root@<IP>), it is best practice to create a dedicated user so your AI doesn’t run with root privileges.
# Create a new user (replace 'moltuser' with your name) adduser moltuser # Grant sudo privileges usermod -aG sudo moltuser # Switch to the new user su - moltuser |
Step 3: Install Node.js 24 via NVM
OpenClaw requires Node.js 24. The most reliable way to handle this on a fresh Cloud Server is using NVM (Node Version Manager).
# Install NVM curl -o- https://raw.githubusercontent.com/nvm-sh/nvm/v0.40.3/install.sh | bash # Activate NVM (or close and reopen terminal) source ~/.bashrc # Install Node 24 nvm install 24 |
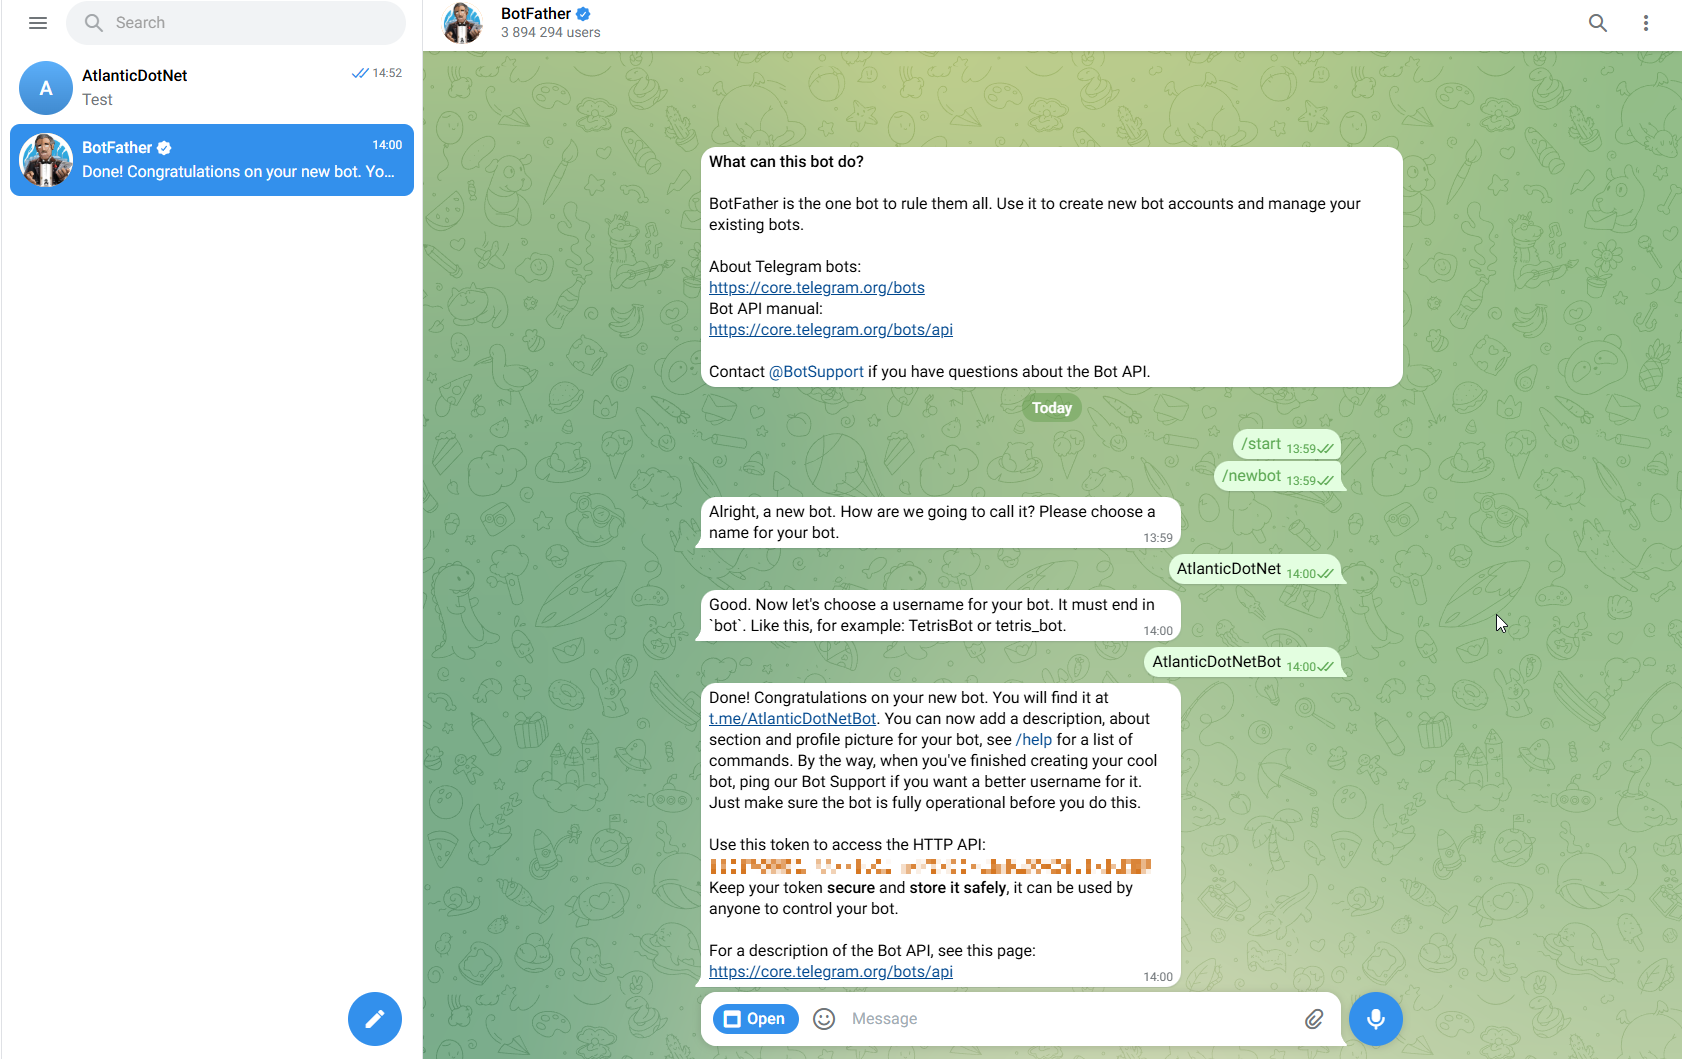
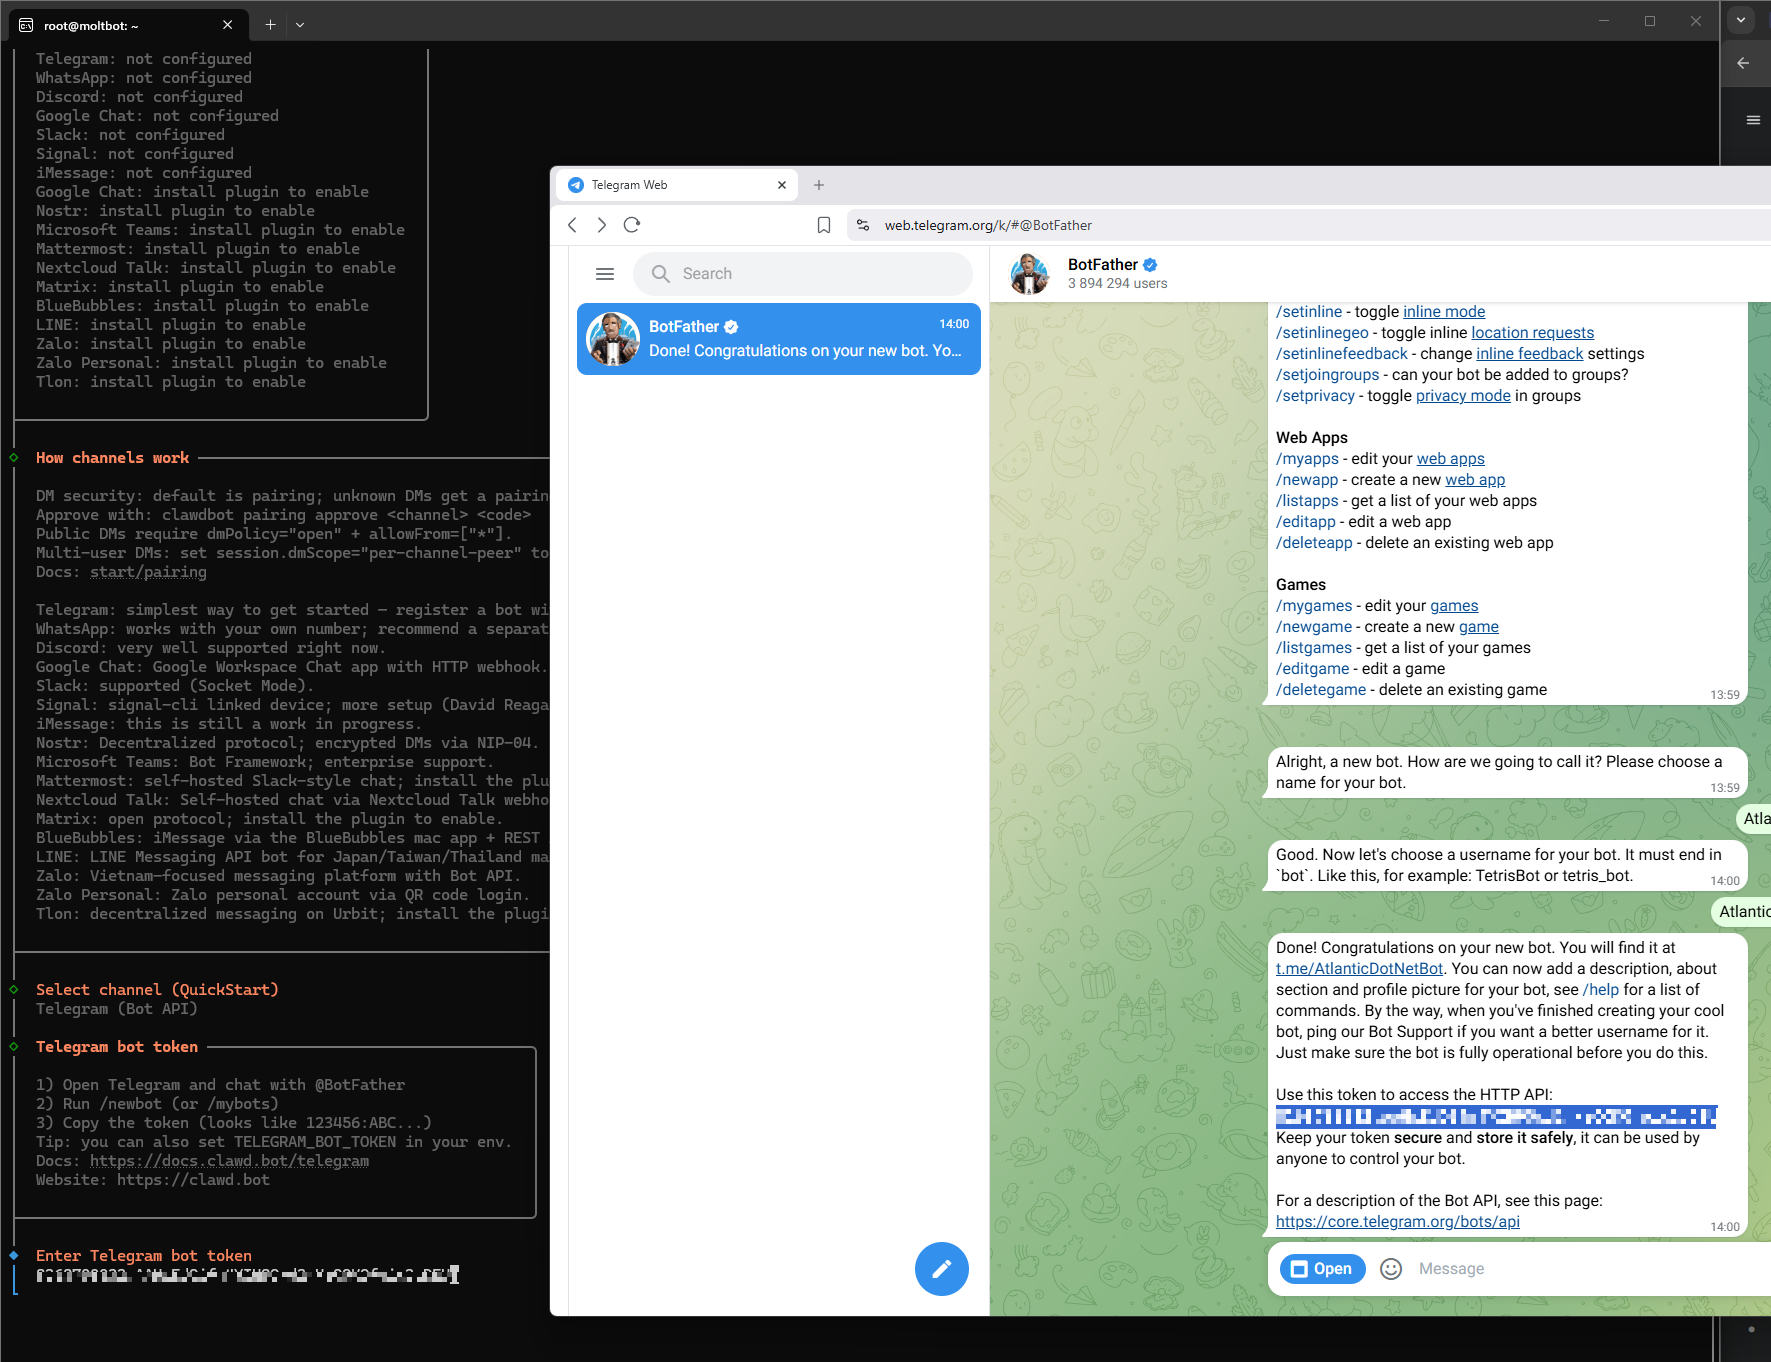
Step 4: Get Your Telegram Bot Token
Before installing OpenClaw , you need a “home” for it on Telegram.
- Open Telegram and search for @BotFather (the official bot builder).
- Send the message: /newbot
- Follow the prompts to name your bot (e.g., “MyAtlanticAgent”).
- Copy the API Token it gives you (it looks like 123456:ABC-DEF…).
Step 5: Install and Onboard OpenClaw
The Installation can be completed in two different ways. There is a quick Installer, but I recommend doing the manual installation so you have better granular controls, which also helps you to learn the UI.
Quick Installation
If you are in a hurry, run the official installer. This handles the heavy lifting, including setting up the background daemon automatically.
# Install the package curl -fsSL https://molt.bot/install.sh | bash # Run the setup wizard openclaw onboard --install-daemon |
Install OpenClaw Manually (via NPM) – Recommended
Instead of running an opaque installation script, we will use the Node Package Manager (NPM) to install OpenClaw directly from the official registry. This gives you clear visibility into exactly what is being installed.
Install the Package:
Run this command to download and install the latest version of the OpenClaw CLI globally:
npm install -g openclaw@latest |
Verify the Installation:
Check that the CLI is accessible:
openclaw --version |
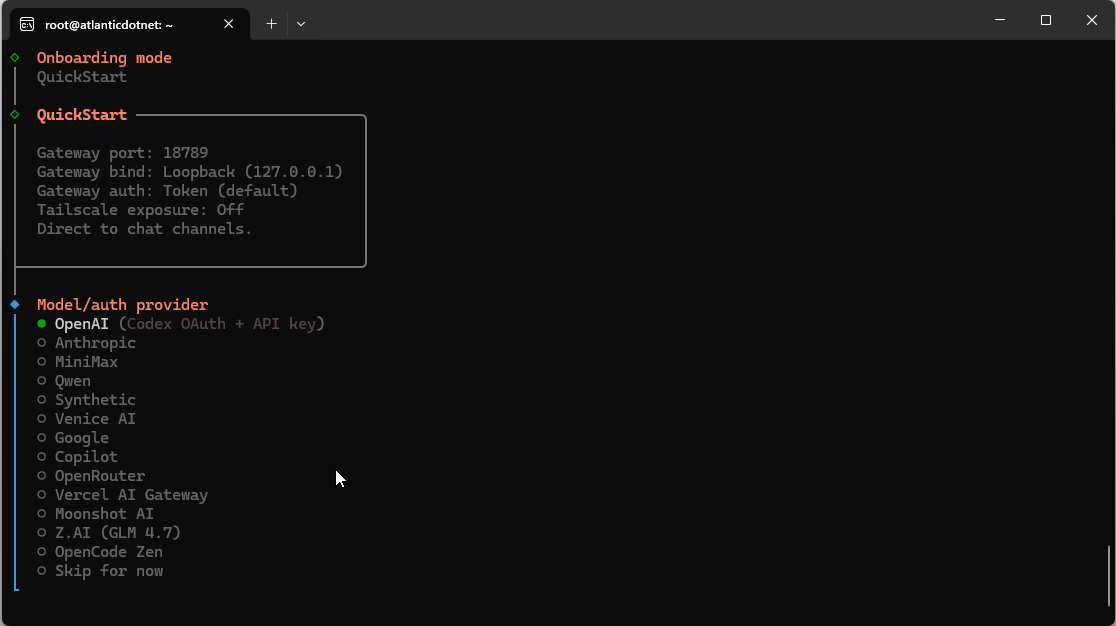
Run the Onboarding Wizard:
Now that the tool is installed, run the setup wizard to generate your configuration and set up the background service (daemon):
openclaw onboard --install-daemon |
Wizard Settings:
Authentication:
- Choose “OpenAI”
- Open the URL in your Browser
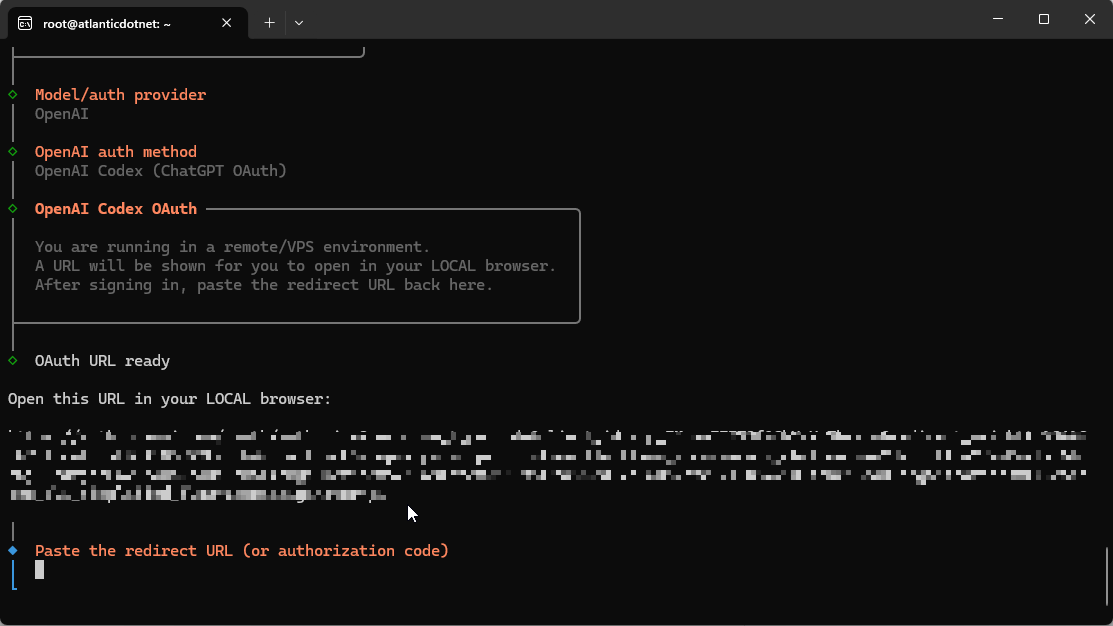
- Log in to your Codex/ChatGPT account
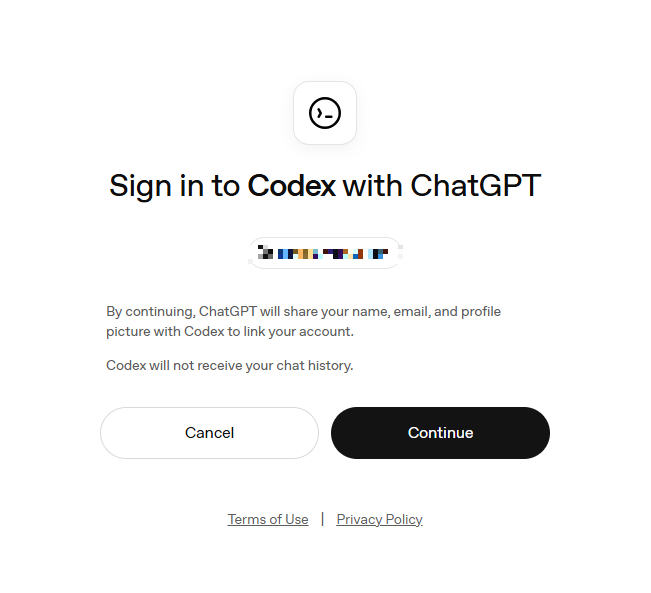
- Copy the URL callback code and paste it into OpenClaw

- Providers: Select Telegram.
- Telegram Token: Paste the token you got from BotFather in Step 4
- Runtime: Select Node.
Step 6: Security & Pairing
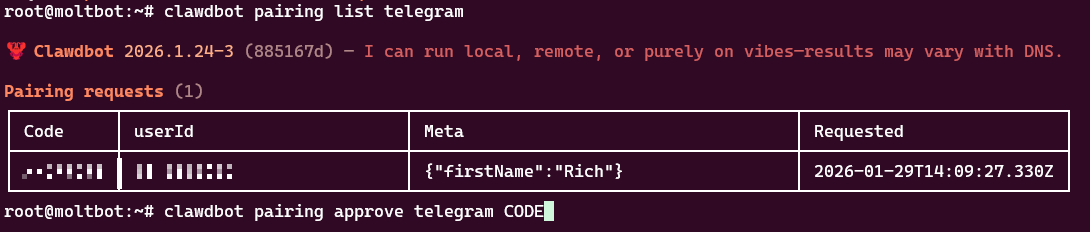
By default, OpenClaw ignores strangers. You must introduce yourself.
- Open your new bot in Telegram and send a Hello Message
- The bot will not reply, but it will register the attempt.
Back in your terminal, check the pending pairing list:
openclaw pairing list telegram |
Approve your user ID using the code displayed:
openclaw pairing approve telegram <YOUR_CODE> |
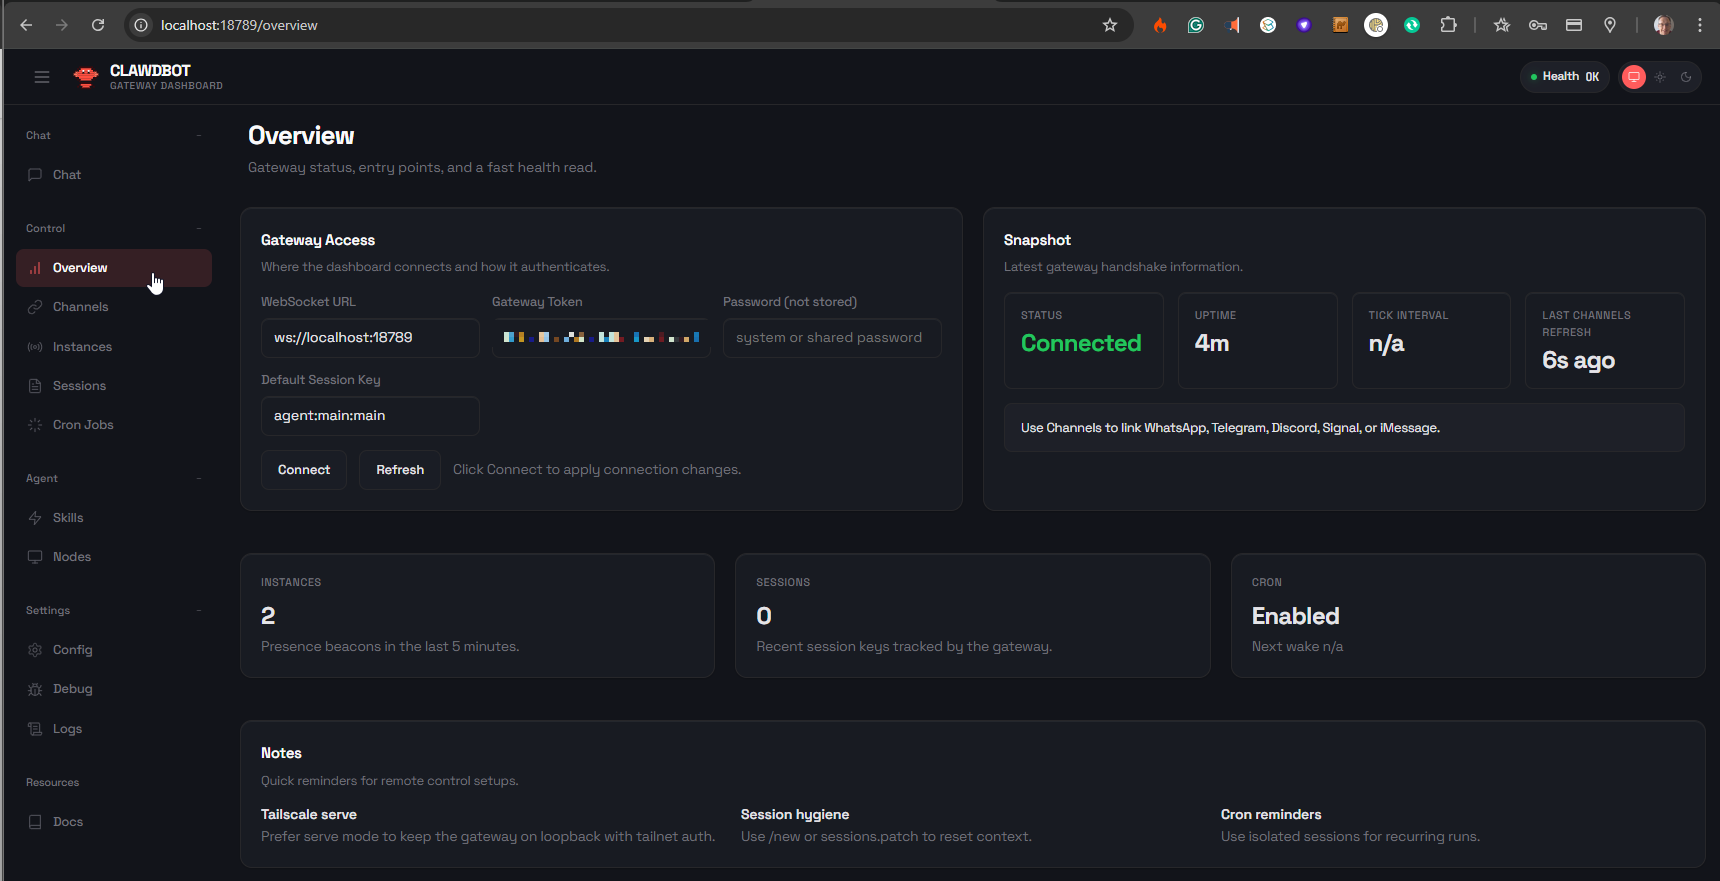
Step 7: Access the Dashboard Securely (SSH Tunnel)
Instead of opening port 18789 to the entire internet, we will use an SSH Tunnel. This allows you to view the OpenClaw dashboard on your local computer as if it were running there.
On your local machine (not the server), run:
ssh -N -L 18789:127.0.0.1:18789 moltuser@<YOUR_SERVER_IP> |
Note: This command will appear to “hang”—that means it’s working!
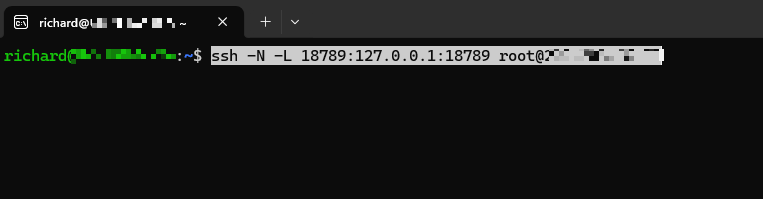
Now, open your browser and go to: http://localhost:18789/
Step 8: Define Your “Digital Twin” (USER.md)
Most users just chat with their bot and hope it remembers. But as a pro user, you can manually architect its brain.
OpenClaw looks at a specific file called USER.md to understand who you are before every single interaction. Instead of just chatting, we will inject a “System Prompt” for your life directly into this file.
Open the file for editing:
nano ~/clawd/USER.md |
Paste in a structured profile (Example below): This gives the bot immediate, structured context about your projects and preferences.
# User Profile: [Your Name] ## Core Identity I am a Senior DevOps Engineer at a fintech startup. I value brevity, clean code, and security above all else. When replying to me: Be direct. Do not use fluff. Use bullet points. ## Active Projects 1. **Project Alpha:** A migration from AWS to Atlantic.Net. - Stack: Terraform, Ansible, Ubuntu 24.04. - Current Status: Testing connectivity. 2. **Home Automation:** A Python script to control my lights. ## Preferences - **Coding:** Prefer Bash for scripts, Typescript for backend. CDK for IaC - **Schedule:** I am deep working from 9 AM to 12 PM. Do not disturb me unless the server is down. |
Save and Exit: Press Ctrl+O, Enter, then Ctrl+X. Your bot now instantly knows all of this context without you ever having to explain it in chat.
Going Pro: 3 Neat Tricks to Try Immediately
Now that your agent is running, here are three “Power User” features from the OpenClaw documentation that turn it from a chatbot into a proactive assistant.
1. The “Morning Briefing” (Heartbeat)
OpenClaw has a feature called “Heartbeat” that allows it to wake up and perform tasks even if you haven’t messaged it. You can use this to get a 7:00 AM briefing.
- Edit the heartbeat file:
- nano ~/clawd/HEARTBEAT.md |
Add a logic rule like this:
- Every morning at 07:00, check the weather in [Your City] and my Google Calendar. - Send me a WhatsApp summary of my day and any urgent emails. |
- Now, your agent will text you first thing in the morning.
2. Give It Internet Access (Brave Search)
By default, your bot can’t search the web. Give it “eyes” by adding the Brave Search API (which has a generous free tier).
Get a free API key from
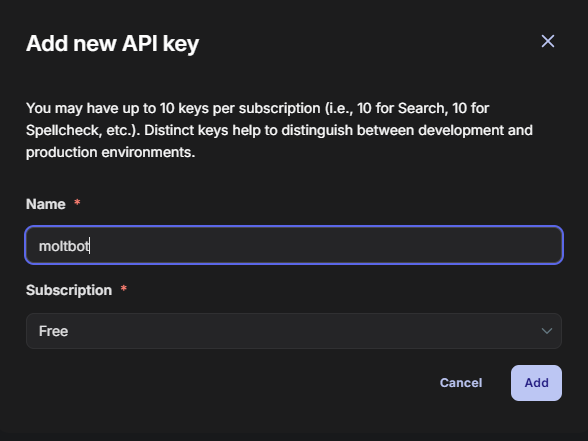
Run the configuration command:
openclaw configure --section web |
Paste your key. Now you can ask: “Search for the latest Atlantic.Net pricing and summarize it.”
3. Install New Skills
OpenClaw has a “Skill Store” of sorts. You can teach it to read PDFs, manage GitHub issues, or check stock prices.
List available skills:
openclaw skills list |
Install a skill (e.g., GitHub integration):
openclaw skills add github |
Final Thoughts
OpenClaw represents an interesting view of where AI might be heading: it’s open-source, runs on your terms, and lives on infrastructure you control. By deploying it on an Atlantic.Net Cloud Server, you ensure it has the high availability and compute power to run 24/7 without slowing down your personal laptop.
You now have a persistent, always-on digital employee. Treat it well, update its USER.md as your life changes, and enjoy the productivity boost!
* This post is for informational purposes only and does not constitute professional, legal, financial, or technical advice. Each situation is unique and may require guidance from a qualified professional.
Readers should conduct their own due diligence before making any decisions.