Nexus is a repository manager that is used for managing all dependencies required in your entire software development lifecycle. It provides a single source for all components and makes it easier to distribute your software. It can be integrated with the existing user and LDAP authentication. Currently, it is used by more than 100,000 organizations globally.
In this post, we will show you how to install the Nexus repository manager on Debian 12.
Step 1 – Install Java
Before starting, Java must be installed on your server.
First, update the repository index with the following command:
apt-get update -y
Next, install Java with the following command:
apt-get install default-jdk -y
Once Java has been installed, verify the Java version using the following command:
java -version
You should see the following output:
java --version
openjdk 17.0.16 2025-07-15
OpenJDK Runtime Environment (build 17.0.16+8-Debian-1deb12u1)
OpenJDK 64-Bit Server VM (build 17.0.16+8-Debian-1deb12u1, mixed mode, sharing)
Step 2 – Install Nexus Repository
First, add a user to run Nexus:
useradd -M -d /opt/nexus -s /bin/bash -r nexus
Next, install the Sudo package and allow nexus user to run all commands without providing Sudo password:
apt-get install sudo bash
echo "nexus   ALL=(ALL)       NOPASSWD: ALL" > /etc/sudoers.d/nexus
Next, go to Nexus website, get the download link and download the latest version of Nexus with the following command:
wget https://sonatype-download.global.ssl.fastly.net/repository/downloads-prod-group/3/nexus-3.83.0-08-linux-x86_64.tar.gz
Next, create a directory for Nexus and extract the downloaded file to /opt/nexus.
mkdir /opt/nexus
tar xzf nexus-3.83.0-08-linux-x86_64.tar.gz -C /opt/nexus --strip-components=1
Next, set proper ownership to the /opt/nexus directory with the following command:
chown -R nexus:nexus /opt/nexus
Step 3 – Configure Nexus Repository
Next, you will need to edit nexus.vmoptions file:
nano /opt/nexus/bin/nexus.vmoptions
Find the following lines:
-Xms2703m
-Xmx2703m
Replaced them with the following lines:
-Xms1024m
-Xmx1024m
Next, find the following lines:
-Dkaraf.data=../sonatype-work/nexus3
-Dkaraf.log=../sonatype-work/nexus3/log
-Djava.io.tmpdir=../sonatype-work/nexus3/tmp
Replaced them with the following lines:
-Dkaraf.data=./nexus3
-Dkaraf.log=./nexus3/log
-Djava.io.tmpdir=./nexus3/tmp
Save and close the file then edit /opt/nexus/bin/nexus file:
nano /opt/nexus/bin/nexus
Change the following line:
#!/bin/bash
run_as_user='nexus'
Save and close the file when you are finished.
Step 4 – Create a Systemd Service File for Nexus
Now, create a systemd service file for Nexus with the following command:
nano /etc/systemd/system/nexus.service
Add the following lines:
[Unit]
Description=nexus service
After=network.target

[Service]
Type=forking
LimitNOFILE=65536
ExecStart=/opt/nexus/bin/nexus start
ExecStop=/opt/nexus/bin/nexus stop
User=nexus
Restart=on-abort

[Install]
WantedBy=multi-user.target
Save and close the file, then reload the systemd daemon:
systemctl daemon-reload
Next, start the Nexus service and enable it to start at system reboot:
systemctl enable --now nexus.service
You can now check the status of Nexus with the following command:
systemctl status nexus
Output:
● nexus.service - nexus service
     Loaded: loaded (/etc/systemd/system/nexus.service; disabled; preset: enabled)
     Active: active (running) since Fri 2025-09-05 05:50:50 UTC; 2min 3s ago
    Process: 40363 ExecStart=/opt/nexus/bin/nexus start (code=exited, status=0/SUCCESS)
   Main PID: 40610 (java)
      Tasks: 73 (limit: 2304)
     Memory: 820.3M
        CPU: 1min 29.405s
     CGroup: /system.slice/nexus.service
             └─40610 /opt/nexus/jdk/temurin_17.0.13_11_linux_x86_64/jdk-17.0.13+11/bin/java -server -Dnexus.installer.type=linux-x86-64 -Xms1024m -Xmx1024m -XX:+Unlock>

Sep 05 05:50:50 debian systemd[1]: Starting nexus.service - nexus service...
Sep 05 05:50:50 debian nexus[40363]: Starting nexus
Sep 05 05:50:50 debian systemd[1]: Started nexus.service - nexus service.
At this point, Nexus is started and listen on port 8081. You can check it with the following command:
ss -antpl | grep :8081
You should see the following output:
LISTEN 0 50 0.0.0.0:8081 0.0.0.0:* users:(("java",pid=1547,fd=793))
Step 5 – Access Nexus Web Interface
Wait for some time to start the Nexus service, then print the Nexus admin password with the following command:
cat /opt/nexus/nexus3/admin.password
Output:
538fd664-215b-45ac-8cf3-e2a24a256a23
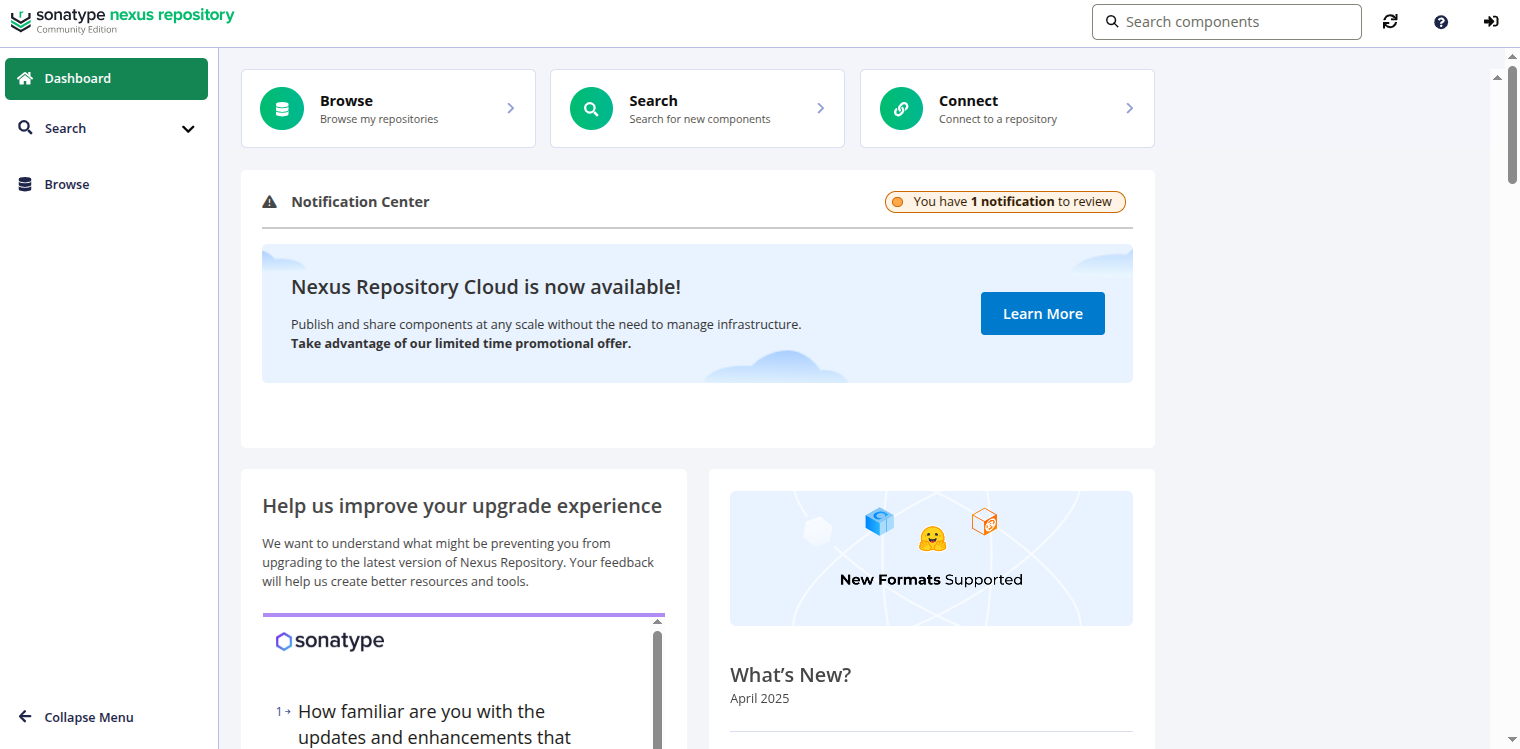
Now, open your web browser and access the Nexus web interface using the URL http://your-server-ip:8081. You should see the following page:
Click on the Sign In button. You should see the Nexus login page:
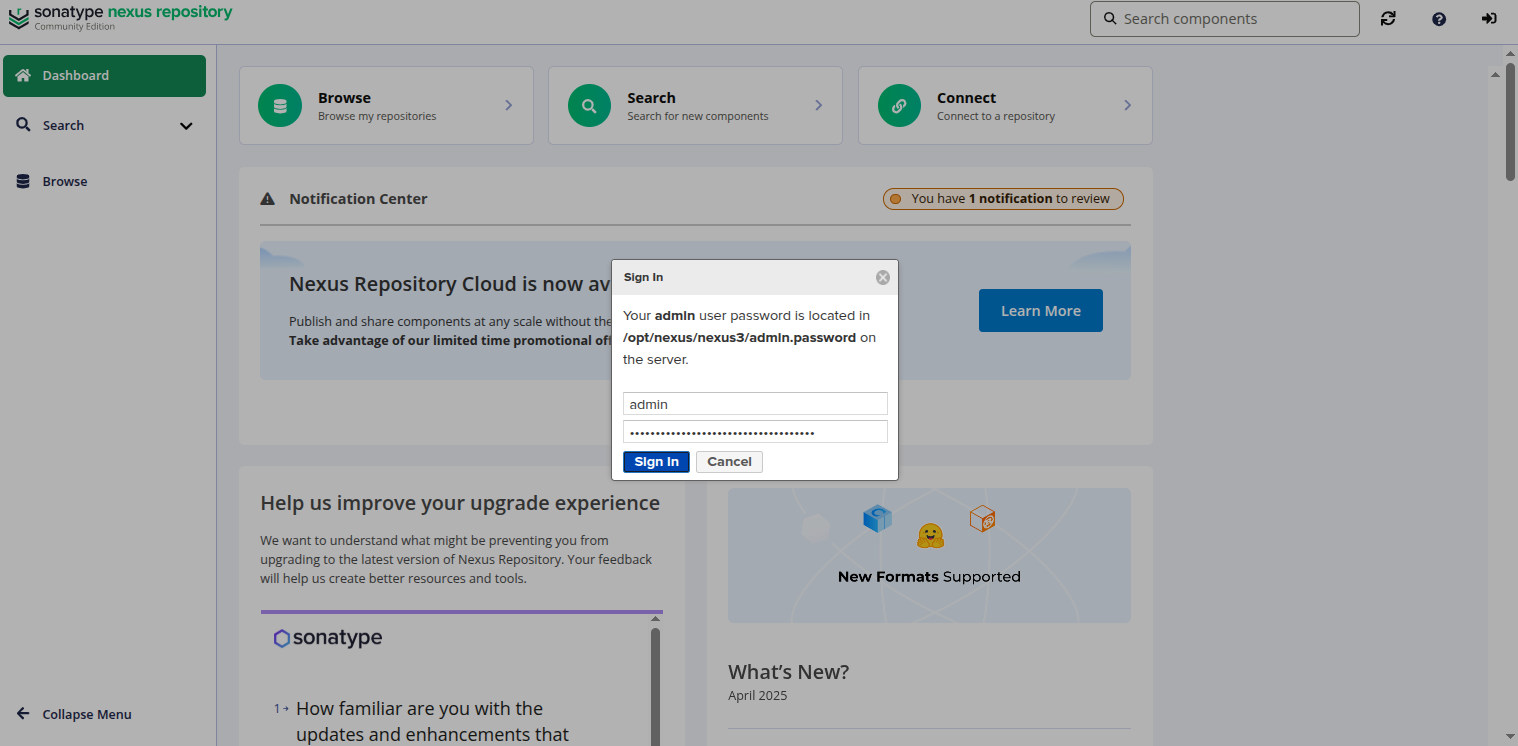
Provide your admin username and password then click on the Sign in button. You should see the Nexus setup page:
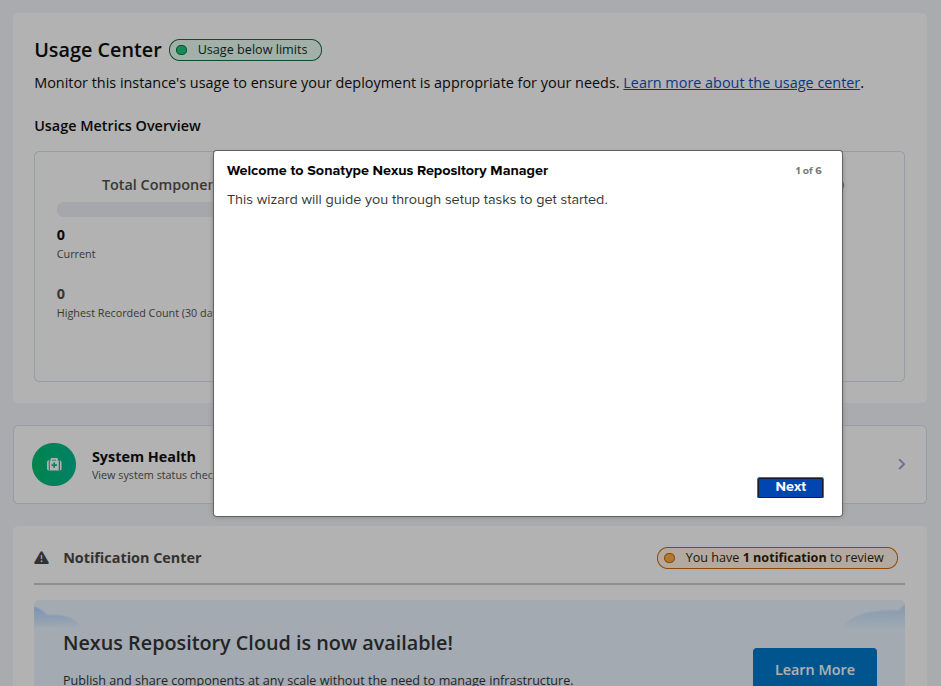 Click on Next. You will see the page below.
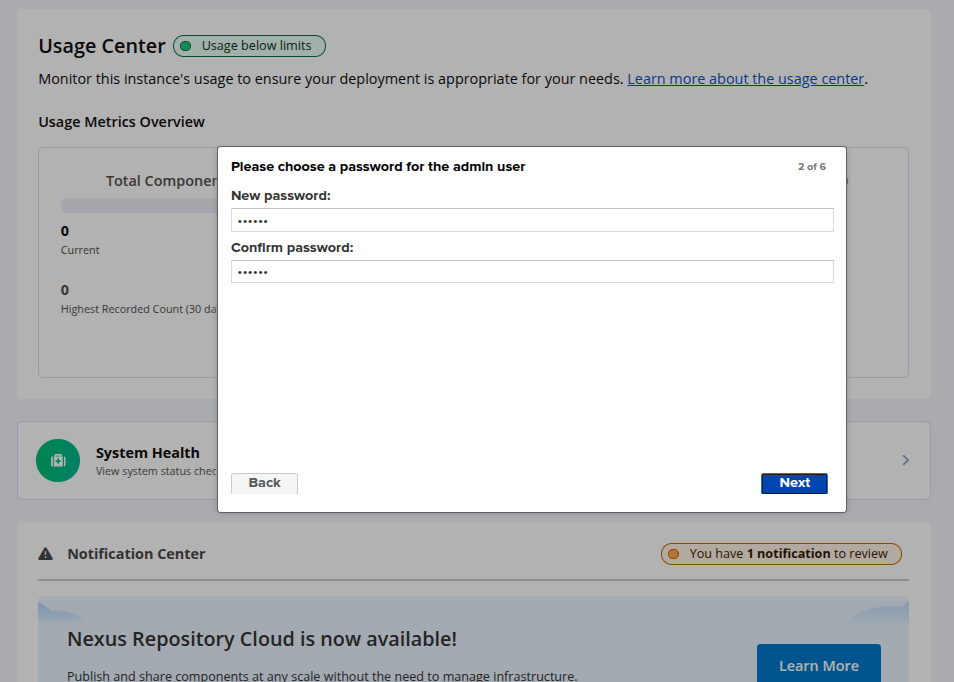
Set your new admin password and click Next. You will see the following page.
Click on Next. You will see the following page.
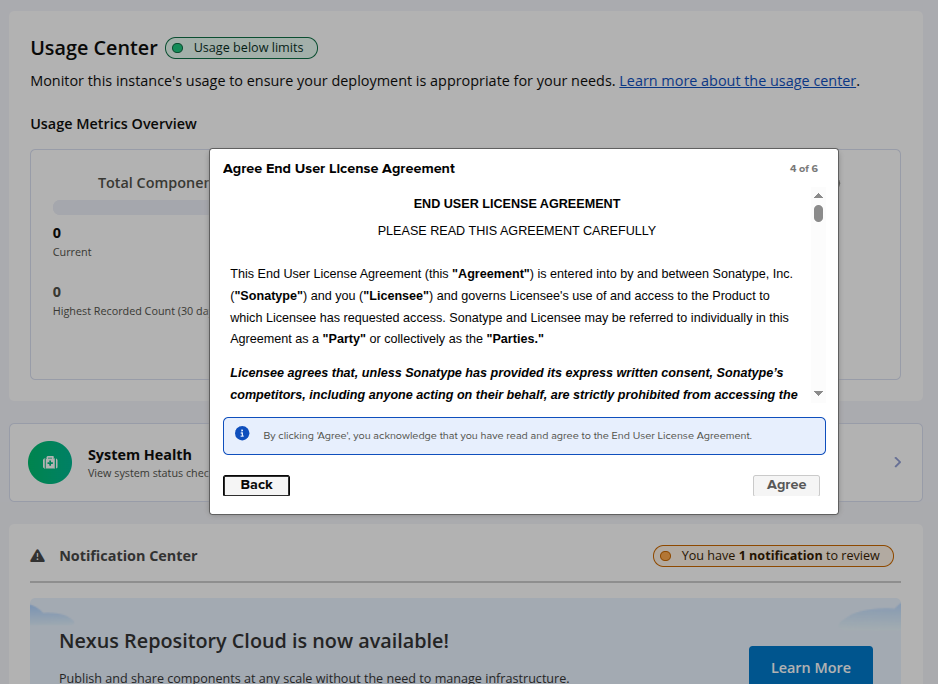
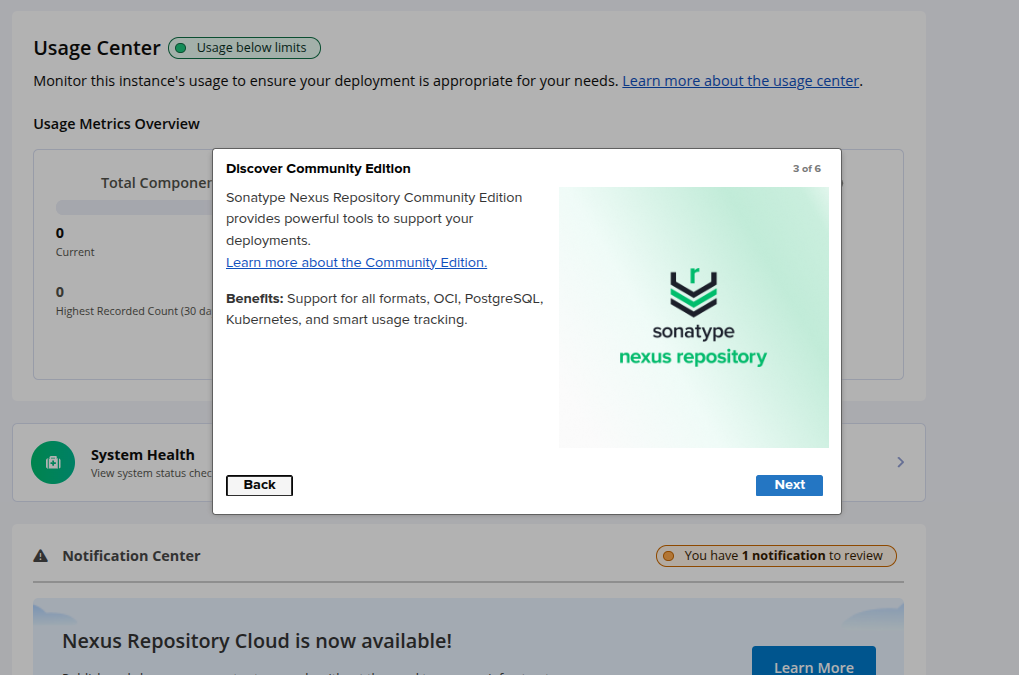
Accept the licence agreement. You will see the following page.
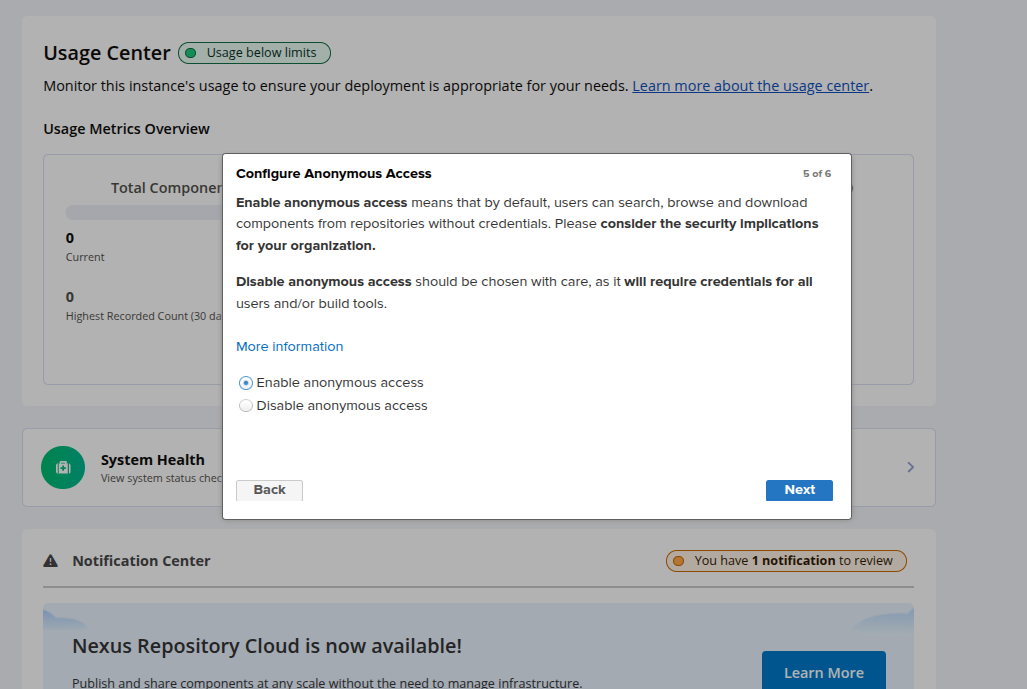
Enable the anonymous access and click Next. You will see the following page.

Click on Finish to finish the repository setup.
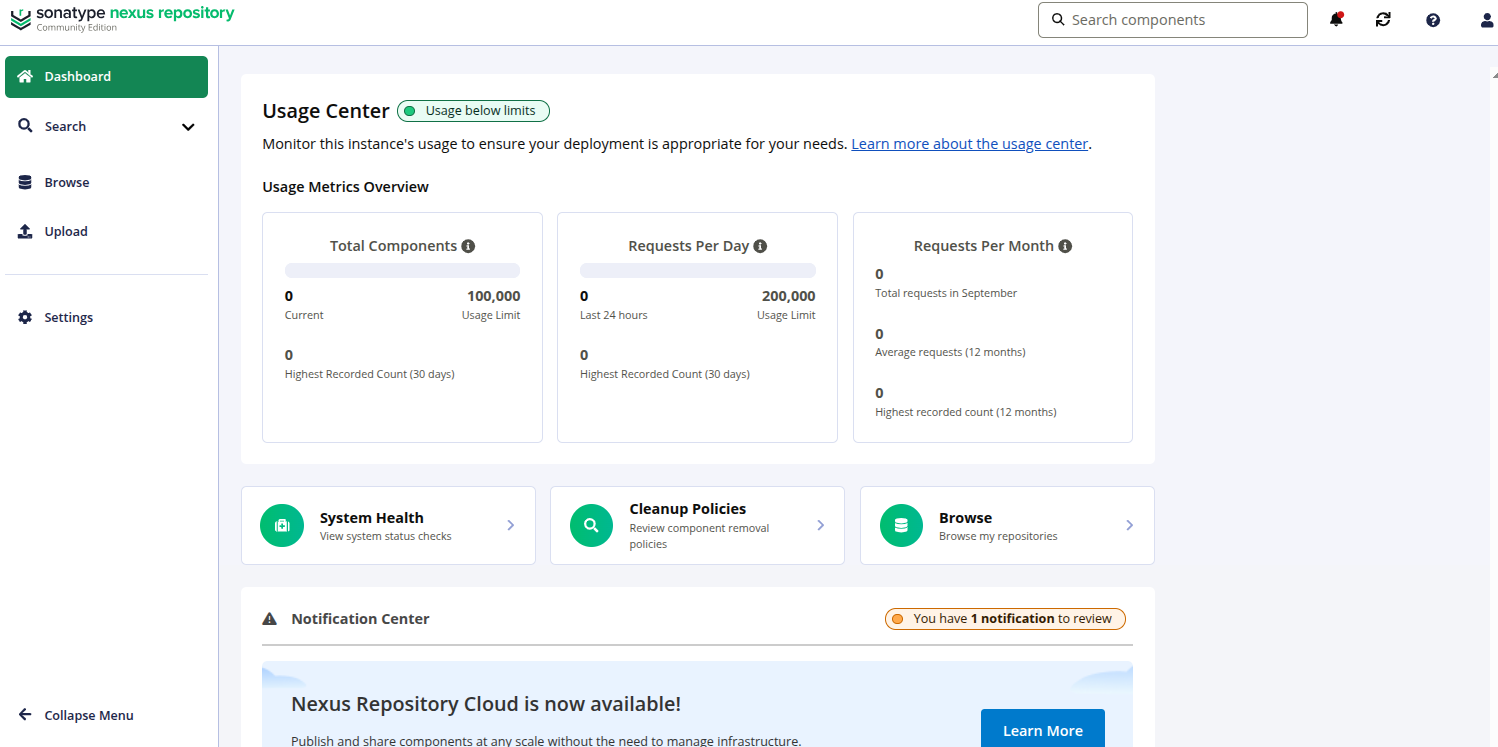
Conclusion
Congratulations! You have successfully installed and configured the Nexus repository manager on Debian 12. You can now implement Nexus in your development environment and start managing your entire software development lifecycle. Try installing it on your dedicated server from Atlantic.Net.
* This post is for informational purposes only and does not constitute professional, legal, financial, or technical advice. Each situation is unique and may require guidance from a qualified professional.
Readers should conduct their own due diligence before making any decisions.