Odoo is a suite of open-source business applications covering various needs such as CRM (Customer Relationship Management), e-commerce, accounting, inventory management, and project management. It is designed to be customizable and modular, allowing businesses to tailor it to their specific requirements.
Odoo is built on a modular architecture, meaning users can start with the basic modules and add more functionalities as needed. It offers both an open-source and free-to-use community edition and an enterprise edition with additional features and support, which requires a subscription fee.
In this tutorial, we will show you how to install Odoo 18 on Ubuntu 24.04.
Step 1 – Install Required Dependencies
Odoo is a Python-based software. Therefore, you will need to install Python and some additional dependencies on your server. You can install all of them using the following command:
apt-get install -y python3-pip python3-dev python3-venv libxml2-dev libxslt1-dev zlib1g-dev libsasl2-dev libldap2-dev build-essential libssl-dev libffi-dev libmysqlclient-dev libjpeg-dev libpq-dev libjpeg8-dev liblcms2-dev libblas-dev libatlas-base-dev -y
Next, install the NPM package manager.
apt-get install -y npm
Then, install other dependencies using NPM.
npm install -g less less-plugin-clean-css
Next, install the node-less package.
apt-get install -y node-less
Next, download wkhtmltopdf package and install it using the following command:
wget https://github.com/wkhtmltopdf/packaging/releases/download/0.12.6-1/wkhtmltox_0.12.6-1.bionic_amd64.deb
dpkg -i wkhtmltox_0.12.6-1.bionic_amd64.deb
apt install -f
Step 2 – Install PostgreSQL
Odoo uses PostgreSQL as a database backend. You can install it using the following command:
apt-get install postgresql -y
After the successful installation, verify the PostgreSQL status using the following command:
systemctl status postgresql
Output:
● postgresql.service - PostgreSQL RDBMS
     Loaded: loaded (/lib/systemd/system/postgresql.service; enabled; vendor preset: enabled)
     Active: active (exited) since Sat 2025-05-12 04:13:39 UTC; 9s ago
    Process: 16418 ExecStart=/bin/true (code=exited, status=0/SUCCESS)
   Main PID: 16418 (code=exited, status=0/SUCCESS)
        CPU: 1ms

May 12 04:13:39 ubuntu24 systemd[1]: Starting PostgreSQL RDBMS...
May 12 04:13:39 ubuntu24 systemd[1]: Finished PostgreSQL RDBMS.
Next, create a user for Odoo using the following command:
useradd -m -U -r -d /opt/odoo18 -s /bin/bash odoo18
Also, create the same user for PostgreSQL.
su - postgres -c "createuser -s odoo18"
Step 3 – Install and Configure Odoo
First, log in as an Odoo user and download the Odoo 18 using the following command:
su - odoo18
git clone https://www.github.com/odoo/odoo --depth 1 --branch 18.0 /opt/odoo18/odoo18
Next, create a Python virtual environment for Odoo.
cd /opt/odoo18
python3 -m venv odoo18-venv
Next, activate the virtual environment.
source odoo18-venv/bin/activate
Next, update the pip to the latest version.
pip install --upgrade pip
Next, install the Weel package.
pip3 install wheel
Next, install additional Python dependencies.
pip3 install -r odoo18/requirements.txt
Finally, deactivate from the Python virtual environment.
deactivate
Also, log out of the Odoo user.
exit
Next, create a directory to store Odoo addons and give it proper ownership.
mkdir /opt/odoo18/odoo18-custom-addons
chown -R odoo18:odoo18 /opt/odoo18/odoo18-custom-addons
Next, create a log directory and file for Odoo and set proper permissions.
mkdir -p /var/log/odoo18
touch /var/log/odoo18/odoo18.log
chown -R odoo18:odoo18 /var/log/odoo18
Next, create an Odoo configuration file.
nano /etc/odoo18.conf
Add the following lines:
[options]
admin_passwd = master-password
db_host = False
db_port = False
db_user = odoo18
db_password = False
xmlrpc_port = 8069
logfile = /var/log/odoo18/odoo18.log
addons_path = /opt/odoo18/odoo18/addons,/opt/odoo18/odoo18-custom-addons
Step 4 – Create a Systemd File for Odoo
You will also need to create a system file to manage the Odoo service.
nano /etc/systemd/system/odoo18.service
Add the following lines:
[Unit]
Description=odoo18
After=network.target [email protected]

[Service]
Type=simple
SyslogIdentifier=odoo18
PermissionsStartOnly=true
User=odoo18
Group=odoo18
ExecStart=/opt/odoo18/odoo18-venv/bin/python3 /opt/odoo18/odoo18/odoo-bin -c /etc/odoo18.conf
StandardOutput=journal+console

[Install]
WantedBy=multi-user.target
Save the file, then reload the systemd daemon.
systemctl daemon-reload
Now, start and enable the Odoo service.
systemctl start odoo18
systemctl enable odoo18
You can now check the Odoo status using the following command:
systemctl status odoo18
Output:
● odoo18.service - odoo18
     Loaded: loaded (/etc/systemd/system/odoo18.service; disabled; preset: enabled)
     Active: active (running) since Mon 2025-05-12 05:32:01 UTC; 3s ago
   Main PID: 32045 (python3)
      Tasks: 4 (limit: 4609)
     Memory: 90.4M (peak: 90.8M)
        CPU: 1.575s
     CGroup: /system.slice/odoo18.service
             └─32045 /opt/odoo18/odoo18-venv/bin/python3 /opt/odoo18/odoo18/odoo-bin -c /etc/odoo18.conf

May 12 05:32:01 ubuntu systemd[1]: Started odoo18.service - odoo18.
Step 5 – Access Odoo Web Interface
At this point, Odoo has started listening on port 8069. You can now access it using the URL http://your-server-ip:8069. You will see the following screen.
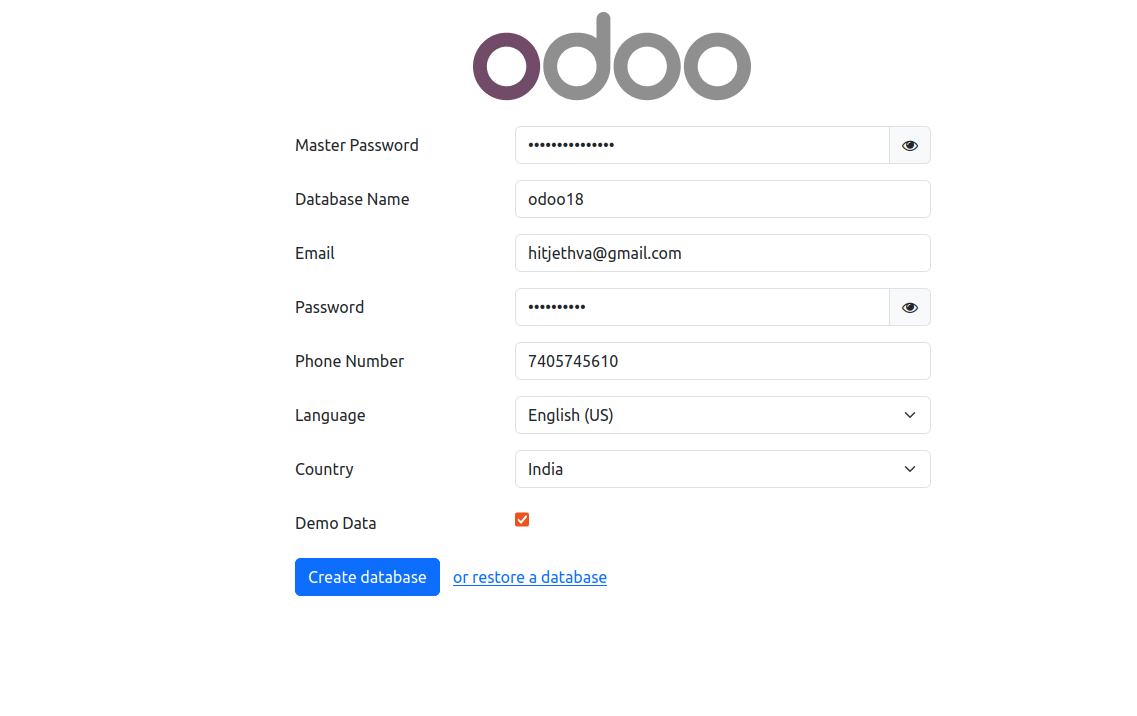
Provide your master password and Odoo database and click on Create Database. You will see the Odoo 18 login page.

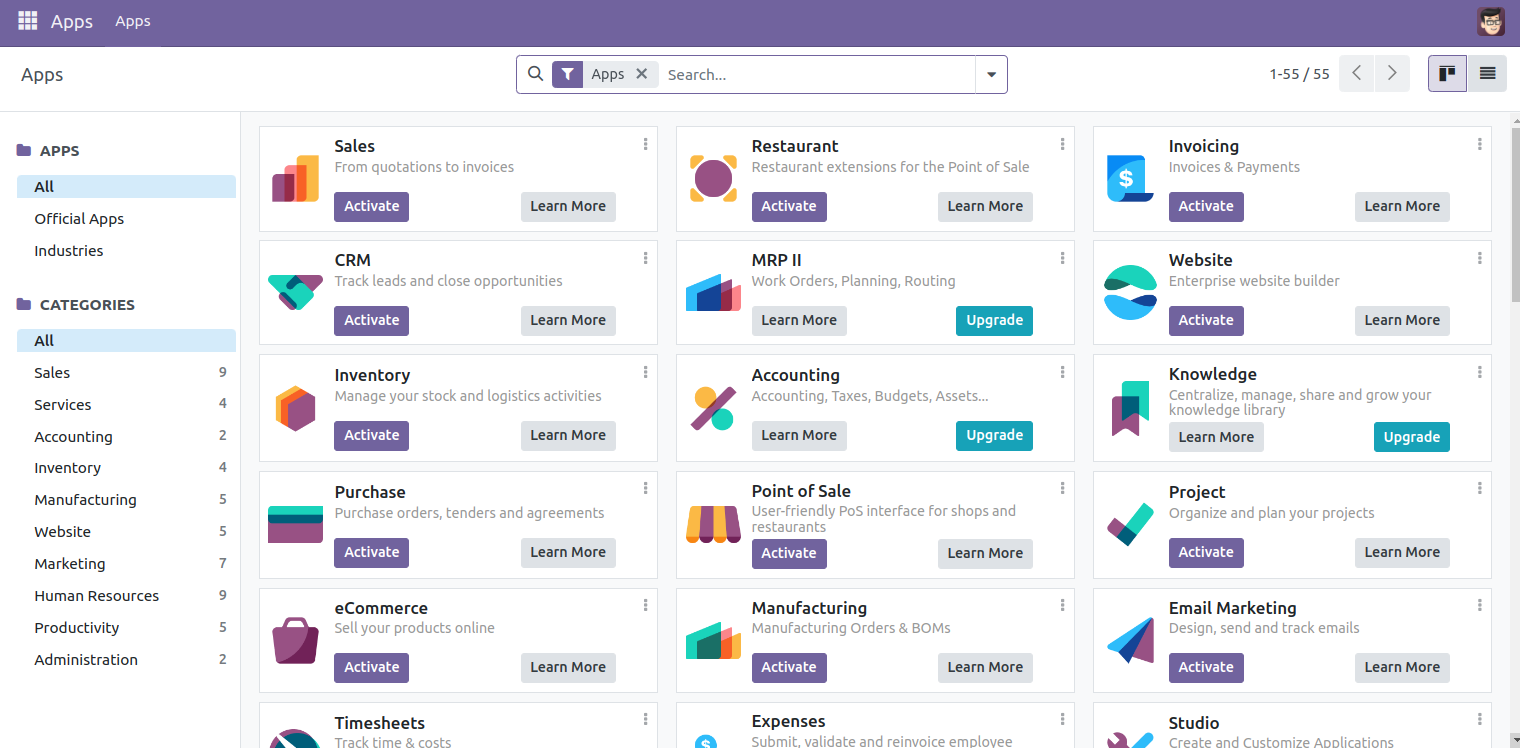
Provide your admin username and password and click on Log in. The Odoo dashboard will appear on the following screen.
Conclusion
Odoo offers a powerful platform for managing various aspects of your business, from CRM to accounting to project management and beyond. By following the steps outlined in this guide, you can successfully set up Odoo 18 on your Ubuntu 24.04 system. Now try to deploy Odoo 18 on dedicated server hosting from Atlantic.Net!
* This post is for informational purposes only and does not constitute professional, legal, financial, or technical advice. Each situation is unique and may require guidance from a qualified professional.
Readers should conduct their own due diligence before making any decisions.