Transcribing audio into text has become an important task across industries. Whether you are a researcher handling interviews, a content creator working on podcasts, or a business professional managing meeting notes, turning speech into written text saves time and improves productivity.
Traditionally, transcription tools required either manual effort or expensive software. With the rise of modern AI models, transcription has become faster and more accessible. Distil Whisper AI, a lightweight and optimized version of OpenAI’s Whisper model, makes this process effortless while maintaining high accuracy.
In this tutorial, you will learn how to set up Distil Whisper AI on an Ubuntu 24.04 GPU server.
Prerequisites
- An Ubuntu 24.04 server with an NVIDIA GPU.
- A non-root user or a user with sudo privileges.
- NVIDIA drivers are installed on your server.
Step 1 – Setting Up Python Environment
Before running Distil Whisper AI, you need to prepare a clean environment with all the required dependencies.
1. First, update your system and install the basic tools along with FFmpeg, which is necessary for handling audio files.
apt update -y
apt install -y python3 python3-venv python3-pip ffmpeg
2. Next, create a dedicated environment for Distil Whisper AI and activate it.
python3 -m venv distilwhisper-env
source distilwhisper-env/bin/activate
3. Upgrade pip to the latest version.
pip install --upgrade pip
4. Finally, install the libraries needed to run Distil Whisper AI.
pip install transformers datasets torchaudio
5. Verify the GPU availability.
python3 - <<'EOF'
import torch
print("CUDA available:", torch.cuda.is_available())
print("GPU name:", torch.cuda.get_device_name(0) if torch.cuda.is_available() else "CPU only")
EOF
If your server has a working NVIDIA GPU with CUDA drivers installed, you should see output like:
CUDA available: True
GPU name: NVIDIA A40-8Q
Step 2 – Building the First Transcription Script
Now that the environment is ready and the GPU is detected, let’s build our first transcription script using Distil Whisper AI. This script will load the model, set up the pipeline, and transcribe a short audio file.
1. Create the script file.
nano transcribe.py
Add the following code.
import torch
from transformers import AutoModelForSpeechSeq2Seq, AutoProcessor, pipeline

# Detect GPU
device = "cuda" if torch.cuda.is_available() else "cpu"
torch_dtype = torch.float16 if torch.cuda.is_available() else torch.float32

# Load Distil-Whisper
model_id = "distil-whisper/distil-large-v2"
print(f"Loading model {model_id} on {device}...")

model = AutoModelForSpeechSeq2Seq.from_pretrained(
    model_id,
    torch_dtype=torch_dtype,
    low_cpu_mem_usage=True,
    use_safetensors=True
).to(device)

processor = AutoProcessor.from_pretrained(model_id)

# Build pipeline
pipe = pipeline(
    "automatic-speech-recognition",
    model=model,
    tokenizer=processor.tokenizer,
    feature_extractor=processor.feature_extractor,
    max_new_tokens=128,
    torch_dtype=torch_dtype,
    device=0 if torch.cuda.is_available() else -1
)

# Test transcription
audio_file = "sample.mp3"  # Replace with your own audio file
print(f"Transcribing: {audio_file}")

result = pipe(audio_file)
print("\n--- Transcription Result ---")
print(result["text"])
2. Use wget to fetch a short audio file and save it as sample.mp3.
wget -O sample.mp3 https://github.com/pyannote/pyannote-audio/raw/develop/tutorials/assets/sample.wav
3. Run the script.
python3 transcribe.py
You should see something like this in your terminal:
--- Transcription Result ---
 Hello? Hello? Oh, hello, I didn't know you were there. Neither did I. Okay, I thought, you know, I heard a beep. This is Diane in New Jersey. And I'm Sheila and Texas, originally from Chicago. Oh, I'm originally from Chicago also. I'm in New Jersey now, though. Well, there isn't that much difference. At least, you know, they all call me a Yankee down here, so what kind of that. Oh, I don't hear that in New Jersey now.
The output may vary slightly depending on the Distil Whisper model’s decoding, but you’ll get a clear, accurate transcript of the conversation in the audio.
Step 3 – Handling Long Audio Files
The script we created in the previous section works well for short clips, but many real-world use cases involve longer recordings — such as meetings, podcasts, or lectures. Processing a long audio file directly can overwhelm the model, so we need to split the audio into manageable chunks and transcribe them piece by piece.
1. Create a new script.
nano transcribe_long.py
Add the following code.
# File: transcribe_long.py
import torch
from transformers import AutoModelForSpeechSeq2Seq, AutoProcessor, pipeline

device = "cuda" if torch.cuda.is_available() else "cpu"
torch_dtype = torch.float16 if torch.cuda.is_available() else torch.float32

model_id = "distil-whisper/distil-large-v2"
print(f"Loading model {model_id} on {device}...")

model = AutoModelForSpeechSeq2Seq.from_pretrained(
    model_id,
    torch_dtype=torch_dtype,
    low_cpu_mem_usage=True,
    use_safetensors=True
).to(device)

processor = AutoProcessor.from_pretrained(model_id)

pipe = pipeline(
    "automatic-speech-recognition",
    model=model,
    tokenizer=processor.tokenizer,
    feature_extractor=processor.feature_extractor,
    max_new_tokens=128,
    chunk_length_s=15,   # split into 15s chunks
    batch_size=16,       # process 16 chunks in parallel
    torch_dtype=torch_dtype,
    device=0 if torch.cuda.is_available() else -1
)

audio_file = "long_sample.mp3"  # Replace with your file
print(f"Transcribing (long mode): {audio_file}")
result = pipe(audio_file)

print("\n--- Long Transcription Result ---")
print(result["text"])
Note: Replaced the long_sample.mp3 file with your own long file.
2. Run the script.
python3 transcribe_long.py
Step 4 – Building a Web Interface with Gradio
So far, you’ve been running transcription from the command line. That works well for quick tests, but in real projects you’ll often want a user-friendly interface where you can upload files or record audio directly in your browser. For this, we’ll use Gradio, a lightweight Python library for creating web apps.
1. Install the additional packages needed for Gradio and microphone input.
pip install sounddevice scipy gradio soundfile
apt install libportaudio2
2. Create an app file.
nano app.py
Add the following code.
# File: app.py
import torch
import gradio as gr
from transformers import AutoModelForSpeechSeq2Seq, AutoProcessor, pipeline

# ------------------------------
# Setup
# ------------------------------
device = "cuda" if torch.cuda.is_available() else "cpu"
torch_dtype = torch.float16 if torch.cuda.is_available() else torch.float32
model_id = "distil-whisper/distil-large-v2"

print(f"Loading {model_id} on {device}...")

model = AutoModelForSpeechSeq2Seq.from_pretrained(
    model_id,
    torch_dtype=torch_dtype,
    low_cpu_mem_usage=True,
    use_safetensors=True
).to(device)

processor = AutoProcessor.from_pretrained(model_id)

# Short pipeline (<30s) pipe_short = pipeline( "automatic-speech-recognition", model=model, tokenizer=processor.tokenizer, feature_extractor=processor.feature_extractor, max_new_tokens=128, torch_dtype=torch_dtype, device=0 if torch.cuda.is_available() else -1 ) # Long pipeline (>30s, chunked)
pipe_long = pipeline(
    "automatic-speech-recognition",
    model=model,
    tokenizer=processor.tokenizer,
    feature_extractor=processor.feature_extractor,
    max_new_tokens=128,
    chunk_length_s=15,
    batch_size=16,
    torch_dtype=torch_dtype,
    device=0 if torch.cuda.is_available() else -1
)

# ------------------------------
# Functions
# ------------------------------
def transcribe_short(audio_file):
    if audio_file is None:
        return "No audio uploaded."
    result = pipe_short(audio_file)
    return result["text"]

def transcribe_long(audio_file):
    if audio_file is None:
        return "No audio uploaded."
    result = pipe_long(audio_file)
    return result["text"]

def transcribe_mic(audio_file):
    if audio_file is None:
        return "No recording found."
    result = pipe_short(audio_file)
    return result["text"]

# ------------------------------
# Gradio UI
# ------------------------------
with gr.Blocks() as demo:
    gr.Markdown("## 🎙️ Distil-Whisper AI — Audio Transcription on Ubuntu 24.04 GPU Server")

    with gr.Tab("Short File (<30s)"): audio_short = gr.Audio(sources=["upload"], type="filepath", label="Upload audio file") output_short = gr.Textbox(label="Transcription") btn_short = gr.Button("Transcribe") btn_short.click(transcribe_short, inputs=audio_short, outputs=output_short) with gr.Tab("Long File (>30s)"):
        audio_long = gr.Audio(sources=["upload"], type="filepath", label="Upload long audio file")
        output_long = gr.Textbox(label="Transcription")
        btn_long = gr.Button("Transcribe")
        btn_long.click(transcribe_long, inputs=audio_long, outputs=output_long)

    with gr.Tab("Live Mic (Browser)"):
        audio_mic = gr.Audio(sources=["microphone"], type="filepath", label="Record from your browser")
        output_mic = gr.Textbox(label="Transcription")
        btn_mic = gr.Button("Transcribe Recording")
        btn_mic.click(transcribe_mic, inputs=audio_mic, outputs=output_mic)

# ------------------------------
# Launch with HTTPS (gradio.live)
# ------------------------------
demo.launch(
    share=True,               # 🌍 get https://.gradio.live
    server_name="0.0.0.0",    # allow external connections
    server_port=7860
)
3. Run the application to start the Gradio interface.
python3 app.py
You’ll see something like:
Running on local URL:  http://127.0.0.1:7860
Running on public URL: https://c914b0a89448da8a6d.gradio.live
The public URL (.gradio.live) allows you to access the app securely without extra setup.
Step 5 – Access the Gradio App
With your Gradio app ready, it’s time to test it. This section will walk you through launching the app and using its different features for transcription.
1. Open your web browser and access the public URL https://c914b0a89448da8a6d.gradio.live. You’ll see three tabs:
- Short File (<30s) – Upload an audio clip shorter than 30 seconds.
- Long File (>30s) – Upload longer files such as meetings, lectures, or podcasts.
- Live Mic (Browser) – Record directly from your browser and transcribe the recording.
2. Try uploading the sample file we downloaded earlier (sample.mp3) using the Short File tab. You should see the same transcript as before, but this time through a clean web interface.

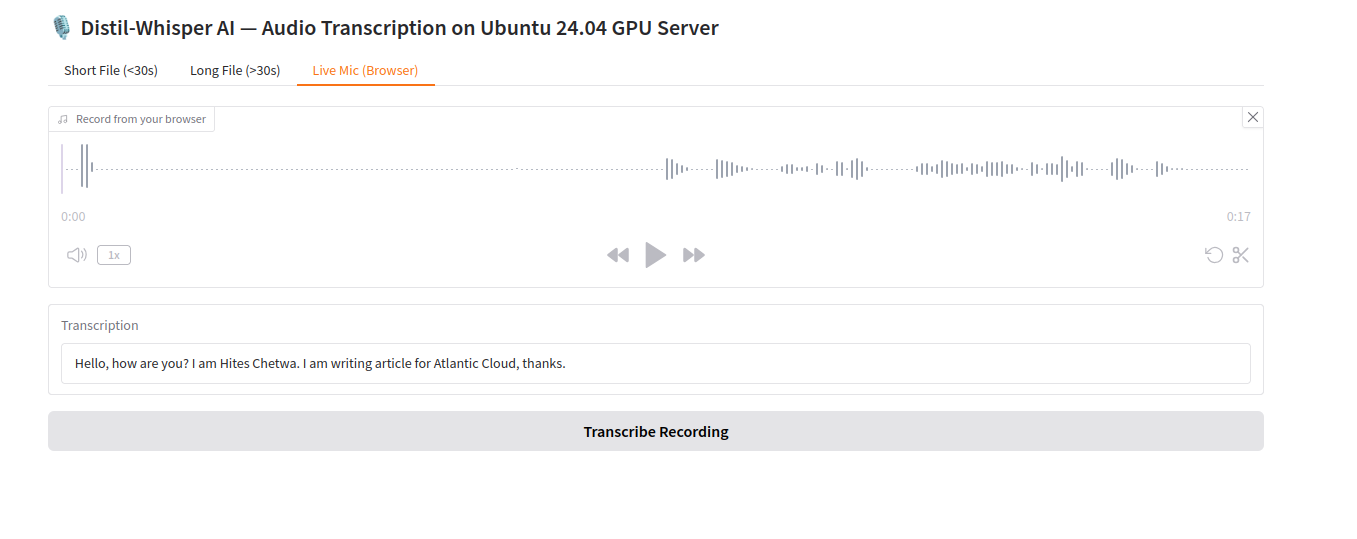
3. Click on Live Mic (Browser) tab. You will see the following page.
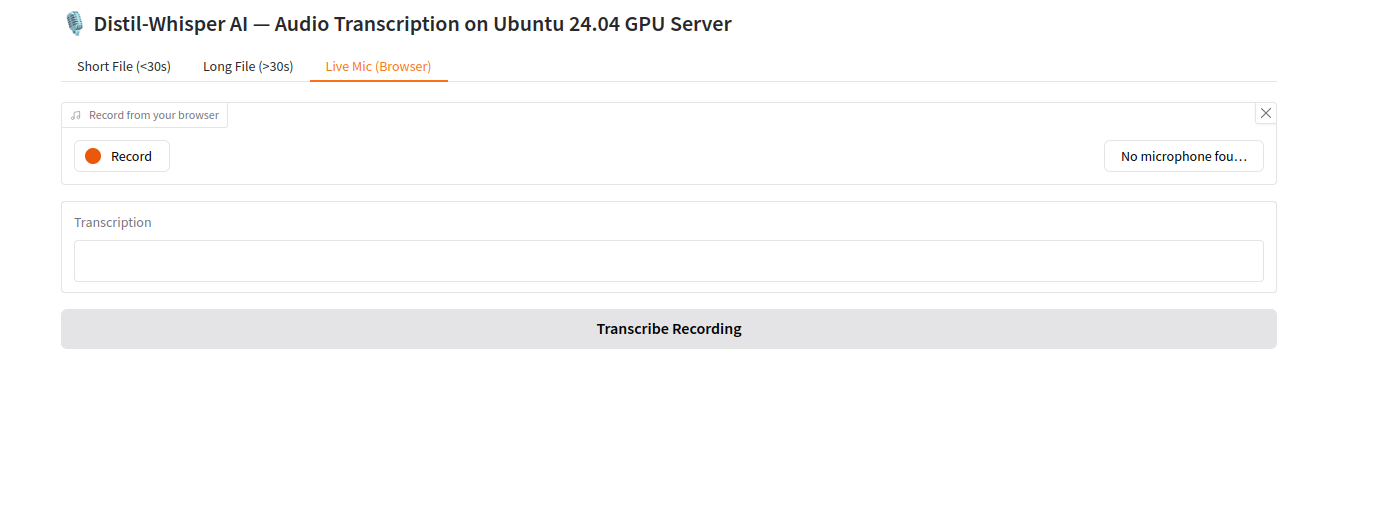
4. Click on Record to start recording your voice. Then, click Transcribe Recording, you will see the transcribed text below the screen.
Conclusion
In this tutorial, you learned how to set up Distil Whisper AI for effortless audio transcription on an Ubuntu 24.04 GPU server. Starting from environment setup and GPU verification, you built your first transcription script for short files, extended it to handle long recordings, and finally created a Gradio-powered web app to make transcription accessible directly from the browser.
By leveraging the GPU, Distil Whisper delivers fast and accurate results, making it ideal for a wide range of use cases from meeting notes and podcasts to interviews and live speech.
* This post is for informational purposes only and does not constitute professional, legal, financial, or technical advice. Each situation is unique and may require guidance from a qualified professional.
Readers should conduct their own due diligence before making any decisions.