Table of Contents
Imagine running advanced machine learning models right inside your web browser—no need for heavy backend servers or complicated deployment pipelines. With TensorFlow.js, you can bring real-time AI features like image classification, object detection, and more directly to users, all with JavaScript. This means your apps can analyze images, predict outcomes, or recognize objects instantly, right in the browser.
In this guide, you’ll learn how to build a ReactJS web app that uses TensorFlow.js to classify images.
Why Use TensorFlow.js in the Browser?
Running machine learning models directly in the browser with TensorFlow.js offers some unique advantages.
Here are a few popular use cases for running machine learning in the browser:
- Image classification (like recognizing objects, animals, or scenes)
- Real-time face or pose detection via webcam
- Sound recognition and speech commands
- Text sentiment analysis or language translation
Prerequisites
- An Ubuntu 24.04 server with an NVIDIA GPU.
- A non-root user or a user with sudo privileges.
- NVIDIA drivers are installed on your server.
Step 1: Setting Up Your Server
Let’s get your server ready to run a ReactJS app with TensorFlow.js. Follow these steps to update your system and install the necessary tools:
1. Update your package index.
apt update -y2. Install Node.js and NPM to build and run your ReactJS project.
apt install -y nodejs npm3. Make sure everything is set up correctly by checking the versions.
node -v
npm -v
Step 2: Create a ReactJS Project
With Node.js and npm installed, you can quickly set up a new ReactJS app using the Create React App tool. This will give you a modern, ready-to-use project structure.
1. Create your app using the npx command.
npx create-react-app tfjs-image-demo2. Navigate into your project directory.
cd tfjs-image-demoStep 3: Install TensorFlow.js and Supporting Libraries
Now it’s time to add the libraries that make in-browser machine learning possible.
1. Install TensorFlow.js and other tools.
npm install @tensorflow/tfjs @tensorflow-models/mobilenet antdExplanation:
- @tensorflow/tfjs – the TensorFlow.js library
- @tensorflow-models/mobilenet – pre-trained MobileNet model
- antd – (optional) for better UI components
Step 4: Build the Image Classifier App
Now, let’s add the code that makes everything work. You’ll create an interactive ReactJS app that uses TensorFlow.js and MobileNet to classify images right in the browser.
1. Edit the file src/App.js.
nano src/App.jsDelete everything in App.js and paste the following code:
import React, { useRef, useState, useEffect } from "react";
import "@tensorflow/tfjs";
import * as mobilenet from "@tensorflow-models/mobilenet";
import { Upload, Button, Tag, Typography } from "antd";

const { Title } = Typography;

function App() {
  const [model, setModel] = useState(null);
  const [predictions, setPredictions] = useState([]);
  const canvasRef = useRef(null);

  // Load MobileNet model on mount
  useEffect(() => {
    async function loadModel() {
      const loadedModel = await mobilenet.load();
      setModel(loadedModel);
    }
    loadModel();
  }, []);

  // Handle image upload
  const handleImageChange = async (info) => {
    const file = info.file.originFileObj;
    if (!file || !model) return;
    const img = new window.Image();
    img.src = URL.createObjectURL(file);
    img.onload = async () => {
      // Draw image to canvas
      const canvas = canvasRef.current;
      canvas.width = img.width;
      canvas.height = img.height;
      const ctx = canvas.getContext("2d");
      ctx.drawImage(img, 0, 0);
      // Classify image
      const preds = await model.classify(canvas, 5);
      setPredictions(preds);
    };
  };

  return (
    <div style={{ maxWidth: 480, margin: "40px auto", textAlign: "center" }}>
      <Title level={2}>TensorFlow.js Image Classifier Demo</Title>
      <Upload
        accept="image/*"
        showUploadList={false}
        customRequest={() => {}}
        onChange={handleImageChange}
      >
        <Button type="primary" size="large" style={{ marginBottom: 16 }}>
          Upload an Image
        </Button>
      </Upload>
      <canvas ref={canvasRef} style={{ width: "100%", display: "block", margin: "0 auto 20px" }} />
      <div>
        {predictions.map(({ className, probability }) => (
          <Tag color="geekblue" key={className}>
            {className.split(",")[0]}: {(probability * 100).toFixed(1)}%
          </Tag>
        ))}
      </div>
    </div>
  );
}

export default App;
The above code:
- Loads the MobileNet model when the app starts.
- Lets users upload any image.
- Shows the image on a canvas and runs the model to classify it.
- Instantly displays predicted labels and confidence scores, right in the browser!
Step 5: Start the Development Server
You’re almost ready to see your app in action! Now, let’s launch the ReactJS development server so you can access your project from your browser.
Start the React development server.
npm start -- --host your-server-ipOutput.
Compiled successfully!

You can now view tfjs-image-demo in the browser.

  http://localhost:3000

Note that the development build is not optimized.
To create a production build, use npm run build.

webpack compiled successfully
Step 6: Test Your Image Classifier in the Browser
Now it’s time for testing using your browser-based AI app.
1. Open your browser and go to http://YOUR_SERVER_IP:3000
2. Click the “Upload an Image” button and choose any photo from your computer. You can try pictures of animals, everyday objects, or anything you like.
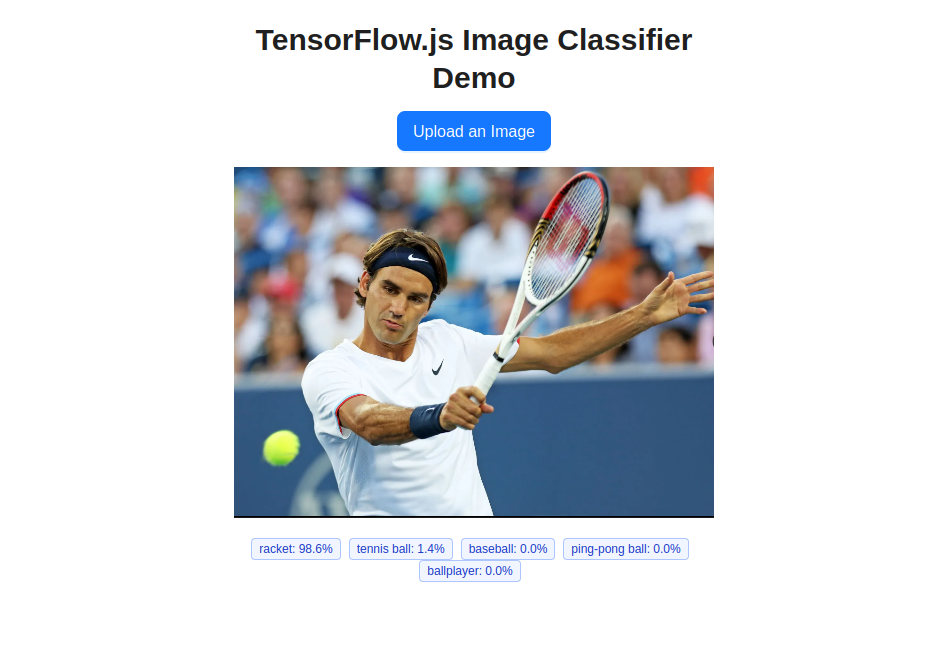
3. As soon as you upload the image, the app will display the picture and show prediction tags with labels and confidence scores (like “tabby cat: 99.5%”).
Conclusion
You’ve just built a modern, browser-based image classifier with TensorFlow.js and ReactJS, right on your Ubuntu 24.04 GPU server. With just a few commands and some simple code, you can now run machine learning models instantly in any web browser, all without sending data to a remote backend.
This approach offers privacy, speed, and a seamless user experience. You can expand this project further by adding support for webcam input, testing other pre-trained models, or customizing the UI to fit your needs.
* This post is for informational purposes only and does not constitute professional, legal, financial, or technical advice. Each situation is unique and may require guidance from a qualified professional.
Readers should conduct their own due diligence before making any decisions.