Table of Contents
- Prerequisites
- Step 1 - Install Dependencies
- Step 2 - Download and Set Up YOLOv5
- Step 3 - Download the Road Sign Dataset from Kaggle
- Step 4 - Convert Pascal VOC Annotations to YOLO Format
- Step 5 - Split the Dataset into Training and Validation
- Step 6 - Create Dataset Configuration File
- Step 7 - Train YOLOv5 Model
- Step 8 - Validate the Model
- Step 9 - Run Inference on Road Signs
- Step 10 - Visualize Inference Results with Matplotlib
- Conclusion
Object detection is one of the most powerful applications of computer vision, and YOLOv5 (You Only Look Once, version 5) has become one of the most popular frameworks to accomplish this. It is fast, lightweight, and accurate, making it suitable for both research and real-world deployment.
In this tutorial, you’ll learn how to train YOLOv5 on a custom dataset using an Ubuntu 24.04 GPU server.
Prerequisites
- An Ubuntu 24.04 server with an NVIDIA GPU.
- A non-root user or a user with sudo privileges.
- NVIDIA drivers are installed on your server.
Step 1 – Install Dependencies
Before training YOLOv5, you need to prepare the environment by installing Python, Git, and other required tools. We’ll also create a virtual environment so that your YOLOv5 setup remains clean and isolated from system packages.
1. Install Python 3, pip, virtual environment support, Git, and unzip.
apt install python3 python3-pip python3-venv git unzip -y
2. It’s a good practice to work in a virtual environment. This avoids conflicts with system-wide libraries.
python3 -m venv yolov5-env
source yolov5-env/bin/activate
After activation, you should see (yolov5-env) at the start of your terminal prompt.
3. Inside the virtual environment, upgrade pip to the latest version.
pip install --upgrade pip
Step 2 – Download and Set Up YOLOv5
With the dependencies ready, the next step is to download the official YOLOv5 repository and install its requirements.
1. Use git to clone the YOLOv5 source code.
git clone https://github.com/ultralytics/yolov5.git
2. Navigate to the downloaded directory.
cd yolov5
3. Inside the YOLOv5 folder, install all required Python packages.
pip install -r requirements.txt
This command installs PyTorch, OpenCV, and other libraries needed for training and inference. Since you’re running on a GPU server, make sure PyTorch installs with CUDA support.
Step 3 – Download the Road Sign Dataset from Kaggle
Now that YOLOv5 is installed, we need a dataset to train our model. For this tutorial, we’ll use the Road Sign Detection dataset from Kaggle, which contains 877 images with annotated bounding boxes in Pascal VOC XML format.
1. Install the Kaggle CLI tool.
pip install kaggle
2. Go to your Kaggle account → Account Settings → Create New API Token.
3. This will download a kaggle.json file (your API credentials). Transfer this JSON file to your server.
4. Move this file to the proper location and secure it with permissions
mkdir -p ~/.kaggle
cp kaggle.json ~/.kaggle/
chmod 600 ~/.kaggle/kaggle.json
5. Make a dedicated folder to store datasets.
mkdir datasets
6. Now download the dataset using Kaggle CLI.
kaggle datasets download -d andrewmvd/road-sign-detection
7. Unzip the downloaded dataset to the datasets directory.
unzip road-sign-detection.zip -d datasets/roadsign
8. After extracting, your dataset should look like this:
datasets/roadsign/
 ├── annotations/   # Pascal VOC XML annotations
 └── images/        # 877 images
Step 4 – Convert Pascal VOC Annotations to YOLO Format
The Road Sign dataset annotations are provided in Pascal VOC XML format, but YOLOv5 requires annotations in YOLO text format (.txt files). Each .txt file corresponds to one image and contains the class ID and normalized bounding box coordinates.
1. Create a new conversion script.
nano convert_voc_to_yolo.py
Paste the following code:
import os
import xml.etree.ElementTree as ET

# Classes in dataset
classes = ["trafficlight", "stop", "speedlimit", "crosswalk"]

input_dir = "datasets/roadsign/annotations"
output_dir = "datasets/roadsign/labels"
os.makedirs(output_dir, exist_ok=True)

def convert_bbox(size, box):
    dw, dh = 1.0/size[0], 1.0/size[1]
    x = (box[0] + box[1]) / 2.0
    y = (box[2] + box[3]) / 2.0
    w = box[1] - box[0]
    h = box[3] - box[2]
    return (x*dw, y*dh, w*dw, h*dh)

for file in os.listdir(input_dir):
    if not file.endswith(".xml"):
        continue
    in_file = open(os.path.join(input_dir, file))
    tree = ET.parse(in_file)
    root = tree.getroot()

    size = root.find("size")
    w, h = int(size.find("width").text), int(size.find("height").text)

    out_file = open(os.path.join(output_dir, file.replace(".xml", ".txt")), "w")

    for obj in root.iter("object"):
        cls = obj.find("name").text
        if cls not in classes:
            continue
        cls_id = classes.index(cls)
        xmlbox = obj.find("bndbox")
        b = (float(xmlbox.find("xmin").text), float(xmlbox.find("xmax").text),
             float(xmlbox.find("ymin").text), float(xmlbox.find("ymax").text))
        bb = convert_bbox((w,h), b)
        out_file.write(f"{cls_id} {' '.join([str(a) for a in bb])}\n")
2. Execute the script to generate YOLO-format labels.
python3 convert_voc_to_yolo.py
Now you’ll have datasets/roadsign/labels/ with .txt files.
Step 5 – Split the Dataset into Training and Validation
To train a YOLOv5 model effectively, you need to split your dataset into training (80%) and validation (20%) sets. Training images will be used to learn, while validation images will help evaluate model performance during training.
1. Make subdirectories for training and validation images and labels.
mkdir -p datasets/roadsign/images/train datasets/roadsign/images/val
mkdir -p datasets/roadsign/labels/train datasets/roadsign/labels/val
2. Create a split script.
nano split_dataset.py
Add the following code.
import os, random, shutil

image_dir = "datasets/roadsign/images"
label_dir = "datasets/roadsign/labels"

train_img = "datasets/roadsign/images/train"
val_img = "datasets/roadsign/images/val"
train_lbl = "datasets/roadsign/labels/train"
val_lbl = "datasets/roadsign/labels/val"

files = [f for f in os.listdir(image_dir) if f.endswith(".png")]
random.shuffle(files)

split = int(0.8 * len(files))
train_files, val_files = files[:split], files[split:]

def move_files(file_list, dest_img, dest_lbl):
    for f in file_list:
        base = os.path.splitext(f)[0]
        shutil.copy(os.path.join(image_dir, f), os.path.join(dest_img, f))
        shutil.copy(os.path.join(label_dir, base + ".txt"), os.path.join(dest_lbl, base + ".txt"))

move_files(train_files, train_img, train_lbl)
move_files(val_files, val_img, val_lbl)
3. Run the script.
python3 split_dataset.py
This will automatically shuffle and copy images with their corresponding label files into the correct folders.
4. After splitting, your dataset should look like this:
datasets/roadsign/
 ├── images/
 │    ├── train/
 │    └── val/
 ├── labels/
 │    ├── train/
 │    └── val/
 └── roadsign.yaml
Step 6 – Create Dataset Configuration File
YOLOv5 requires a YAML configuration file that tells the training script where to find images, how many classes exist, and what the class names are. Without this, YOLOv5 won’t know how to load your dataset.
Create a dataset configuration file.
nano datasets/roadsign/roadsign.yaml
Add the following lines.
train: datasets/roadsign/images/train
val: datasets/roadsign/images/val

nc: 4
names: ['trafficlight', 'stop', 'speedlimit', 'crosswalk']
Note: Make sure the file paths (datasets/roadsign/images/train and datasets/roadsign/images/val) are correct relative to the YOLOv5 root folder. If you placed your dataset in a different location, adjust the paths accordingly.
Step 7 – Train YOLOv5 Model
Now that the dataset is prepared and the configuration file is ready, you can train YOLOv5 on the road sign dataset.
Start training on datasets.
python3 train.py --img 640 --batch 16 --epochs 100 \
--data datasets/roadsign/roadsign.yaml --weights yolov5s.pt --device 0
Output.
Validating runs/train/exp2/weights/best.pt...
Fusing layers...
Model summary: 157 layers, 7020913 parameters, 0 gradients, 15.8 GFLOPs
                 Class     Images  Instances          P          R      mAP50   mAP50-95: 100%|██████████| 6/6 [00:01<00:00,  3.32it/s]
                   all        176        275      0.936      0.916      0.936      0.791
          trafficlight        176         46      0.897      0.804      0.845      0.598
                  stop        176         21      0.953      0.976      0.986      0.915
            speedlimit        176        160       0.98          1      0.995       0.91
             crosswalk        176         48      0.914      0.883      0.916      0.741
Results saved to runs/train/exp2
Step 8 – Validate the Model
Once training is complete, you should validate the model to check how well it performs on unseen data. YOLOv5 provides a built-in validation script that uses your best trained weights.
Now, run the validation.
python3 val.py --weights runs/train/exp2/weights/best.pt --data datasets/roadsign/roadsign.yaml --img 640
Output.
val: data=datasets/roadsign/roadsign.yaml, weights=['runs/train/exp2/weights/best.pt'], batch_size=32, imgsz=640, conf_thres=0.001, iou_thres=0.6, max_det=300, task=val, device=, workers=8, single_cls=False, augment=False, verbose=False, save_txt=False, save_hybrid=False, save_conf=False, save_json=False, project=runs/val, name=exp, exist_ok=False, half=False, dnn=False
YOLOv5 🚀 v7.0-430-g459d8bf0 Python-3.12.3 torch-2.8.0+cu128 CUDA:0 (NVIDIA A40-8Q, 8005MiB)

Fusing layers...
Model summary: 157 layers, 7020913 parameters, 0 gradients, 15.8 GFLOPs
val: Scanning /root/yolov5/datasets/roadsign/labels/val.cache... 176 images, 0 backgrounds, 0 corrupt: 100%|██████████| 176/176 [00:00
R (Recall) - How many actual objects were detected.
mAP50 - Mean Average Precision at IoU threshold 0.5 (higher is better).
mAP50-95 - Average precision across IoU thresholds (stricter measure).
Step 9 – Run Inference on Road Signs
After training and validation, it’s time to see the model in action. YOLOv5 provides a detect.py script to run inference on images, videos, or even live camera streams.
Use your trained weights to detect objects in the validation set.
python3 detect.py --weights runs/train/exp2/weights/best.pt \
--source datasets/roadsign/images/val --img 640
Output.
Results saved in runs/detect/exp2/.
Step 10 – Visualize Inference Results with Matplotlib
Running YOLOv5 with detect.py saves results to disk, but sometimes you may want to display predictions directly in Python for analysis or integration into an application. We can do this with Matplotlib and OpenCV.
1. Create an inference script.
nano inference_plot.py
Paste the following code:
import torch
import matplotlib.pyplot as plt
import cv2

# Load YOLOv5 model
model = torch.hub.load('ultralytics/yolov5', 'custom',
                       path='runs/train/exp2/weights/best.pt', force_reload=True)

# Run inference on an image
img_path = 'datasets/roadsign/images/val/road107.png'  # change to any test image
results = model(img_path)

# Results summary
results.print()   # class, confidence, bbox
results.save()    # saves to runs/detect/exp

# Display inside Python using matplotlib
img = results.render()[0]  # render() returns list of images
plt.figure(figsize=(10,10))
plt.imshow(cv2.cvtColor(img, cv2.COLOR_BGR2RGB))
plt.axis("off")
plt.show()
2. Run the script.
python3 inference_plot.py
Output.
Downloading: "https://github.com/ultralytics/yolov5/zipball/master" to /root/.cache/torch/hub/master.zip
YOLOv5 🚀 2025-9-11 Python-3.12.3 torch-2.8.0+cu128 CUDA:0 (NVIDIA A40-8Q, 8005MiB)

Fusing layers...
Model summary: 157 layers, 7020913 parameters, 0 gradients, 15.8 GFLOPs
Adding AutoShape...
/root/.cache/torch/hub/ultralytics_yolov5_master/models/common.py:906: FutureWarning: `torch.cuda.amp.autocast(args...)` is deprecated. Please use `torch.amp.autocast('cuda', args...)` instead.
  with amp.autocast(autocast):
image 1/1: 400x320 1 speedlimit
Speed: 22.3ms pre-process, 83.1ms inference, 119.0ms NMS per image at shape (1, 3, 640, 512)
Saved 1 image to runs/detect/exp2
Open the generated image at /root/yolov5/runs/detect/exp2/road107.jpg. You’ll see your road sign image with bounding boxes like:
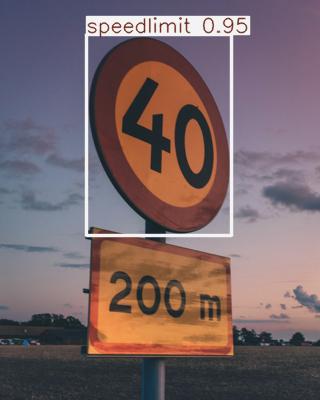
🟥 trafficlight
🟦 stop
🟨 speedlimit
🟩 crosswalk
Each box has a confidence score.
You’ve now visualized YOLOv5 predictions directly inside Python. This method is useful for debugging, generating plots for reports, or integrating YOLOv5 inference into larger applications.
Conclusion
In this tutorial, you learned how to train YOLOv5 on a custom dataset using an Ubuntu 24.04 GPU server. Starting from environment setup, dataset preparation, annotation conversion, and splitting train/validation sets, you successfully trained, validated, and tested a YOLOv5 model on the Road Sign Detection dataset.
You now have a working YOLOv5 object detection pipeline. This workflow is flexible, you can replace the dataset with your own images and annotations to train YOLOv5 on any custom problem.
* This post is for informational purposes only and does not constitute professional, legal, financial, or technical advice. Each situation is unique and may require guidance from a qualified professional.
Readers should conduct their own due diligence before making any decisions.