Optical Character Recognition (OCR) is a powerful technology that enables machines to convert images of text into editable and searchable data. By leveraging machine learning and GPU acceleration, you can greatly enhance OCR accuracy and processing speed.
In this guide, you’ll learn how to set up an OCR solution using machine learning tools on an Ubuntu 24.04 GPU server.
Prerequisites
- An Ubuntu 24.04 server with an NVIDIA GPU.
- A non-root user with sudo privileges.
- NVIDIA drivers installed.
Step 1: Set Up Python Virtual Environment
1. Install required system packages.
apt install -y python3-pip python3-dev python3-venv2. Create and activate a Python virtual environment.
python3 -m venv ocr-env
source ocr-env/bin/activate
3. Update pip to the latest version.
pip install --upgrade pipStep 2: Install EasyOCR and Dependencies
EasyOCR is a popular library for optical character recognition (OCR) tasks, leveraging machine learning.
1. Install Torch with GPU support.
pip install tensorflow torch torchvision torchaudio2. Install the OCR package and other dependencies.
pip install easyocr opencv-python matplotlibStep 3: Perform OCR on Images
Create a Python script gpu_ocr.py to read text from an image.
nano gpu_ocr.pyAdd the following content.
import easyocr
import cv2
import matplotlib.pyplot as plt
import numpy as np
import requests

# Initialize EasyOCR reader with GPU support
reader = easyocr.Reader(['en'], gpu=True)

# Load image directly from URL
image_url = 'https://i.postimg.cc/NfdDwSw5/sample-ocr.png'  # Replace with your image URL
response = requests.get(image_url)

# Convert image bytes to NumPy array for OpenCV
image_array = np.frombuffer(response.content, dtype=np.uint8)
image = cv2.imdecode(image_array, cv2.IMREAD_COLOR)

# Perform OCR on the loaded image
results = reader.readtext(image)

# Display OCR results in the console
for detection in results:
    bbox, text, confidence = detection
    print(f"Detected: '{text}' (Confidence: {confidence:.2f})")

# Visualize OCR results by drawing bounding boxes and labels
for detection in results:
    bbox, text, confidence = detection
    top_left = tuple(map(int, bbox[0]))
    bottom_right = tuple(map(int, bbox[2]))

    # Draw bounding box
    cv2.rectangle(image, top_left, bottom_right, (0, 255, 0), 2)

    # Label detected text
    cv2.putText(image, text, (top_left[0], top_left[1] - 10),
                cv2.FONT_HERSHEY_SIMPLEX, 0.6, (255, 0, 0), 2)

# Display the resulting image with OCR annotations
plt.figure(figsize=(10, 10))
plt.imshow(cv2.cvtColor(image, cv2.COLOR_BGR2RGB))
plt.axis('off')
plt.show()
Run the OCR script.
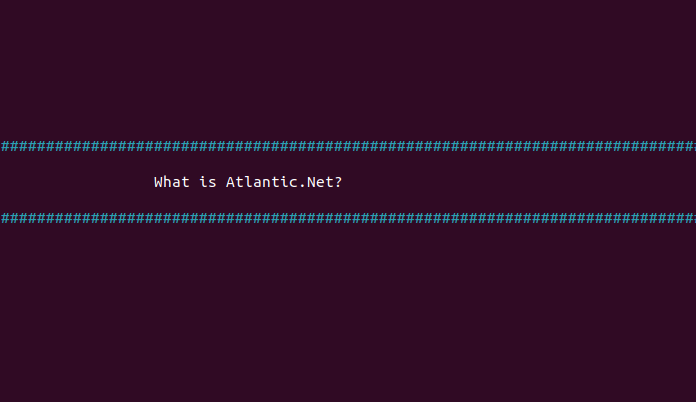
python3 gpu_ocr.py You will see the extracted text in the output below.
Detected: 'What' (Confidence: 0.99)
Detected: 'is Atlantic.Net?' (Confidence: 0.98)
Step 4: Create a Web Interface for OCR
You can also create a web-based application for OCR.
1. Install required packages.
pip install flask numpy2. Create an application for OCR.
nano app.pyAdd the following code.
from flask import Flask, request, render_template
import easyocr
import cv2
import numpy as np

app = Flask(__name__)
reader = easyocr.Reader(['en'], gpu=True)

@app.route('/', methods=['GET', 'POST'])
def upload_image():
    text_results = []
    if request.method == 'POST':
        file = request.files['image']
        if file:
            img_bytes = file.read()
            np_img = np.frombuffer(img_bytes, np.uint8)
            img = cv2.imdecode(np_img, cv2.IMREAD_COLOR)
            results = reader.readtext(img)
            text_results = [result[1] for result in results]
    return render_template('upload.html', results=text_results)

if __name__ == '__main__':
    app.run(host='0.0.0.0', port=5000)
    app.run(debug=True)
2. Create an HTML Template for your application.
mkdir templates
nano templates/upload.html
Add the below content:
<!doctype html>
<html lang="en">
<head>
    <meta charset="UTF-8">
    <meta name="viewport" content="width=device-width, initial-scale=1.0">
    <title>OCR Web Interface</title>
</head>
<body>
    <h1>Upload an Image for OCR</h1>
    <form method="POST" enctype="multipart/form-data">
        <input type="file" name="image" required>
        <button type="submit">Upload</button>
    </form>
    {% if results %}
    <h2>Extracted Text:</h2>
    <ul>
        {% for text in results %}
        <li>{{ text }}</li>
        {% endfor %}
    </ul>
    {% endif %}
</body>
</html>
4. Run the application.
python3 app.py5. Access the application by navigating to http://your-server-ip:5000 in your browser.
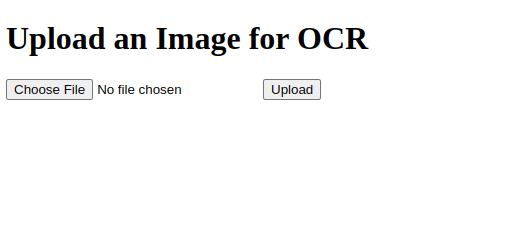
6. Click on Choose File to select the following image file from your local system.
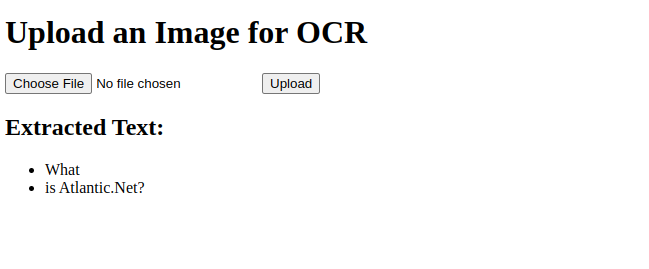
7. Click on Upload. The application extracts a text from your uploaded image file and displays it in the following output.
Conclusion
By following this guide, you’ve successfully set up and executed OCR using machine learning on your Ubuntu 24.04 GPU server. Leveraging GPU acceleration significantly enhances performance, allowing rapid processing of large datasets. Additionally, the web interface provides an intuitive way to interact with the OCR functionality.
* This post is for informational purposes only and does not constitute professional, legal, financial, or technical advice. Each situation is unique and may require guidance from a qualified professional.
Readers should conduct their own due diligence before making any decisions.