Table of Contents
- Prerequisites
- Step 1: Install Required Dependencies
- Step 2: Setting Up Tortoise-TTS
- Step 3: Prepare the Voice Directory
- Step 4: Setting Up a Python Virtual Environment
- Step 5: Install Python Dependencies
- Step 6: Building the Flask Web Application
- Step 7: Running the Voice Cloning Web App
- Step 8: Accessing the Web Interface Remotely
- Step 9: Using the Voice Cloning App
- Conclusion
Voice cloning technology has seen major advances in recent years. You can now synthesize realistic speech that sounds like almost anyone, using just a few minutes of recorded audio. This opens up exciting new possibilities, from personal voice assistants to accessibility tools, creative media, and more.
Tortoise-TTS stands out as one of the most advanced open-source tools for high-quality, controllable voice synthesis. It can generate natural-sounding speech and lets you “clone” a target voice with a small reference sample.
In this guide, you’ll learn how to set up Tortoise-TTS on Ubuntu 24.04, build a simple Flask web interface, and clone voices by uploading a reference sample and custom text for instant speech generation.
Prerequisites
- An Ubuntu 24.04 server with an NVIDIA GPU.
- A non-root user or a user with sudo privileges.
- NVIDIA drivers are installed on your server.
Step 1: Install Required Dependencies
Before you dive into voice cloning, let’s make sure your environment is ready.
1. Install the required dependency.
apt install -y software-properties-common2. Add the Python repository.
add-apt-repository ppa:deadsnakes/ppa3. Install Python 3.10 with other packages.
apt install -y python3.10 python3.10-venv python3-pip python3.10-dev python3.10-distutils ffmpeg4. Verify the Python installation.
python3.10 --versionOutput.
Python 3.10.18Step 2: Setting Up Tortoise-TTS
Before you can start cloning voices, you’ll need to get Tortoise-TTS up and running on your Ubuntu 24.04 server. This section walks you through cloning the official repository and applying a quick code fix to avoid a common runtime error.
1. First, let’s download the latest Tortoise-TTS code from GitHub.
git clone https://github.com/neonbjb/tortoise-tts.git2. Navigate inside the downloaded directory.
cd tortoise-tts3. Tortoise-TTS sometimes throws an error related to an unexpected argument in the API. The fix is simple—just update one line in the tortoise/api.py file.
nano tortoise/api.pyFind the following line:
cond_mel = wav_to_univnet_mel(sample.to(self.device), do_normalization=False,
                                              device=self.device, stft=self.stft)
And, replaced it with the following line.
cond_mel = wav_to_univnet_mel(sample.to(self.device), do_normalization=False)Save and close the file
Step 3: Prepare the Voice Directory
Before you can start cloning a voice, you’ll need a special folder to store your reference audio sample. Tortoise-TTS uses this folder to find the audio it will learn from and later use for synthesis.
Let’s make a new folder called my_target_voice inside the tortoise/voices directory. This will hold your recorded sample.
mkdir -p tortoise/voices/my_target_voiceStep 4: Setting Up a Python Virtual Environment
Running Tortoise-TTS and its dependencies inside a Python virtual environment is the best way to keep your project organized and avoid conflicts with other Python apps on your server.
1. First, make sure you’re in the root folder of your Tortoise-TTS project:
cd ~/tortoise-tts2. Now, create a new virtual environment called tortoise-venv using Python 3.10.
python3.10 -m venv tortoise-venv3. Activate your new environment so all Python commands use the right interpreter and dependencies.
source tortoise-venv/bin/activateStep 5: Install Python Dependencies
With your virtual environment activated, you’re ready to install everything Tortoise-TTS needs to run smoothly. This includes core requirements, plus a couple of extra packages for the web interface.
1. Start by making sure pip (Python’s package installer) is up to date.
pip install --upgrade pip2. Next, install all the required packages listed by the Tortoise-TTS repository.
pip install -r requirements.txtNote: The installation will take a few minutes
3. For the web interface and easier running of the Tortoise-TTS API, you’ll also want Flask and the latest Tortoise-TTS package.
pip install flask tortoise-ttsStep 6: Building the Flask Web Application
With Tortoise-TTS installed and ready, let’s make it user-friendly! You’ll build a simple Flask web app so you can record/upload your reference voice, type any text, and get your cloned voice as an MP3, all from your browser.
1. Create a new file named app.py in your tortoise-tts directory.
nano app.pyAdd the following code.
import os
from flask import Flask, render_template, request, send_file

app = Flask(__name__)

VOICE_DIR = "tortoise/voices/my_target_voice"
AUDIO_PATH = os.path.join(VOICE_DIR, "sample1.wav")
RESULT_WAV = "results/output_001.wav"
RESULT_MP3 = "results/output_001.mp3"
RESULTS_DIR = "results"

# Ensure directories exist
os.makedirs(VOICE_DIR, exist_ok=True)
os.makedirs(RESULTS_DIR, exist_ok=True)

@app.route("/", methods=["GET"])
def index():
    return render_template("index.html")

@app.route("/upload", methods=["POST"])
def upload():
    # Remove old wav files in the target voice directory
    for f in os.listdir(VOICE_DIR):
        if f.endswith(".wav"):
            os.remove(os.path.join(VOICE_DIR, f))
    audio = request.files["audio_data"]
    temp_path = os.path.join(VOICE_DIR, "temp_upload")
    audio.save(temp_path)
    # Convert to real WAV format using ffmpeg
    os.system(f'ffmpeg -y -i "{temp_path}" -ar 22050 -ac 1 "{AUDIO_PATH}"')
    os.remove(temp_path)
    return "Uploaded", 200

@app.route("/synthesize", methods=["POST"])
def synthesize():
    text = request.form["text"]

    # Clean old .wav and .mp3 files from results/
    for f in os.listdir(RESULTS_DIR):
        if f.endswith(".wav") or f.endswith(".mp3"):
            os.remove(os.path.join(RESULTS_DIR, f))

    # Run Tortoise-TTS with the user's recorded reference
    cmd = f'python3 tortoise/do_tts.py --text "{text}" --voice my_target_voice'
    os.system(cmd)

    # Find the latest .wav file in results/
    wav_files = [os.path.join(RESULTS_DIR, f) for f in os.listdir(RESULTS_DIR) if f.endswith(".wav")]
    if not wav_files:
        return "Synthesis failed: No output .wav found.", 500
    latest_wav = max(wav_files, key=os.path.getctime)

    # Convert the wav file to mp3 using ffmpeg
    os.system(f'ffmpeg -y -i "{latest_wav}" -codec:a libmp3lame -qscale:a 2 "{RESULT_MP3}"')

    # Return the mp3 file for download
    if not os.path.exists(RESULT_MP3):
        return "Synthesis failed: MP3 not created.", 500
    return send_file(RESULT_MP3, as_attachment=True, download_name="cloned_voice.mp3")

if __name__ == "__main__":
    app.run(debug=True)
The above code:
- Handles audio upload and conversion to the right format.
- Runs the Tortoise-TTS synthesis process.
- Converts the result to MP3 and sends it back for download.
- Serves the web page for your interface.
2. Now let’s make a folder for your HTML files.
mkdir templates3. Create a new HTML file inside the templates directory.
nano templates/index.htmlAdd the following code.
<!DOCTYPE html>
<html>
<head>
    <meta charset="UTF-8">
    <title>Voice Clone Web UI</title>
    <style>
        body { font-family: sans-serif; background: #222; color: #fff; text-align: center; }
        .box { background: #333; border-radius: 12px; padding: 2em; display: inline-block; margin-top: 2em; }
        button { font-size: 1em; padding: 10px 20px; margin: 10px; border-radius: 8px; }
        input[type=text] { width: 350px; font-size: 1em; padding: 6px; }
        a.button-link {
            display: inline-block;
            padding: 10px 22px;
            border-radius: 8px;
            background: #5fdfff;
            color: #222;
            text-decoration: none;
            font-weight: bold;
            margin-top: 15px;
            margin-bottom: 10px;
        }
    </style>
</head>
<body>
    <div class="box">
        <h2>1. Record your voice sample</h2>
        <button id="recordBtn">🎙️ Record</button>
        <button id="stopBtn" disabled>⏹️ Stop</button>
        <audio id="audioPlayback" controls style="display:none"></audio>
        <div id="uploadStatus"></div>
    </div>

    <div class="box">
        <h2>2. Clone your voice</h2>
        <form id="cloneForm">
            <input type="text" id="inputText" name="text" placeholder="Enter text to synthesize" required>
            <button type="submit">Clone Voice</button>
        </form>
        <div id="progressBarContainer" style="display:none; margin-top:20px;">
            <div id="progressBar" style="width: 300px; height: 18px; background: #444; border-radius: 8px; overflow: hidden; margin: 0 auto;">
                <div id="progressFill" style="width: 0%; height: 100%; background: linear-gradient(90deg, #5fdfff, #0089c7 80%); transition: width 0.5s; border-radius: 8px;"></div>
            </div>
            <div id="progressText" style="margin-top:8px;">Synthesizing... please wait</div>
        </div>
        <div id="downloadLink"></div>
    </div>

    <script>
    let mediaRecorder, audioChunks;
    let progressInterval;

    function showProgressBar() {
        document.getElementById("progressBarContainer").style.display = "block";
        document.getElementById("progressFill").style.width = "0%";
        document.getElementById("progressText").textContent = "Synthesizing... please wait";
        let width = 0;
        progressInterval = setInterval(() => {
            width += 3 + Math.random() * 3;
            if (width > 97) width = 97;
            document.getElementById("progressFill").style.width = width + "%";
        }, 500);
    }

    function hideProgressBar() {
        clearInterval(progressInterval);
        document.getElementById("progressBarContainer").style.display = "none";
        document.getElementById("progressFill").style.width = "0%";
    }

    document.getElementById("recordBtn").onclick = function() {
        audioChunks = [];
        navigator.mediaDevices.getUserMedia({ audio: true })
            .then(stream => {
                mediaRecorder = new MediaRecorder(stream);
                mediaRecorder.start();
                document.getElementById("stopBtn").disabled = false;
                document.getElementById("recordBtn").disabled = true;
                document.getElementById("uploadStatus").innerText = "Recording...";
                mediaRecorder.ondataavailable = e => audioChunks.push(e.data);
                mediaRecorder.onstop = e => {
                    const audioBlob = new Blob(audioChunks, { type: 'audio/wav' });
                    document.getElementById("audioPlayback").src = URL.createObjectURL(audioBlob);
                    document.getElementById("audioPlayback").style.display = "block";
                    let fd = new FormData();
                    fd.append('audio_data', audioBlob, "sample1.wav");
                    fetch("/upload", { method: "POST", body: fd })
                        .then(r => r.text())
                        .then(() => {
                            document.getElementById("uploadStatus").innerText = "Voice sample uploaded!";
                        });
                    document.getElementById("recordBtn").disabled = false;
                };
            })
            .catch(err => {
                document.getElementById("uploadStatus").innerText = "Mic permission denied or unavailable.";
                alert("Microphone permission denied or unavailable.\n\nTry from localhost or over HTTPS, and check browser permissions.");
            });
    };

    document.getElementById("stopBtn").onclick = function() {
        if (mediaRecorder && mediaRecorder.state === "recording") {
            mediaRecorder.stop();
        }
        document.getElementById("stopBtn").disabled = true;
    };

    document.getElementById("cloneForm").onsubmit = function(e) {
        e.preventDefault();
        showProgressBar();
        document.getElementById("downloadLink").innerHTML = "";
        fetch("/synthesize?ts=" + Date.now(), {
            method: "POST",
            body: new URLSearchParams({text: document.getElementById("inputText").value})
        }).then(response => {
            hideProgressBar();
            if (!response.ok) {
                return response.text().then(text => { throw new Error(text || "Synthesis failed."); });
            }
            return response.blob();
        }).then(blob => {
            const url = window.URL.createObjectURL(blob);
            document.getElementById("downloadLink").innerHTML =
                `<a href="${url}" download="cloned_voice.mp3" class="button-link">⬇️ Download Cloned Voice</a>`;
        }).catch(err => {
            hideProgressBar();
            document.getElementById("downloadLink").innerHTML =
                `<span style="color:#ff5555">Error: ${err.message}</span>`;
        });
    };
    </script>
</body>
</html>
The above code allows you to:
- Record your own voice or upload an audio sample directly from your browser.
- Enter any text for voice synthesis.
- Shows progress and lets you download your cloned voice as an MP3.
Step 7: Running the Voice Cloning Web App
Now that you’ve built your Flask web application and set up all the required files, it’s time to launch your own private voice cloning site!
Run your Flask application.
python3 app.pyYou should see output like this.
 * Serving Flask app 'app'
 * Debug mode: on
WARNING: This is a development server. Do not use it in a production deployment.
 * Running on http://127.0.0.1:5000
This means your server is running locally and ready for you to test!
Step 8: Accessing the Web Interface Remotely
If your Ubuntu 24.04 server is running in the cloud, you’ll want to use your laptop or desktop browser to control your voice cloning web app. The safest and easiest way to do this is with an SSH tunnel.
An SSH tunnel creates a secure, encrypted connection from your local computer to your server. It forwards a port from your server to your local machine, so only you can access the web app, no public exposure or risky firewall changes.
On your local desktop computer, open a terminal and run:
ssh -N -f -L 5000:localhost:5000 root@your-server-ipNote: Replace your-server-ip with your server’s public IP address or domain name.
The above command:
- Forward your local port 5000 to port 5000 on the server.
- Any request you make to localhost:5000 on your laptop goes securely to your server’s Flask app.
Step 9: Using the Voice Cloning App
Once you have your Tortoise-TTS web app running (and have connected via SSH tunnel if needed), you’re ready to try out voice cloning for yourself. Here’s how you can go from recording your own voice to downloading a fully cloned audio sample, all from your browser.
1. Open the Web App
On your local computer, open a web browser and visit:
http://localhost:5000This brings up your voice cloning app’s main interface.
2. Record Your Voice Sample
- Click the “Record” button to begin recording your voice.
- When your browser asks for permission, allow microphone access.
- Speak clearly and record a short sample, just a few seconds is enough for a quick demo.
- Click “Stop” when you’re done.
- You’ll see your recorded sample appear in the audio player and a message confirming upload.
3. Enter the Text to Clone
In the input field below, type any text you want the app to synthesize in your voice.
- Example: “My name is hitesh“
4. Generate the Cloned Voice
- Click the “Clone Voice” button.
You’ll see a progress bar as the server processes your request and generates the synthetic voice.
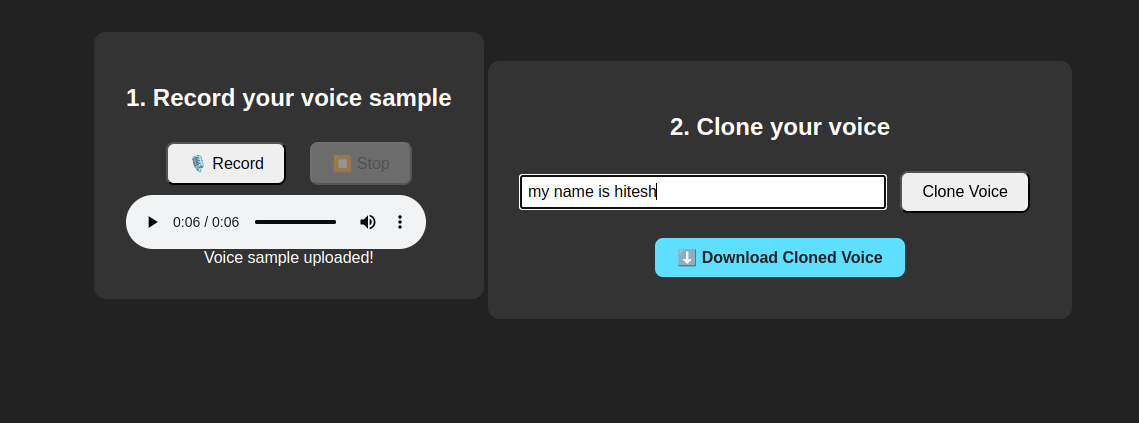
5. Download Your Cloned Audio
- Once the process is finished, a download link for an MP3 file will appear.
- Click the link to download your cloned voice and play it on your computer, phone, or any audio player.
Conclusion
You’ve now learned how to set up a powerful, private voice cloning app using Tortoise-TTS on an Ubuntu 24.04 GPU server. With just a few steps, you can record your voice, enter custom text, and generate natural-sounding speech, all from an easy-to-use web interface.
This workflow is perfect for experimenting with AI voice technology in a secure environment, whether you’re a developer, content creator, or just curious about the latest in speech synthesis. If you want to go further, you can explore customizing the web UI, adding support for more voices, or integrating Tortoise-TTS with other applications and APIs.
* This post is for informational purposes only and does not constitute professional, legal, financial, or technical advice. Each situation is unique and may require guidance from a qualified professional.
Readers should conduct their own due diligence before making any decisions.