Synapse is a home server implementation of Matrix written in Python. Matrix is an open standard for real-time communication over IP. IT allows people, services, and devices to easily communicate with each other. Matrix Synapse is a great alternative for applications like Slack, Discord, Rocket.chat, Skype and others. You can access the Matrix server through a web browser or other clients like Riot, bots, and bridges.
In this post, we will show you how to deploy Matrix Synapse with Nginx on Debian 10.
Step 1 – Install Matrix Synapse
By default, the Matrix Synapse package is not available in the Debian 10 default repository, so you will need to add the Matrix Synapse repository to your system.
First, install the required dependencies using the following command:
apt-get install gnupg2 wget apt-transport-https -y
Once all the packages are installed, add the Matrix Synapse repository to APT with the following command:
wget -qO /usr/share/keyrings/matrix-org-archive-keyring.gpg https://packages.matrix.org/debian/matrix-org-archive-keyring.gpg
echo "deb [signed-by=/usr/share/keyrings/matrix-org-archive-keyring.gpg] https://packages.matrix.org/debian/ $(lsb_release -cs) main" | tee /etc/apt/sources.list.d/matrix-org.list
Next, update the repository and install Matrix Synapse with the following command:
apt-get update -y
apt-get install matrix-synapse-py3 -y
You will be asked to provide your domain name as shown below:

Provide your domain name and hit Enter. You will be asked to choose for the anonymous data report as shown below:
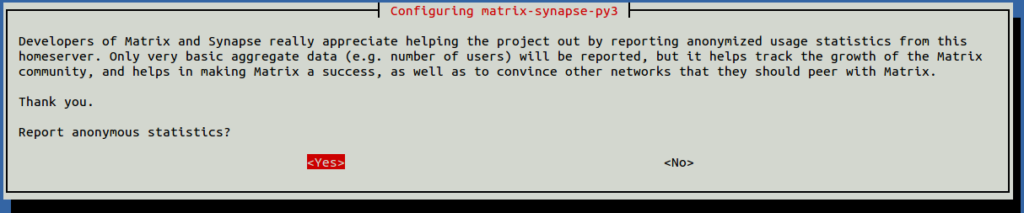
Select your desired option and hit Enter to start the installation.
Once the installation is completed, start the Matrix Synapse service and enable it to start at system reboot:
systemctl start matrix-synapse
systemctl enable matrix-synapse
You can also check the status of Matrix Synapse with the following command:
systemctl status matrix-synapse
Output:
● matrix-synapse.service - Synapse Matrix homeserver
   Loaded: loaded (/lib/systemd/system/matrix-synapse.service; enabled; vendor preset: enabled)
   Active: active (running) since Fri 2021-04-09 07:48:42 UTC; 28s ago
  Process: 1754 ExecStartPre=/opt/venvs/matrix-synapse/bin/python -m synapse.app.homeserver --config-path=/etc/matrix-synapse/homeserver.yaml -
 Main PID: 1761 (python)
    Tasks: 2 (limit: 4701)
   Memory: 78.5M
   CGroup: /system.slice/matrix-synapse.service
           └─1761 /opt/venvs/matrix-synapse/bin/python -m synapse.app.homeserver --config-path=/etc/matrix-synapse/homeserver.yaml --config-pat

Apr 09 07:48:40 debian10 matrix-synapse[1754]: Generating signing key file /etc/matrix-synapse/homeserver.signing.key
Apr 09 07:48:41 debian10 matrix-synapse[1761]: This server is configured to use 'matrix.org' as its trusted key server via the
Apr 09 07:48:41 debian10 matrix-synapse[1761]: 'trusted_key_servers' config option. 'matrix.org' is a good choice for a key
Apr 09 07:48:41 debian10 matrix-synapse[1761]: server since it is long-lived, stable and trusted. However, some admins may
Apr 09 07:48:41 debian10 matrix-synapse[1761]: wish to use another server for this purpose.
Apr 09 07:48:41 debian10 matrix-synapse[1761]: To suppress this warning and continue using 'matrix.org', admins should set
Apr 09 07:48:41 debian10 matrix-synapse[1761]: 'suppress_key_server_warning' to 'true' in homeserver.yaml.
Apr 09 07:48:41 debian10 matrix-synapse[1761]: --------------------------------------------------------------------------------
Apr 09 07:48:41 debian10 matrix-synapse[1761]: Config is missing macaroon_secret_key
Apr 09 07:48:42 debian10 systemd[1]: Started Synapse Matrix homeserver.
At this point, Matrix Synapse is started and listening on port 8008. You can check it with the following command:
ss -antpl | grep 8008
Output:
LISTEN    0         50               127.0.0.1:8008             0.0.0.0:*        users:(("python",pid=1761,fd=13))
LISTEN    0         50                   [::1]:8008                [::]:*        users:(("python",pid=1761,fd=12))
Step 2 – Configure Matrix Synapse
Next, you will need to configure Matrix Synapse to work properly.
First, generate the shared-secret-key with the following command:
cat /dev/urandom | tr -dc 'a-zA-Z0-9' | fold -w 32 | head -n 1
Output:
cLmgfxKcNav5qHDuM31HNUlvAsVtSTDN
Next, edit the Matrix Synapse configuration file:
nano /etc/matrix-synapse/homeserver.yaml
Change the following lines:
listeners:

  - port: 8008
    tls: false
    type: http
    x_forwarded: true
    bind_addresses: ['::1', '127.0.0.1']
 domain: matrix.turbogeek.club
registration_shared_secret: cLmgfxKcNav5qHDuM31HNUlvAsVtSTDN
Save and close the file, then restart Matrix Synapse to apply the changes:
systemctl restart matrix-synapse
Step 3 – Download Let’s Encrypt SSL
Next, you will need to install the Certbot client to download the free Let’s Encrypt SSL.
First, install the Nginx web server with the following command:
apt-get install nginx -y
Next, install the Certbot client with the following command:
apt-get install python3-certbot-nginx
Once installed, download the Let’s Encrypt SSL for your domain with the following command:
certbot certonly --nginx -d matrix.example.com
You will be asked to provide your email and accept the terms of service as shown below:
Saving debug log to /var/log/letsencrypt/letsencrypt.log
Plugins selected: Authenticator nginx, Installer nginx
Enter email address (used for urgent renewal and security notices) (Enter 'c' to
cancel): [email protected]

- - - - - - - - - - - - - - - - - - - - - - - - - - - - - - - - - - - - - - - -
Please read the Terms of Service at
https://letsencrypt.org/documents/LE-SA-v1.2-November-15-2017.pdf. You must
agree in order to register with the ACME server at
https://acme-v02.api.letsencrypt.org/directory
- - - - - - - - - - - - - - - - - - - - - - - - - - - - - - - - - - - - - - - -
(A)gree/(C)ancel: A

- - - - - - - - - - - - - - - - - - - - - - - - - - - - - - - - - - - - - - - -
Would you be willing to share your email address with the Electronic Frontier
Foundation, a founding partner of the Let's Encrypt project and the non-profit
organization that develops Certbot? We'd like to send you email about our work
encrypting the web, EFF news, campaigns, and ways to support digital freedom.
- - - - - - - - - - - - - - - - - - - - - - - - - - - - - - - - - - - - - - - -
(Y)es/(N)o: N
Obtaining a new certificate
Performing the following challenges:
http-01 challenge for matrix.example.com
Using default address 80 for authentication.
Waiting for verification...
Cleaning up challenges
Could not automatically find a matching server block for matrix.example.com. Set the `server_name` directive to use the Nginx installer.

IMPORTANT NOTES:
 - Unable to install the certificate
 - Congratulations! Your certificate and chain have been saved at:
   /etc/letsencrypt/live/matrix.example.com/fullchain.pem
   Your key file has been saved at:
   /etc/letsencrypt/live/matrix.example.com/privkey.pem
   Your cert will expire on 2021-07-08. To obtain a new or tweaked
   version of this certificate in the future, simply run certbot again
   with the "certonly" option. To non-interactively renew *all* of
   your certificates, run "certbot renew"
 - Your account credentials have been saved in your Certbot
   configuration directory at /etc/letsencrypt. You should make a
   secure backup of this folder now. This configuration directory will
   also contain certificates and private keys obtained by Certbot so
   making regular backups of this folder is ideal.
At this point, all Let’s Encrypt SSL are downloaded in /etc/letsencrypt/live/matrix.example.com directory.
Step 4 – Configure Nginx for Matrix Synapse
Next, you will need to create an Nginx virtual host configuration file for Matrix Synapse.
nano /etc/nginx/conf.d/matrix.conf
Add the following lines:
server {
    listen 80;
    server_name matrix.example.com;
    return 301 https://$host$request_uri;
}

server {
    listen 443 ssl;
    server_name matrix.example.com;

    ssl_certificate /etc/letsencrypt/live/matrix.example.com/fullchain.pem;
    ssl_certificate_key /etc/letsencrypt/live/matrix.example.com/privkey.pem;

    location / {
        proxy_pass http://localhost:8008;
        proxy_set_header X-Forwarded-For $remote_addr;
        # Nginx by default only allows file uploads up to 1M in size
        # Increase client_max_body_size to match max_upload_size defined in homeserver.yaml
        client_max_body_size 10M;
    }
}

# This is used for Matrix Federation
# which is using default TCP port '8448'
server {
    listen 8448 ssl;
    server_name matrix.example.com;

    ssl_certificate /etc/letsencrypt/live/matrix.example.com/fullchain.pem;
    ssl_certificate_key /etc/letsencrypt/live/matrix.example.com/privkey.pem;

    location / {
        proxy_pass http://localhost:8008;
        proxy_set_header X-Forwarded-For $remote_addr;
    }
}
Save and close the file, then edit the Nginx main configuration file:
nano /etc/nginx/nginx.conf
Add the following line below HTTP {:
server_names_hash_bucket_size 64;
Save the file then verify Nginx for any error with the following command:
nginx -t
Output:
nginx: the configuration file /etc/nginx/nginx.conf syntax is ok
nginx: configuration file /etc/nginx/nginx.conf test is successful
Next, restart the Nginx to apply the changes:
systemctl restart nginx
Step 5 – Add User to Matrix Synapse Server
Next, you will need to add a user to the Matrix Synapse server. You can add it with the following command:
register_new_matrix_user -c /etc/matrix-synapse/homeserver.yaml http://localhost:8008
You will be asked to set a username and password as shown below:
New user localpart [root]: admin
Password:
Confirm password:
Make admin [no]: yes
Sending registration request...
Success!
Step 6 – Access Matrix Synapse
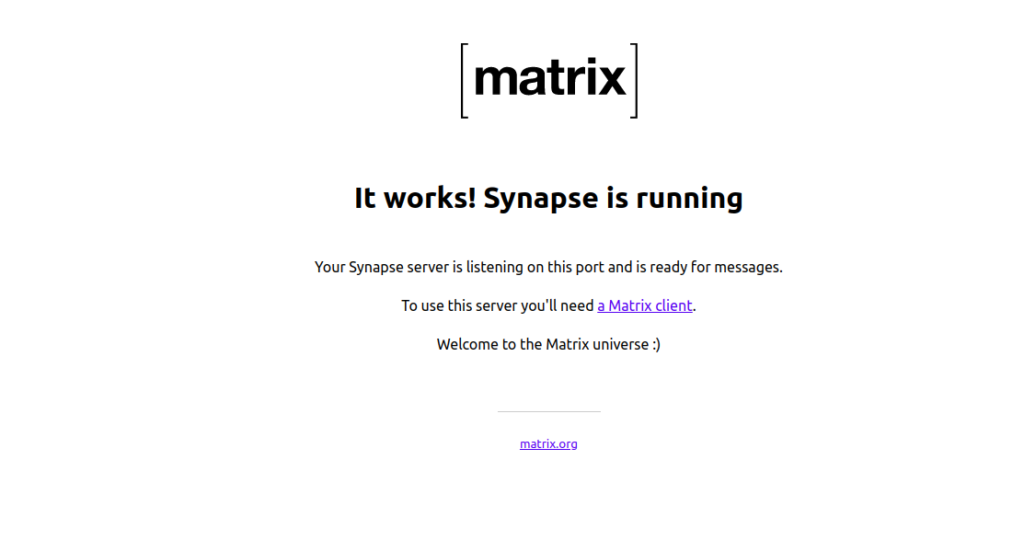
You can now open your web browser and access the Matrix Synapse using the URL https://matrix.example.com. You should see the following page:
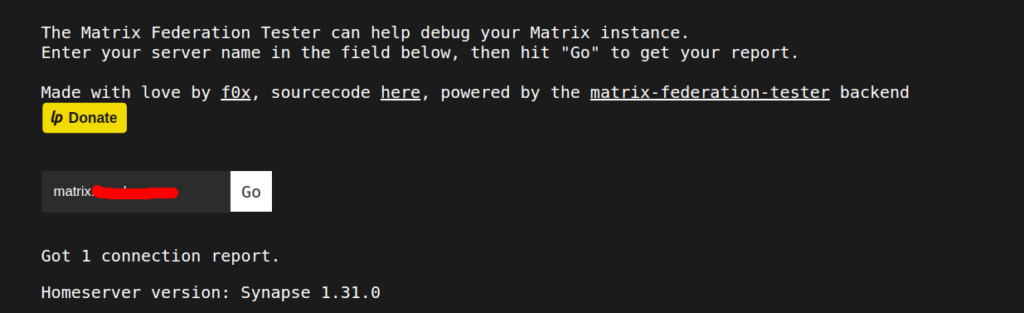
You can also test Matrix Synapse using Matrix Synapse Federation Tester URL https://federationtester.matrix.org/
Provide your Matrix Synapse domain name and click on the Go button. If everything is fine, you should see the following page:
Conclusion
In the above guide, you learned how to install Matrix Synapse server with Nginx and Let’s Encrypt SSL on Debian 10. You can now easily implement your own communication server in the production environment of your dedicated server.