Zimplit is a free, open-source, extremely lightweight content management system. It is simple, easy to install, customizable, and doesn’t need any database system. Zimplit consists of only one core engine file; you can edit your site by editing the HTML/CSS page. It has an on-site editor that enables you to do everything on the website directly without an admin area.
In this post, we will show you how to install Zimplit CMS on Ubuntu 20.04.
Step 1 – Install Apache and PHP
First, you will need to install Apache web server, PHP, and other PHP extensions to your system. You can install all of them using the following command:
apt-get install apache2 libapache2-mod-php php php-mysql php-xml php-curl php-imap php-gd php-mbstring php-soap php-sqlite3 php-ldap php-zip -y
Once all the packages are installed, start the Apache service and enable it to start at system reboot:
systemctl start apache2
systemctl enable apache2
Step 2 – Install Zimplit CMS
First, download the latest version of Zimplit CMS from Github using the following command:
wget https://github.com/niutech/zimplitcms/archive/3.0.zip
Once the download is completed, unzip the downloaded file with the following command:
unzip 3.0.zip
Next, move the extracted directory to the Apache root directory:
mv zimplitcms-3.0 /var/www/html/zimplitcms
Next, set proper permissions and ownership with the following command:
chown -R www-data:www-data /var/www/html/zimplitcms
chmod -R 775 /var/www/html/zimplitcms
At this point, Zimplit CMS is downloaded to the Apache root directory.
Step 3 – Configure Apache for Zimplit CMS
Next, you will need to create an Apache virtual host configuration file for Zimplit CMS. You can create it with the following command:
nano /etc/apache2/sites-available/zimplit.conf
Add the following lines:
<VirtualHost *:80>
ServerAdmin [email protected]
DocumentRoot /var/www/html/zimplitcms
ServerName zimplit.domain.com

ErrorLog /var/log/apache2/zimplitcms-error_log
CustomLog /var/log/apache2/zimplitcms-access_log common
</VirtualHost>
Save and close the file, then activate the Zimplit virtual host with the following command:
a2ensite zimplit
Finally, restart the Apache service to apply the changes:
systemctl restart apache2
Step 4 – Access Zimplit CMS
Now, open your web browser and access the Zimplit CMS using the URL http://zimplit.domain.com/zimplit.php. You should see the following page:
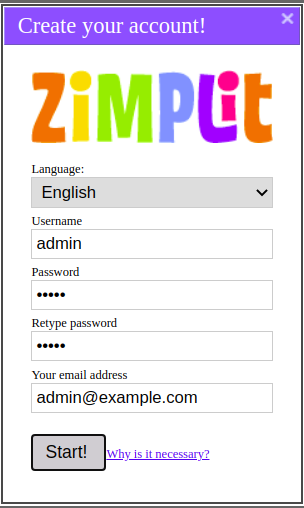
Provide your admin username, password, email, and click on the Start button. You should see the following page:
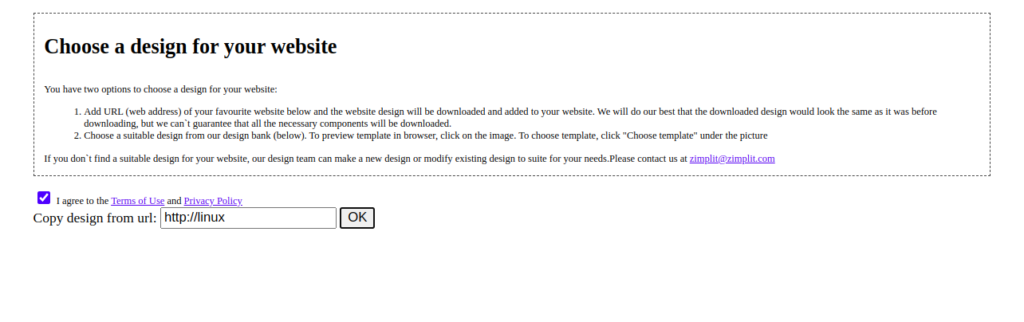
Now, accept the terms of use and type any word then click on the OK.
Now, open a new browser window and type the URL http://zimplit.domain.com/zimplit.php. You should see your Zimplit CMS dashboard on the following page:

Conclusion
Congratulations! You have successfully installed Zimplit CMS on Ubuntu 20.04 server. You can now create a new website easily using the Zimplit CMS – try it today on dedicated server hosting from Atlantic.Net.