Minikube is an open-source tool specially designed for developers to run a single-node Kubernetes cluster on their local system. Minikube starts a virtual machine and runs a Kubernetes cluster inside it. You can then test in a Kubernetes environment locally. With Minikube, you don’t need to set up multiple systems for the Kubernetes cluster.
In this guide, we will show you how to set up a Kubernetes cluster with Minikube on Ubuntu 20.04.
Step 1 – Install Required Dependencies
First, you will need to install some required dependencies on your server. You can install all the dependencies using the following command:
apt-get install git apt-transport-https ca-certificates curl gnupg-agent software-properties-common virtualbox virtualbox-ext-pack -y
Once all the packages are installed, you can proceed to the next step.
Step 2 – Install Docker CE
Kubernetes requires Docker CE to be installed in your server. First, add the Docker CE repository with the following command:
curl -fsSL https://download.docker.com/linux/ubuntu/gpg | apt-key add -
add-apt-repository "deb [arch=amd64] https://download.docker.com/linux/ubuntu $(lsb_release -cs) stable"
Once the repository is added, install the Docker with the following command:
apt-get install docker-ce -y
Once installed, verify the Docker CE version with the following command:
docker --version
You should see the following output:
Docker version 20.10.7, build f0df350
Step 3 – Install Minikube
By default, the Minikube package is not included in Ubuntu, so you will need to download it from their website.
Run the following command to download it:
wget https://storage.googleapis.com/minikube/releases/latest/minikube-linux-amd64
Next, move the downloaded file to the system path:
mv minikube-linux-amd64 /usr/local/bin/minikube
Next, set execution permissions with the following command:
chmod +x /usr/local/bin/minikube
Now, verify the Minikube version with the following command:
minikube version
Output:
minikube version: v1.20.0
commit: c61663e942ec43b20e8e70839dcca52e44cd85ae
Step 4 – Install Kubernetes Utility
Next, you will need to install Kubernetes utilities including kubectl, kubeadm, and kubectl to your server.
First, add the Kubernetes repository with the following command:
curl -s https://packages.cloud.google.com/apt/doc/apt-key.gpg | apt-key add -
echo "deb http://apt.kubernetes.io/ kubernetes-xenial main" | tee /etc/apt/sources.list.d/kubernetes.list
Next, update the repository and install all the utilities with the following command:
apt-get update -y
apt-get install kubectl kubeadm kubectl -y
Step 5 – Launch Kubernetes Cluster with Minikube
Now, you can start the Kubernetes cluster using the Minikube as shown below:
minikube start --driver=none
You should get the following output:
* minikube v1.20.0 on Ubuntu 20.04 (kvm/amd64)
* Using the none driver based on user configuration
* Starting control plane node minikube in cluster minikube
* Running on localhost (CPUs=2, Memory=3936MB, Disk=80568MB) ...
* OS release is Ubuntu 20.04 LTS
* Preparing Kubernetes v1.20.2 on Docker 20.10.7 ...
  - kubelet.resolv-conf=/run/systemd/resolve/resolv.conf
    > kubectl.sha256: 64 B / 64 B [--------------------------] 100.00% ? p/s 0s
    > kubeadm.sha256: 64 B / 64 B [--------------------------] 100.00% ? p/s 0s
    > kubelet.sha256: 64 B / 64 B [--------------------------] 100.00% ? p/s 0s
    > kubectl: 38.37 MiB / 38.37 MiB [-------------] 100.00% 29.81 MiB p/s 1.5s
    > kubeadm: 37.40 MiB / 37.40 MiB [-------------] 100.00% 28.73 MiB p/s 1.5s
    > kubelet: 108.73 MiB / 108.73 MiB [-----------] 100.00% 42.93 MiB p/s 2.7s
  - Generating certificates and keys ...
  - Booting up control plane ...
  - Configuring RBAC rules ...
* Configuring local host environment ...
*
! The 'none' driver is designed for experts who need to integrate with an existing VM
* Most users should use the newer 'docker' driver instead, which does not require root!
* For more information, see: https://minikube.sigs.k8s.io/docs/reference/drivers/none/
*
! kubectl and minikube configuration will be stored in /root
! To use kubectl or minikube commands as your own user, you may need to relocate them. For example, to overwrite your own settings, run:
*
  - sudo mv /root/.kube /root/.minikube $HOME
  - sudo chown -R $USER $HOME/.kube $HOME/.minikube
*
* This can also be done automatically by setting the env var CHANGE_MINIKUBE_NONE_USER=true
* Verifying Kubernetes components...
  - Using image gcr.io/k8s-minikube/storage-provisioner:v5
* Enabled addons: storage-provisioner, default-storageclass
* Done! kubectl is now configured to use "minikube" cluster and "default" namespace by default
You can check the cluster information with the following command:
kubectl cluster-info
Output:
Kubernetes control plane is running at https://45.58.43.101:8443
KubeDNS is running at https://45.58.43.101:8443/api/v1/namespaces/kube-system/services/kube-dns:dns/proxy

To further debug and diagnose cluster problems, use 'kubectl cluster-info dump'.
Kubernetes stores all configuration information in the file ~/.minikube/machines/minikube/config.json. You can check it with the following command:
kubectl config view
Output:
apiVersion: v1
clusters:
- cluster:
    certificate-authority: /root/.minikube/ca.crt
    extensions:
    - extension:
        last-update: Tue, 08 Jun 2021 11:51:58 UTC
        provider: minikube.sigs.k8s.io
        version: v1.20.0
      name: cluster_info
    server: https://45.58.43.101:8443
  name: minikube
contexts:
- context:
    cluster: minikube
    extensions:
    - extension:
        last-update: Tue, 08 Jun 2021 11:51:58 UTC
        provider: minikube.sigs.k8s.io
        version: v1.20.0
      name: context_info
    namespace: default
    user: minikube
  name: minikube
current-context: minikube
kind: Config
preferences: {}
users:
- name: minikube
  user:
    client-certificate: /root/.minikube/profiles/minikube/client.crt
    client-key: /root/.minikube/profiles/minikube/client.key
To check the Minikube node status, run the following command:
minikube status
Output:
minikube
type: Control Plane
host: Running
kubelet: Running
apiserver: Running
kubeconfig: Configured
Step 6 – Enable Kubernetes Dashboard
Next, you will need to enable the Kubernetes dashboard to access it from the web browser.
To enable the dashboard, run the following command:
minikube dashboard &
This will start a Kubernetes dashboard on the localhost.
Next, you will need to create a local proxy for access to the dashboard from the remote machine.
Run the following command to create a local proxy:
kubectl proxy &
This will start a proxy on localhost on port 8001.
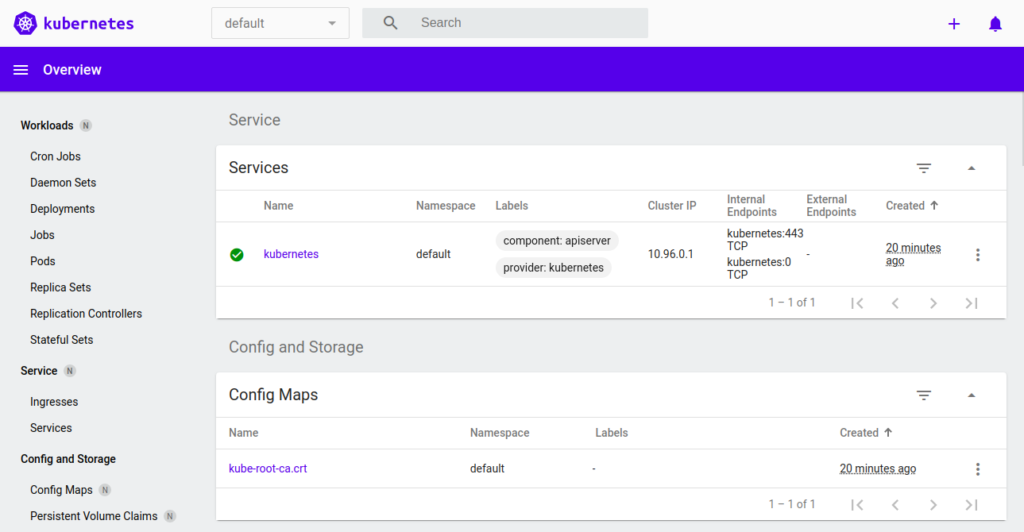
Step 7 – Access Kubernetes Dashboard
At this point, the Kubernetes dashboard is accessible on the localhost on port 8001.
Next, you will need to set an SSH port forwarding on the client machine from where you want to access the Kubernetes cluster.
On the client machine, run the following command to set an SSH port forwarding:
ssh -L 12345:localhost:8001 root@your-kubernetes-server-ip
Now, you can access your Kubernetes cluster using the URL http://localhost:12345/api/v1/namespaces/kubernetes-dashboard/services/http:kubernetes-dashboard:/proxy/ from your web browser.
Conclusion
Congratulations! You have successfully set up a Kubernetes cluster with Minikube on Ubuntu 20.04. You now have enough knowledge to set up a local Kubernetes cluster using Minikube. Get started with Minikube on a dedicated server from Atlantic.Net.
* This post is for informational purposes only and does not constitute professional, legal, financial, or technical advice. Each situation is unique and may require guidance from a qualified professional.
Readers should conduct their own due diligence before making any decisions.