Ansible is a free and open-source automation tool used for automating administrative tasks on multiple Linux servers. It is an agentless tool and supports Linux, Windows, and VMware cloud servers. It is a simple and lightweight alternative to other automation tools, including Chef and Puppet. It is primarily designed for IT professionals for application deployment, system updates, cloud provisioning, configuration management, and much more.
In this post, we will show you how to install Ansible on Arch Linux.
Step 1 – Configure Repository
By default, the default repository is outdated in Arch Linux, so you will need to modify the default mirror list. You can do it by editing the mirrorlist configuration file:
nano /etc/pacman.d/mirrorlist
Remove all lines and add the following lines:
## Score: 0.7, United States
Server = http://mirror.us.leaseweb.net/archlinux/$repo/os/$arch
## Score: 0.8, United States
Server = http://lug.mtu.edu/archlinux/$repo/os/$arch
Server = http://mirror.nl.leaseweb.net/archlinux/$repo/os/$arch
## Score: 0.9, United Kingdom
Server = http://mirror.bytemark.co.uk/archlinux/$repo/os/$arch
## Score: 1.5, United Kingdom
Server = http://mirrors.manchester.m247.com/arch-linux/$repo/os/$arch
Server = http://archlinux.dcc.fc.up.pt/$repo/os/$arch
## Score: 6.6, United States
Server = http://mirror.cs.pitt.edu/archlinux/$repo/os/$arch
## Score: 6.7, United States
Server = http://mirrors.acm.wpi.edu/archlinux/$repo/os/$arch
## Score: 6.8, United States
Server = http://ftp.osuosl.org/pub/archlinux/$repo/os/$arch
## Score: 7.1, India
Server = http://mirror.cse.iitk.ac.in/archlinux/$repo/os/$arch
## Score: 10.1, United States
Server = http://mirrors.xmission.com/archlinux/$repo/os/$arch
Save and close the file, then update all the package indexes with the following command:
pacman -Syu
Step 2 – Install Ansible
By default, the Ansible package is included in the Arch Linux default repository. You can install it with the following command.
pacman -S ansible
After the successful installation, you can verify the Ansible version using the following command.
ansible --version
You will get the following output.
ansible [core 2.14.1]
  config file = /etc/ansible/ansible.cfg
  configured module search path = ['/root/.ansible/plugins/modules', '/usr/share/ansible/plugins/modules']
  ansible python module location = /usr/lib/python3.10/site-packages/ansible
  ansible collection location = /root/.ansible/collections:/usr/share/ansible/collections
  executable location = /usr/bin/ansible
  python version = 3.10.9 (main, Dec 19 2022, 17:35:49) [GCC 12.2.0] (/usr/bin/python)
  jinja version = 3.1.2
  libyaml = True
Step 3 – Configure SSH Key-based Authentication
Ansible uses SSH to connect to the remote server, so you will need to set up password-less key-based SSH authentication for remote Linux hosts that you want to manage.
First, generate an SSH key on the Ansible server with the following command:
ssh-keygen -t rsa
You will get the following output.
Generating public/private rsa key pair.
Enter file in which to save the key (/root/.ssh/id_rsa):
Enter passphrase (empty for no passphrase):
Enter same passphrase again:
Your identification has been saved in /root/.ssh/id_rsa
Your public key has been saved in /root/.ssh/id_rsa.pub
The key fingerprint is:
SHA256:vNxc7Y1vQAX7odhmpn1fZq4BdkMpXAh8xBUoflyEDl4 root@archlinux
The key's randomart image is:
+---[RSA 3072]----+
|         ..+.**o |
|          +.E..o.|
|         o Bo.+o |
|       .  o *+o..|
|        S  o+B+ .|
|       . + o*+.+ |
|        o o. .+o=|
|              .*+|
|              .o+|
+----[SHA256]-----+
Next, copy the generated key to the remote Linux hosts with the following command:
ssh-copy-id -i ~/.ssh/id_rsa.pub root@your-remote-host-ip
You will be asked to provide the remote server password to copy the SSH key.
Number of key(s) added: 1

Now try logging into the machine, with:   "ssh 'root@209.23.11.45'"
and check to make sure that only the key(s) you wanted were added.
Next, check the SSH password-less login with the following command:
ssh root@your-remote-host-ip
Step 4 – Configure Ansible Hosts
Next, you will need to configure Ansible hosts to define your remote Linux servers.
nano /etc/ansible/hosts
Add your remote server information as shown below:
[servers]
server1 ansible_ssh_host=your-remote-host-ip ansible_ssh_port=22 ansible_ssh_user=root
Save and close the file when you are finished.
Step 5 – How to Use Ansible
At this point, Ansible is installed and configured. Now, it’s time to check how Ansible works.
Let’s run the following command on the Ansible server to check the connectivity of remote hosts.
ansible -m ping all
If everything is fine, you should get the following output:

To test the connectivity of specific hosts like server1, run the following command:
ansible -m ping server1
You should see the following output.

Step 6 – Ansible Adhoc Commands
Ansible provides ad-hoc commands to manage remote Linux hosts directly via the command line.
To check the memory usage of all Ansible hosts, run the following command:
ansible -m shell -a "free -m" all
You should see the following screen:

To check the uptime of all Ansible hosts, run the following command:
ansible -m shell -a "uptime" all
You should see the following screen:

To check the disk usage of all Ansible hosts, run the following command:
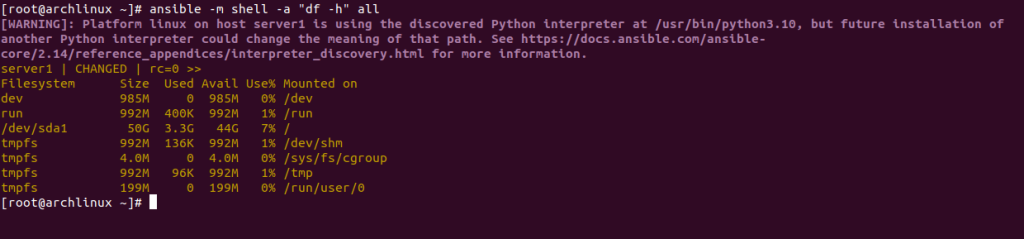
ansible -m shell -a "df -h" all
You should see the following screen:
Conclusion
In this post, we explained how to install Ansible on Arch Linux. You can now use Ansible to provision and manage multiple Linux hosts using Ansible. You can deploy an Ansible server on dedicated server hosting from Atlantic.Net!
* This post is for informational purposes only and does not constitute professional, legal, financial, or technical advice. Each situation is unique and may require guidance from a qualified professional.
Readers should conduct their own due diligence before making any decisions.