Apache Spark is open-source distributed processing system used to handle big data workloads in cluster computing environments. It is designed for speed, ease of use, and sophisticated analytics, with APIs available in Java, Scala, Python, R, and SQL. It supports several programming languages including Java, Scala, Python, and R. It can run programs up to 100x faster than Hadoop MapReduce in memory, or 10x faster on disk. It is used by data scientists and engineers for executing data engineering, data science, and machine learning on single-node machines or clusters.
In this post, we will show you how to install Apache Spark on Oracle Linux 8.
Step 1 – Install Java
Apache Spark is a Java-based application, so Java must be installed on your server. If not installed, you can install it by running the following command:
dnf install java-11-openjdk-devel -y
Once Java is installed, you can verify it using the following command:
java --version
You will get the following output:
openjdk 11.0.15 2022-04-19 LTS
OpenJDK Runtime Environment 18.9 (build 11.0.15+9-LTS)
OpenJDK 64-Bit Server VM 18.9 (build 11.0.15+9-LTS, mixed mode, sharing)
Also Read
How to Install and Manage Multiple Java Versions
Step 2 – Install Spark
At the time of writing this tutorial, the latest version of Apache Spark is 3.2.1. You can download the latest version of Apache Spark from Apache’s official website using the wget command:
wget https://dlcdn.apache.org/spark/spark-3.2.1/spark-3.2.1-bin-hadoop3.2.tgz
Once the download is completed, extract the downloaded file with the following command:
tar -xvf spark-3.2.1-bin-hadoop3.2.tgz
Next, move the extracted directory to /opt with the following command:
mv spark-3.2.1-bin-hadoop3.2 /opt/spark
Next, create a dedicated user for Apache Spark and set proper ownership to the /opt directory:
useradd spark
chown -R spark:spark /opt/spark
Step 3 – Create a Systemd Service File for Apache Spack
Next, you will need to create a service file for managing Apache Spark Master and Slave via systemd.
First, create a systemd service file for Master using the following command:
nano /etc/systemd/system/spark-master.service
Add the following lines:
[Unit]
Description=Apache Spark Master
After=network.target

[Service]
Type=forking
User=spark
Group=spark
ExecStart=/opt/spark/sbin/start-master.sh
ExecStop=/opt/spark/sbin/stop-master.sh

[Install]
WantedBy=multi-user.target
Save and close the file, then create a systemd service file for Slave:
nano /etc/systemd/system/spark-slave.service
Add the following lines:
[Unit]

Description=Apache Spark Slave

After=network.target

[Service]
Type=forking
User=spark
Group=spark
ExecStart=/opt/spark/sbin/start-slave.sh spark://your-server-ip:7077
ExecStop=/opt/spark/sbin/stop-slave.sh

[Install]
WantedBy=multi-user.target
Save and close the file, then reload the systemd daemon to apply the changes.
systemctl daemon-reload
Next, start the Spark Master service and enable it to start at system reboot:
systemctl start spark-master
systemctl enable spark-master
To verify the status of the Master service, run the following command:
systemctl status spark-master
You will get the following output:
● spark-master.service - Apache Spark Master
   Loaded: loaded (/etc/systemd/system/spark-master.service; disabled; vendor preset: disabled)
   Active: active (running) since Sat 2022-04-30 08:15:45 EDT; 6s ago
  Process: 5253 ExecStart=/opt/spark/sbin/start-master.sh (code=exited, status=0/SUCCESS)
 Main PID: 5264 (java)
    Tasks: 32 (limit: 23694)
   Memory: 177.7M
   CGroup: /system.slice/spark-master.service
           └─5264 /usr/lib/jvm/java-11-openjdk-11.0.15.0.9-2.el8_5.x86_64/bin/java -cp /opt/spark/conf/:/opt/spark/jars/* -Xmx1g org.apache.s>

Apr 30 08:15:42 oraclelinux systemd[1]: Starting Apache Spark Master...
Apr 30 08:15:42 oraclelinux start-master.sh[5253]: starting org.apache.spark.deploy.master.Master, logging to /opt/spark/logs/spark-spark-org>
Apr 30 08:15:45 oraclelinux systemd[1]: Started Apache Spark Master.
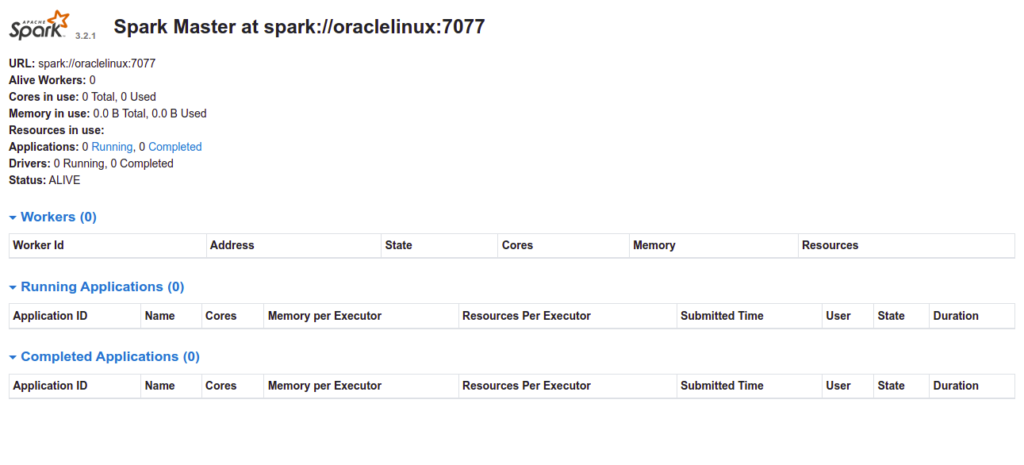
Step 4 – Access Apache Spark
At this point, Apache Spark is started and listening on port 8080. You can access it using the URL http://your-server-ip:8080. You should see the following page:
Now, start the Spark Slave service and enable it to start at system reboot:
systemctl start spark-slave
systemctl enable spark-slave
You can check the status of the Slave service using the following command:
systemctl status spark-slave
Sample output:
● spark-slave.service - Apache Spark Slave
   Loaded: loaded (/etc/systemd/system/spark-slave.service; disabled; vendor preset: disabled)
   Active: active (running) since Sat 2022-04-30 08:23:11 EDT; 4s ago
  Process: 5534 ExecStop=/opt/spark/sbin/stop-slave.sh (code=exited, status=0/SUCCESS)
  Process: 5557 ExecStart=/opt/spark/sbin/start-slave.sh spark://oraclelinux:7077 (code=exited, status=0/SUCCESS)
 Main PID: 5575 (java)
    Tasks: 35 (limit: 23694)
   Memory: 207.4M
   CGroup: /system.slice/spark-slave.service
           └─5575 /usr/lib/jvm/java-11-openjdk-11.0.15.0.9-2.el8_5.x86_64/bin/java -cp /opt/spark/conf/:/opt/spark/jars/* -Xmx1g org.apache.s>

Apr 30 08:23:08 oraclelinux systemd[1]: Starting Apache Spark Slave...
Apr 30 08:23:08 oraclelinux start-slave.sh[5557]: This script is deprecated, use start-worker.sh
Apr 30 08:23:08 oraclelinux start-slave.sh[5557]: starting org.apache.spark.deploy.worker.Worker, logging to /opt/spark/logs/spark-spark-org.>
Apr 30 08:23:11 oraclelinux systemd[1]: Started Apache Spark Slave.
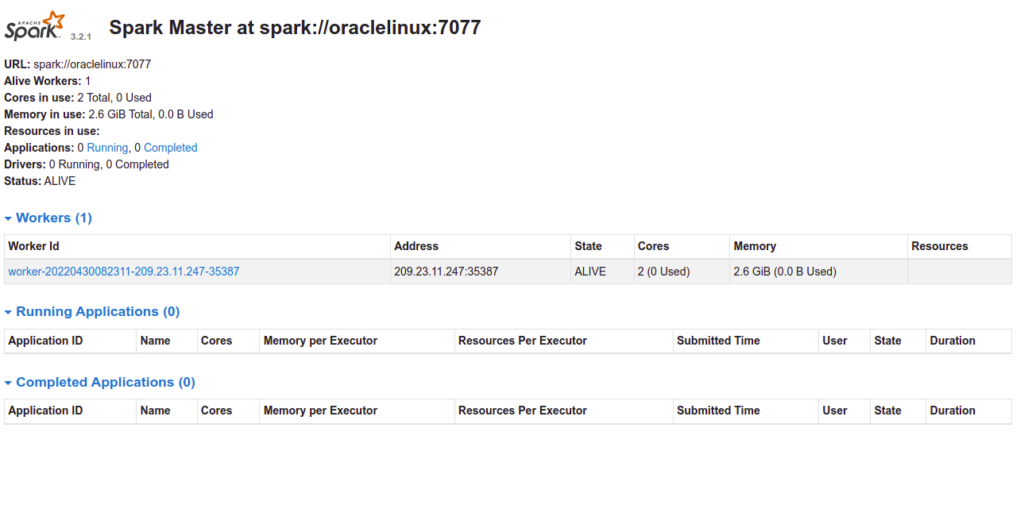
Now, reload your Apache Spark dashboard. You should see your worker on the following page:
Conclusion
Congratulations! You have successfully installed Apache Spark on Oracle Linux 8. You can now use Apache Spark in Hadoop or cluster computing environments to improve the data processing speeds. Give it a try on dedicated server hosting from Atlantic.Net!