Chatwoot is an open-source customer support tool for real-time messaging channels. It is like other commercial customer support software like Intercorn & Zendesk. Chatwoot is designed to provide a great customer experience and to increase the productivity of your support team. Chatwoot allows you to integrate social media chat including WhatsApp, Twitter, Facebook and Email to a central place.
In this tutorial, we will explain how to install Chatwoot on Ubuntu 20.04.
Step 1 – Install Chatwoot
You can install Chatwoot easily by downloading its automated installation script.
You can download it with the following command:
apt install git -y
git clone https://github.com/chatwoot/chatoot.git
cd chatwoot/deployment/
bash setup_20.04.sh -O setup.sh
Note: the install process will take several minutes.
Once the installation has been completed successfully, you should get the following output:
Woot! Woot!! Chatwoot server installation is complete
The server will be accessible at http://<server-ip>:3000
To configure a domain and SSL certificate, follow the guide at
https://www.chatwoot.com/docs/deployment/deploy-chatwoot-in-linux-vm
You can also verify the status of the Chatwoot service with the following command:
systemctl status chatwoot.target
You should get the following output:
-
chatwoot.target
Loaded: loaded (/etc/systemd/system/chatwoot.target; enabled; vendor preset: enabled)
Active: active since Mon 2021-01-11 07:13:25 UTC; 2min 20s ago
Jan 11 07:13:25 ubuntu2004 systemd[1]: Reached target chatwoot.target.
By default, Chatwoot listens on port 3000. You can verify it with the following command:
ss -antpl | grep 3000
You should see the following output:
LISTEN 0 1024 0.0.0.0:3000 0.0.0.0:* users:(("ruby",pid=57666,fd=8))
Step 2 – Configure Nginx as a Reverse Proxy
Next, you will need to install and configure Nginx as a reverse proxy for Chatwoot.
First, install the Nginx with the following command:
apt-get install nginx -y
Once the Nginx has been installed, create a new Nginx virtual host configuration file with the following command:
nano /etc/nginx/conf.d/chatwoot.conf
Add the following lines:
server {
server_name chatwoot.example.com;

# Point upstream to Chatwoot App Server
set $upstream 127.0.0.1:3000;

# Nginx strips out underscore in headers by default
# Chatwoot relies on underscore in headers for API
# Make sure that the config is turned on.
underscores_in_headers on;
location /.well-known {
alias /var/www/ssl-proof/chatwoot/.well-known;
}

location / {
proxy_pass_header Authorization;
proxy_pass http://$upstream;
proxy_set_header Upgrade $http_upgrade;
proxy_set_header Connection "upgrade";
proxy_set_header Host $host;
proxy_set_header X-Forwarded-Proto $scheme;
proxy_set_header X-Forwarded-Ssl on; # Optional

proxy_set_header X-Real-IP $remote_addr;
proxy_set_header X-Forwarded-For $proxy_add_x_forwarded_for;

proxy_http_version 1.1;
proxy_set_header Connection “”;
proxy_buffering off;

client_max_body_size 0;
proxy_read_timeout 36000s;
proxy_redirect off;
}
listen 80;
}
Save and close the file, then verify Nginx for any syntax errors with the following command:
nginx -t
If you get this error:
nginx: [emerg] could not build server_names_hash, you should increase
server_names_hash_bucket_size: 32
Do the following:
nano /etc/nginx/nginx.conf
In the http block, add:
server_names_hash_bucket_size 64;
Next, restart the Nginx to apply the configuration changes:
systemctl reload nginx
Step 3 – Access Chatwoot
Now, open your web browser and access the Chatwoot web interface using the URL http://chatwoot.example.com. You will be redirected to the following page:
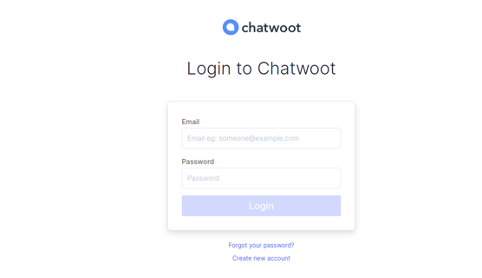
Click on the Create new account button. You should see the following page:
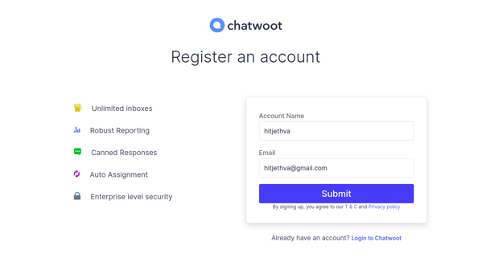
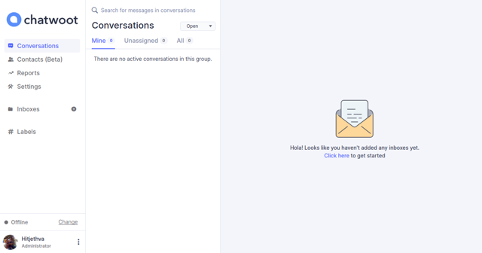
Provide your username and email and click on the Submit button. You should see the Chatwoot dashboard in the following page:
Conclusion
Congratulations! You have successfully installed Chatwoot on Ubuntu 20.04. You can now use Chatwoot to integrate all your social accounts and manage them from a central location. Try it using a dedicated server from Atlantic.Net!
* This post is for informational purposes only and does not constitute professional, legal, financial, or technical advice. Each situation is unique and may require guidance from a qualified professional.
Readers should conduct their own due diligence before making any decisions.