Focalboard is a free, open-source, self-hosted project management system used to track and manage projects across systems such as Windows, Mac, or Linux. It is an alternate solution for Asana, Trello, and Notion and is designed for both personal and development use. Focalboard helps the software development team to complete tasks, reach milestones, and achieve goals. It supports multiple boards and multiple languages and comes with import and export options for boards and tasks, making it easy to migrate to and from Focalboard.
In this post, we will explain how to install Focalboard on Rocky Linux 8.
Step 1 – Install and Configure PostgreSQL
Focalboard uses PostgreSQL as a database backend, so you will need to install the PostgreSQL server on your system.
First, enable the PostgreSQL module with the following command:
dnf module enable postgresql:12 -y
Next, install the PostgreSQL server using the following command:
dnf install postgresql-server postgresql-contrib -y
Next, initialize the PostgreSQL database using the following command:
postgresql-setup --initdb
Next, edit the PostgreSQL configuration file:
nano /var/lib/pgsql/data/pg_hba.conf
Find the following lines:
host    all             all             127.0.0.1/32            ident
host    all             all             ::1/128                 ident
And replace them with the following lines:
host    all             all             127.0.0.1/32            trust
host    all             all             ::1/128                 trust
Save and close the file, then start and enable the PostgreSQL service with the following command:
systemctl start postgresql
systemctl enable postgresql
Next, log in to PostgreSQL with the following command:
su - postgres
psql
Next, create a database and user for PostgreSQL with the following command:
CREATE DATABASE focaldb;
CREATE USER focaluser WITH PASSWORD 'password';
Next, exit from PostgreSQL using the following command:
\q
exit
Also Read
How to Install and Configure Postgres 14 on Ubuntu 20.04
Step 2 – Install and Configure Focalboard
First, download the latest version of Focalboard with the wget command:
VER=$(curl -s https://api.github.com/repos/mattermost/focalboard/releases/latest|grep tag_name | cut -d '"' -f 4)
wget https://github.com/mattermost/focalboard/releases/download/${VER}/focalboard-server-linux-amd64.tar.gz
Once the download is completed, extract the downloaded file with the following command:
tar -xvzf focalboard-server-linux-amd64.tar.gz
Next, move the extracted directory to /opt with the following command:
mv focalboard /opt
Next, edit the Focalboard configuration file:
nano /opt/focalboard/config.json
Find the following lines:
        "dbtype": "sqlite3",
    "dbconfig": "./focalboard.db",
        "postgres_dbconfig": "dbname=focalboard sslmode=disable",
And replace them with the following lines:
	 "dbtype": "postgres",
   "dbconfig": "postgres://focal:password@localhost/focaldb?sslmode=disable&connect_timeout=10",
        "postgres_dbconfig": "dbname=focaldb sslmode=disable",
Save and close the file when you are finished.
Step 3 – Create a Systemd Service File
Next, you will need to create a systemd service file to manage the Focalboard service:
nano /lib/systemd/system/focalboard.service
Add the following lines:
[Unit]
Description=Focalboard server

[Service]
Type=simple
Restart=always
RestartSec=5s
ExecStart=/opt/focalboard/bin/focalboard-server
WorkingDirectory=/opt/focalboard

[Install]
WantedBy=multi-user.target
Save and close the file, then reload the systemd daemon to apply the changes:
systemctl daemon-reload
Next, start and enable the Focalboard service with the following command:
systemctl start focalboard
systemctl enable focalboard
At this point, Focalboard is started and listening on port 8000. You can check it with the following command:
ss -antpl | grep 8000
You will get the following output:
LISTEN 0 128 *:8000 *:* users:(("focalboard-serv",pid=6547,fd=9))
Step 4 – Configure Nginx as a Reverse Proxy for Focalboard
Next, you will need to install and configure Nginx as a reverse proxy for Focalboard.
First, install Nginx with the following command:
dnf install nginx -y
Next, create an Nginx virtual host configuration file:
nano /etc/nginx/conf.d/focalboard.conf
Add the following lines:
upstream focalboard {
   server localhost:8000;
   keepalive 32;
}

server {
   listen 80;

   server_name focalboard.example.com;

   location ~ /ws/* {
       proxy_set_header Upgrade $http_upgrade;
       proxy_set_header Connection "upgrade";
       client_max_body_size 50M;
       proxy_set_header Host $http_host;
       proxy_set_header X-Real-IP $remote_addr;
       proxy_set_header X-Forwarded-For $proxy_add_x_forwarded_for;
       proxy_set_header X-Forwarded-Proto $scheme;
       proxy_set_header X-Frame-Options SAMEORIGIN;
       proxy_buffers 256 16k;
       proxy_buffer_size 16k;
       client_body_timeout 60;
       send_timeout 300;
       lingering_timeout 5;
       proxy_connect_timeout 1d;
       proxy_send_timeout 1d;
       proxy_read_timeout 1d;
       proxy_pass http://focalboard;
   }

   location / {
       client_max_body_size 50M;
       proxy_set_header Connection "";
       proxy_set_header Host $http_host;
       proxy_set_header X-Real-IP $remote_addr;
       proxy_set_header X-Forwarded-For $proxy_add_x_forwarded_for;
       proxy_set_header X-Forwarded-Proto $scheme;
       proxy_set_header X-Frame-Options SAMEORIGIN;
       proxy_buffers 256 16k;
       proxy_buffer_size 16k;
       proxy_read_timeout 600s;
       proxy_cache_revalidate on;
       proxy_cache_min_uses 2;
       proxy_cache_use_stale timeout;
       proxy_cache_lock on;
       proxy_http_version 1.1;
       proxy_pass http://focalboard;
   }
}
Save and close the file, then edit the Nginx configuration file:
nano /etc/nginx/nginx.conf
Add the following line below http {:
server_names_hash_bucket_size 64;
Save and close the file, then verify Nginx for any syntax configuration errors:
nginx -t
You will get the following output:
nginx: the configuration file /etc/nginx/nginx.conf syntax is ok
nginx: configuration file /etc/nginx/nginx.conf test is successful
Next, start and enable the Nginx service:
systemctl start nginx
systemctl enable nginx
Step 5 – Access Focalboard
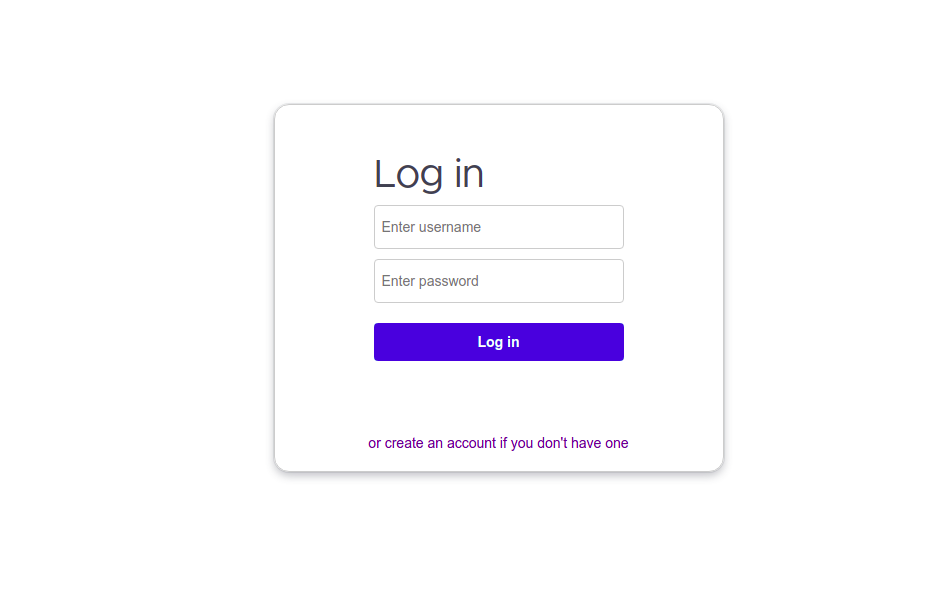
Now, open your web browser and access the Focalboard web interface using the URL http://focalboard.example.com. You will be redirected to the Focalboard login page:
Click on create an account if you don’t have one. You should see the account creation page:
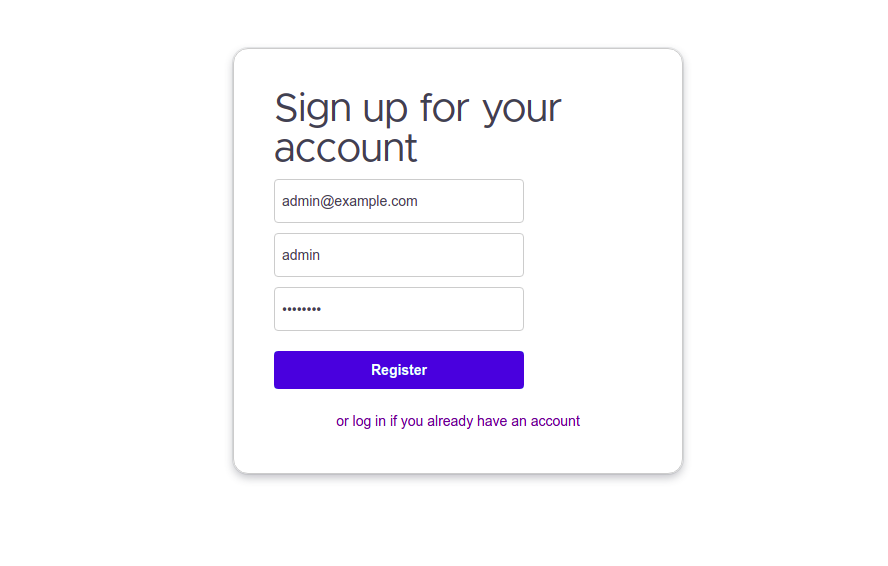
Set up your admin email address, username, and password, and click on the Register button. You should see the following page:
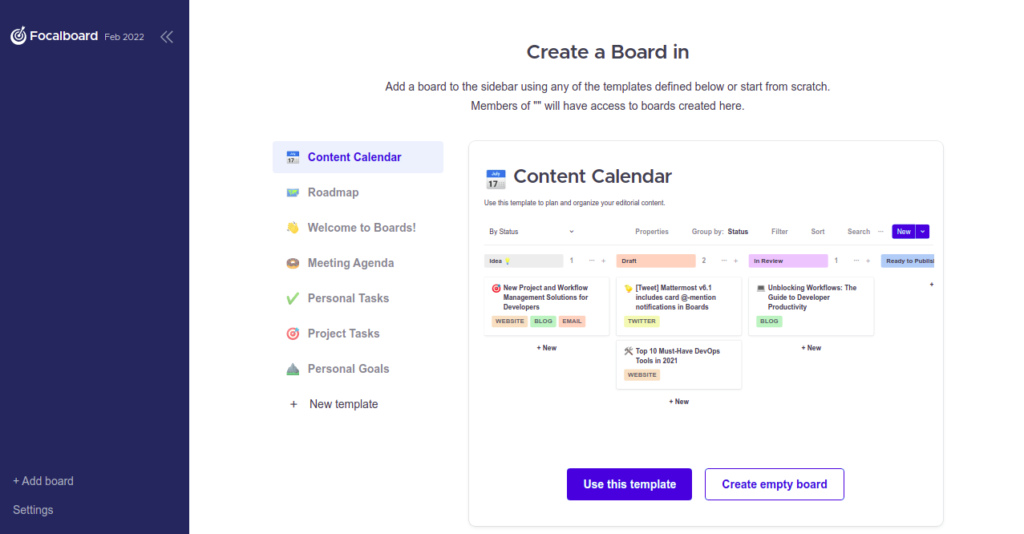
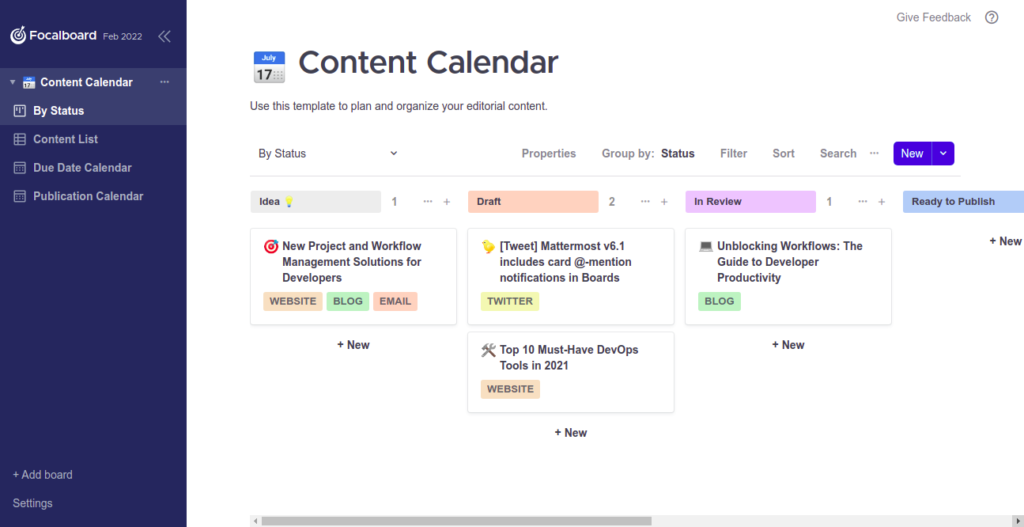
Click on the Use this template button. You should see the Focalboard dashboard on the following page:
Conclusion
In this guide, you learned how to install Focalboard with Nginx as a reverse proxy on Rocky Linux 8. You can now manage your projects easily through a web browser. Try it on dedicated servers from Atlantic.Net!