Glances is a free, open-source, cross-platform monitoring tool used for monitoring system metrics such as CPU, memory, disk, and more. It provides a command line as well as a web-based interface where you can easily monitor all system resources. Compared to other monitoring tools such as top, atop, and htop, Glances can monitor other useful resources such as filesystem I/O, network I/O, and sensor readouts.
In this post, we will show you how to install the Glances monitoring tool on Arch Linux.
Step 1 – Configure Repository
By default, the default repository is outdated in Arch Linux, so you will need to modify the default mirror list. You can do it by editing the mirror list configuration file:
nano /etc/pacman.d/mirrorlist
Remove all lines and add the following lines:
## Score: 0.7, United States
Server = http://mirror.us.leaseweb.net/archlinux/$repo/os/$arch
## Score: 0.8, United States
Server = http://lug.mtu.edu/archlinux/$repo/os/$arch
Server = http://mirror.nl.leaseweb.net/archlinux/$repo/os/$arch
## Score: 0.9, United Kingdom
Server = http://mirror.bytemark.co.uk/archlinux/$repo/os/$arch
## Score: 1.5, United Kingdom
Server = http://mirrors.manchester.m247.com/arch-linux/$repo/os/$arch
Server = http://archlinux.dcc.fc.up.pt/$repo/os/$arch
## Score: 6.6, United States
Server = http://mirror.cs.pitt.edu/archlinux/$repo/os/$arch
## Score: 6.7, United States
Server = http://mirrors.acm.wpi.edu/archlinux/$repo/os/$arch
## Score: 6.8, United States
Server = http://ftp.osuosl.org/pub/archlinux/$repo/os/$arch
## Score: 7.1, India
Server = http://mirror.cse.iitk.ac.in/archlinux/$repo/os/$arch
## Score: 10.1, United States
Server = http://mirrors.xmission.com/archlinux/$repo/os/$arch
Save and close the file, then update all the package indexes with the following command:
pacman -Syu
Step 2 – Install Required Dependencies
Before starting, you will need to install some required dependencies on your server. First, install the Python PIP package using the following command.
pacman -S python-pip
Next, install the bottle module with the following command.
pip install bottle
Once you are done, you can proceed to install Glances.
Step 3 – Install Glances Monitoring Tool
By default, the Glances tool is included in the Arch Linux default repository. You can install it using the following command.
pacman -S glances
Once Glances is installed, you can verify the Glances version with the following command.
glances --version
You will get the following output.
Glances v3.3.0 with PsUtil v5.9.4
Log file: /tmp/glances-root.log
Next, start and enable the Glances service with the following command.
systemctl start glances
systemctl enable glances
You can also check the Glances status using the following command.
systemctl status glances
You should get the following output.
● glances.service - Glances Server
     Loaded: loaded (/usr/lib/systemd/system/glances.service; disabled; preset: disabled)
     Active: active (running) since Fri 2023-02-24 10:25:36 UTC; 26s ago
   Main PID: 57020 (glances)
      Tasks: 1 (limit: 4700)
     Memory: 18.8M
     CGroup: /system.slice/glances.service
             └─57020 /usr/bin/python /usr/bin/glances -s

Feb 24 10:25:36 archlinux systemd[1]: Started Glances Server.
Step 4 – How to Use Glances
Glances provides a command line interface that allows you to monitor your system resources via the command line.
Open your command line interface and run the following command.
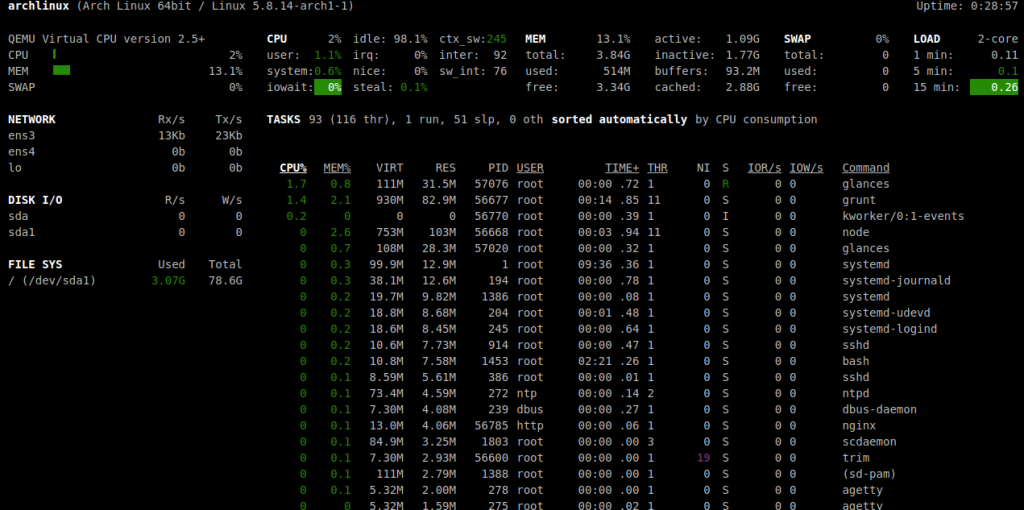
glances
You should see the Glances monitoring shell on the following screen.

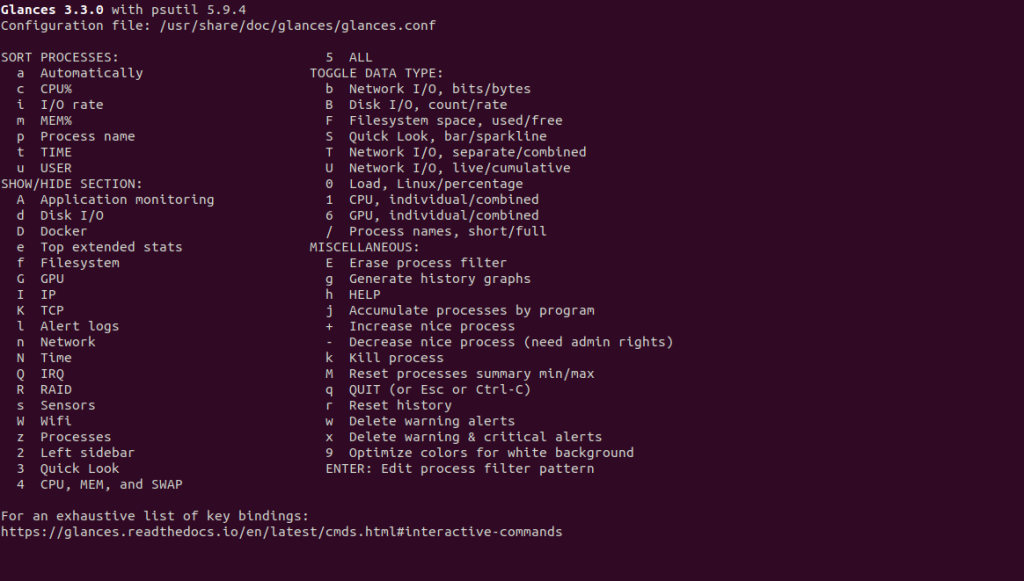
Press the h key to see all available options as shown below:
Press the q key to exit from the Glances shell.
Step 5 – Create a Systemd Service for Glances Web
You can also monitor the system resources via a web-based interface. To do so, you will need to start Glances in web server mode.
First, create a systemd service for Glances web.
nano /usr/lib/systemd/system/glancesweb.service
Add the following configurations:
[Unit]
Description = Glances in Web Server Mode
After = network.target

[Service]
ExecStart = /usr/bin/glances  -w  -t  5

[Install]
WantedBy = multi-user.target
Save and close the file then reload the systemd daemon to apply the changes.
systemctl daemon-reload
Next, start and enable the Glances web service:
systemctl start glancesweb
systemctl enable glancesweb
To check the status of the service, run the following command.
systemctl status glancesweb
You will get the following output.
glancesweb.service - Glances in Web Server Mode
     Loaded: loaded (/usr/lib/systemd/system/glancesweb.service; disabled; preset: disabled)
     Active: active (running) since Fri 2023-02-24 10:29:23 UTC; 4s ago
   Main PID: 57076 (glances)
      Tasks: 1 (limit: 4700)
     Memory: 19.9M
     CGroup: /system.slice/glancesweb.service
             └─57076 /usr/bin/python /usr/bin/glances -w -t 5

Feb 24 10:29:23 archlinux systemd[1]: Started Glances in Web Server Mode.
At this point, the Glances web is started and listens on ports 61208 and 61209. You can check it using the following command.
ss -antpl | grep glances
You should see the following output.
LISTEN 0      0            0.0.0.0:61208      0.0.0.0:*    users:(("glances",pid=57076,fd=4))
LISTEN 0      0            0.0.0.0:61209      0.0.0.0:*    users:(("glances",pid=57020,fd=4))
Step 6 – Access Glances Web
Now, open your web browser and access the Glances Web UI using the URL http://your-server-ip:61208. You should see the following screen.
Conclusion
In this post, we explained how to install the Glances monitoring tool on Arch Linux. We also explained how to enable the Glances web server mode to access it via a web-based interface. You can now start monitoring your system resources via the web browser. You can now implement the Glances monitoring tool on a dedicated server from Atlantic.Net!
* This post is for informational purposes only and does not constitute professional, legal, financial, or technical advice. Each situation is unique and may require guidance from a qualified professional.
Readers should conduct their own due diligence before making any decisions.