Table of Contents
When working in a local environment, each system is assigned an IP address to distinguish it from other hosts on the network. However, remembering IP addresses for every server can be difficult, especially in large infrastructures. A hostname provides a more user-friendly way to identify systems and allows machines to communicate using names instead of IP addresses.
This guide explains how to perform a Rocky Linux change hostname operation using several methods. The instructions apply to both Rocky Linux 9 and Rocky Linux 10. If you are migrating from CentOS or another Linux distribution, the process is very similar.
Step 1 – Check Your Current Hostname
Before you change hostname settings, it is important to check the current hostname configured on your system.
You can check it using the following command:
hostnamectl
You should see the current hostname of your system in the following output:
     Static hostname: rocky
           Icon name: computer-vm
             Chassis: vm 🖴
          Machine ID: c0b9710ec77a40fd91a1887844dc0166
             Boot ID: af19459c03a44f9383ba620f61dd6f44
        Product UUID: c0b9710e-c77a-40fd-91a1-887844dc0166
      Virtualization: kvm
    Operating System: Rocky Linux 10.0 (Red Quartz)
         CPE OS Name: cpe:/o:rocky:rocky:10::baseos
      OS Support End: Thu 2035-05-31
OS Support Remaining: 9y 7month 2w
              Kernel: Linux 6.12.0-55.21.1.el10_0.x86_64
        Architecture: x86-64
     Hardware Vendor: QEMU
      Hardware Model: Standard PC _i440FX + PIIX, 1996_
    Firmware Version: 1.15.0-1
       Firmware Date: Tue 2014-04-01
        Firmware Age: 11y 6month 2w
The output provides useful system information, including the static hostname, KVM operating system details, computer VM chassis information, VM machine ID, cpe os identifier, and Red Hat hardware model compatibility details.
As you can see, the current hostname of your system is rocky.
Also Read
Step 2 – Change the Hostname Temporarily
If you want to change the hostname of your system temporarily, you can use the following syntax:
hostname new-hostname
After a reboot, logout, or restart, the new hostname will revert to the previous hostname.
For example, to change the hostname to newpc, run the following command:
hostname newpc
This method is useful for testing changes in a development environment before applying them permanently.
Step 3 – Change the Hostname Permanently
The recommended method is to use the hostnamectl command. This utility updates the system’s static hostname and allows you to modify hostname settings without editing configuration files manually.
Use the following syntax:
hostnamectl set-hostname new-hostname
For example, to change the hostname of your system to newpc, run the following command:
hostnamectl set-hostname newpc
After running the command, verify the change with:
hostnamectl
The system will immediately update the hostname for the current session and future reboots.
Optional: Set a Pretty Hostname
Linux systems also support a pretty hostname, which is a more descriptive display name that can contain spaces and special characters. This is useful for desktop systems and virtual machines.
Example:
hostnamectl set-hostname "Production Web Server" --pretty
The pretty hostname does not replace the actual hostname used by the network.
Step 4 – Change the Hostname Using /etc/hostname File
You can also change the hostname by editing the hostname configuration file. In this case, you will need to restart your system to apply the changes.
To change the hostname, edit the /etc/hostname file:
nano /etc/hostname
Replace the old hostname with a new hostname:
newpc
Save the file and exit the editor. Then restart your system to apply the changes:
reboot
Also Read
How to Change or Set User Password in Linux
Step 5 – Update the /etc/hosts File
After changing the hostname, it is a good practice to modify the etc hosts file so local hostname resolution continues to work correctly.
Open the file:
nano /etc/hosts
You may see entries similar to:
127.0.0.1   localhost localhost.localdomain
127.0.1.1   newpc
Ensure the new hostname is associated with localhost or the appropriate local IP address.
If your server uses a domain, you can also configure an FQDN (Fully Qualified Domain Name):
192.168.1.10 server.example.com server
This helps applications resolve the hostname correctly across the network.
Step 6 – Change the Hostname Using NMTUI Tool
You can also change the hostname using the Network Manager Text User Interface (NMTUI).
To start the utility, run:
nmtui
You should see the following dialog box:
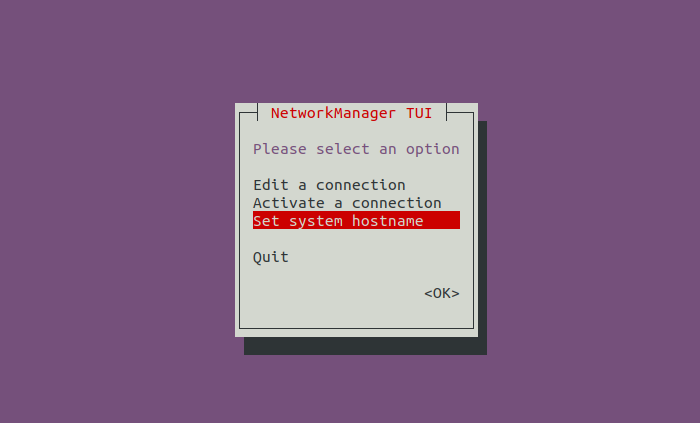
Select Set system hostname and press the Enter key. You should see the following dialog box:
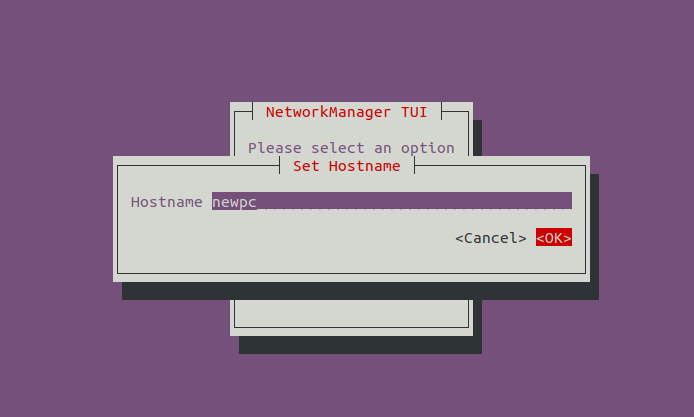
Type your new hostname and click on the OK. You should see the following dialog box:
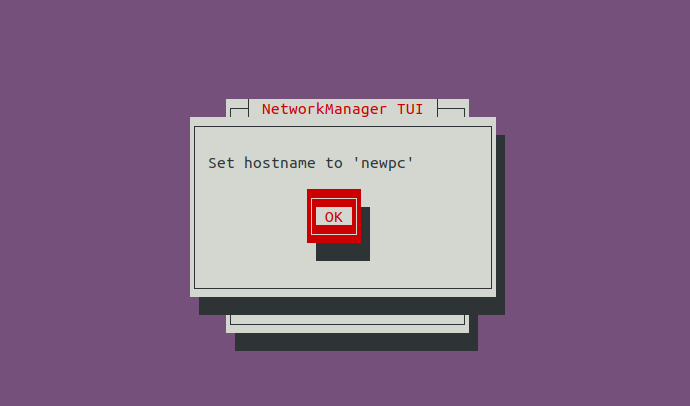
Click on the OK button to change the hostname.
Verify the New Hostname
Once you have changed the hostname using any method, verify the change with:
hostnamectl
You can also confirm hostname resolution through the etc hosts file and test communication between systems on the network.
For systems connected to a domain, verify that the configured FQDN resolves correctly.
Conclusion
In this tutorial, we demonstrated several ways to perform a Rocky Linux change hostname operation. We covered the hostnamectl command, editing the /etc/hostname file, updating etc hosts, configuring a static hostname, and using the NMTUI interface. We also discussed hostname verification, localhost configuration, FQDN setup, and hostname management in virtualized kvm operating system deployments.
Whether you manage a single server or hundreds of hosts in a production environment, following this guidance will help you efficiently change hostname, add proper hostname mappings, and update system identification settings in Rocky Linux.
* This post is for informational purposes only and does not constitute professional, legal, financial, or technical advice. Each situation is unique and may require guidance from a qualified professional.
Readers should conduct their own due diligence before making any decisions.