Sign language is a vital means of communication for millions of people in the deaf and hard-of-hearing communities. However, the language barrier between sign language users and non-signers can create significant communication challenges. To bridge this gap, we can use machine learning techniques to automatically recognize hand gestures and translate them into readable text or speech.
In this tutorial, you’ll learn how to build a real-time American Sign Language (ASL) recognition system using machine learning.
Prerequisites
- An Ubuntu 24.04 server with an NVIDIA GPU.
- A non-root user or a user with sudo privileges.
- NVIDIA drivers are installed on your server.
Step 1: Set Up Python Environment
First, ensure that Python 3 and related tools are installed on your system.
apt update -y
apt install -y python3 python3-pip python3-venv
Create a Python virtual environment.
python3 -m venv asl-ml-env
source asl-ml-env/bin/activate
Next, upgrade pip and install all required Python libraries.
pip install --upgrade pip
pip install kaggle tensorflow opencv-python matplotlib scikit-learn flask
Here’s a brief description of what we’re installing:
- tensorflow: Core library for building and training our CNN model.
- opencv-python: For handling images and capturing webcam input.
- matplotlib: For plotting training metrics.
- scikit-learn: For additional utilities if needed.
- flask: A Lightweight web framework for creating web interfaces.
- kaggle: CLI tool for downloading datasets from Kaggle.
Step 2: Download ASL Alphabet Dataset from Kaggle
You’ll need your Kaggle API key for this step.
1. Go to your Kaggle account settings.
2. Create and download an API token (a kaggle.json file).
3. Place kaggle.json in ~/.kaggle/.
4. Download the ASL dataset.
kaggle datasets download -d grassknoted/asl-alphabet5. Unzip the downloaded dataset.
unzip asl-alphabet.zipThe dataset folder asl_alphabet_train will contain images for training and validation.
Step 3: Model Development
Now that our environment is ready and the dataset is downloaded, it’s time to build, train, and save the machine learning model that will recognize American Sign Language (ASL) letters from images.
1. Let’s create a Python script to define and train the CNN model.
nano train_model.pyAdd the following code:
import os
import tensorflow as tf
from tensorflow.keras.preprocessing.image import ImageDataGenerator
from tensorflow.keras import layers, models
import matplotlib.pyplot as plt

# Dataset directory path
DATA_DIR = "asl_alphabet_train/asl_alphabet_train"

# Parameters
IMG_HEIGHT, IMG_WIDTH = 64, 64
BATCH_SIZE = 32
EPOCHS = 10

# Data augmentation and preprocessing
datagen = ImageDataGenerator(
    rescale=1./255,
    validation_split=0.2
)

train_generator = datagen.flow_from_directory(
    DATA_DIR,
    target_size=(IMG_HEIGHT, IMG_WIDTH),
    batch_size=BATCH_SIZE,
    class_mode='categorical',
    subset='training'
)

val_generator = datagen.flow_from_directory(
    DATA_DIR,
    target_size=(IMG_HEIGHT, IMG_WIDTH),
    batch_size=BATCH_SIZE,
    class_mode='categorical',
    subset='validation'
)

# CNN model architecture
model = models.Sequential([
    layers.Conv2D(32, (3, 3), activation='relu', input_shape=(IMG_HEIGHT, IMG_WIDTH, 3)),
    layers.MaxPooling2D((2, 2)),

    layers.Conv2D(64, (3, 3), activation='relu'),
    layers.MaxPooling2D((2, 2)),

    layers.Conv2D(128, (3, 3), activation='relu'),
    layers.MaxPooling2D((2, 2)),

    layers.Flatten(),
    layers.Dense(128, activation='relu'),
    layers.Dense(len(train_generator.class_indices), activation='softmax')
])

# Compile model
model.compile(optimizer='adam',
              loss='categorical_crossentropy',
              metrics=['accuracy'])

# Train the model
history = model.fit(
    train_generator,
    validation_data=val_generator,
    epochs=EPOCHS
)

# Save the trained model
model.save("asl_sign_model.h5")
2. Run the script to start training.
python3 train_model.pyThis will take a few minutes, depending on your GPU. After training completes. The model will be saved as asl_sign_model.h5
Step 4: Model Evaluation
After training the model, it’s essential to evaluate its performance to ensure that it generalizes well to unseen data. In this section, we’ll test the saved model on the validation dataset and display key metrics, such as validation loss and accuracy.
1. Let’s create a new script to load the trained model and run evaluation.
nano evaluate_model.pyAdd the following code:
import tensorflow as tf
from tensorflow.keras.models import load_model
from tensorflow.keras.preprocessing.image import ImageDataGenerator

# Load trained model
model = load_model('asl_sign_model.h5')

# Dataset directory
DATA_DIR = "asl_alphabet_train"

# Parameters
IMG_HEIGHT, IMG_WIDTH = 64, 64
BATCH_SIZE = 32

# Prepare test/validation dataset again
datagen = ImageDataGenerator(rescale=1./255, validation_split=0.2)

val_generator = datagen.flow_from_directory(
    DATA_DIR,
    target_size=(IMG_HEIGHT, IMG_WIDTH),
    batch_size=BATCH_SIZE,
    class_mode='categorical',
    subset='validation'
)

# Evaluate on validation dataset
loss, accuracy = model.evaluate(val_generator)
print(f"Validation Loss: {loss:.4f}")
print(f"Validation Accuracy: {accuracy:.4f}")
2. Run the evaluation script.
python3 evaluate_model.pyExample output might look like this:
Validation Loss: 2.2038
Validation Accuracy: 0.7276
This means our model achieves ~72% accuracy on validation data after just 10 epochs, which is a promising result for a basic implementation.
Step 5: Web Application Development
Now that we have a trained model ready, it’s time to build a web application that allows users to interact with the model in real-time via their webcam. We’ll use Flask as the backend framework and HTML/JavaScript for the frontend to display webcam video and show predictions.
1. First, set up the necessary files and folders for our web app.
mkdir templates2. Create the HTML frontend.
nano templates/index.htmlAdd the below code:
<!DOCTYPE html>
<html lang="en">
<head>
<meta charset="UTF-8">
<title>ASL Recognition Web App</title>
<style>
body { text-align: center; font-family: sans-serif; }
video { border: 2px solid #333; border-radius: 8px; }
h1 { margin-top: 20px; }
</style>
</head>
<body>
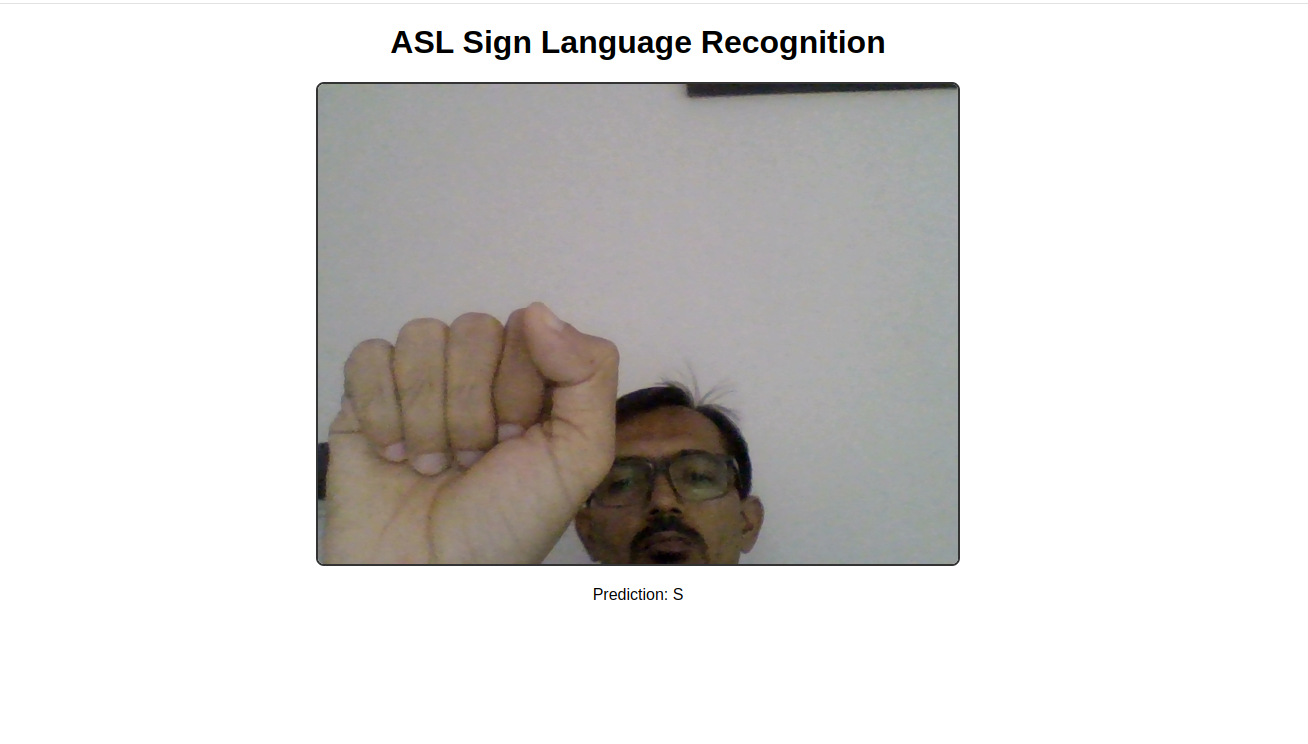
<h1>ASL Sign Language Recognition</h1>
<video id="video" width="640" height="480" autoplay></video>
<p>Prediction: <span id="prediction">...</span></p>
<script>
const video = document.getElementById('video');
const predictionText = document.getElementById('prediction');
// Start webcam
navigator.mediaDevices.getUserMedia({ video: true })
.then(stream => {
video.srcObject = stream;
});
// Send frames to server every 1 second
setInterval(() => {
const canvas = document.createElement('canvas');
canvas.width = video.videoWidth;
canvas.height = video.videoHeight;
const ctx = canvas.getContext('2d');
ctx.drawImage(video, 0, 0);
const dataURL = canvas.toDataURL('image/jpeg');
fetch('/predict', {
method: 'POST',
headers: { 'Content-Type': 'application/json' },
body: JSON.stringify({ image: dataURL })
})
.then(response => response.json())
.then(data => {
predictionText.innerText = data.prediction;
});
}, 1000);
</script>
</body>
</html>Explanation:
- Captures webcam video
- Every second, takes a snapshot from the video feed
- Sends the snapshot to our Flask backend for prediction
- Displays the prediction result below the video
2. Now create the Flask application that serves the HTML page and handles prediction requests.
nano app.pyAdd the following code.
import base64
import io
import numpy as np
from PIL import Image
from flask import Flask, render_template, request, jsonify
from tensorflow.keras.models import load_model
from tensorflow.keras.preprocessing.image import img_to_array

# Load model
model = load_model('asl_sign_model.h5')

# Define parameters
IMG_HEIGHT, IMG_WIDTH = 64, 64

# Initialize Flask app
app = Flask(__name__)

# Labels map from training
class_labels = list('ABCDEFGHIJKLMNOPQRSTUVWXYZ') + ['del', 'nothing', 'space']

@app.route('/')
def index():
    return render_template('index.html')

@app.route('/predict', methods=['POST'])
def predict():
    data = request.get_json()
    if 'image' not in data:
        return jsonify({'error': 'No image data'}), 400

    image_data = data['image'].split(',')[1]
    image_bytes = base64.b64decode(image_data)
    image = Image.open(io.BytesIO(image_bytes)).convert('RGB')
    image = image.resize((IMG_WIDTH, IMG_HEIGHT))
    img_array = img_to_array(image) / 255.0
    img_array = np.expand_dims(img_array, axis=0)

    preds = model.predict(img_array)
    predicted_class = np.argmax(preds[0])
    predicted_label = class_labels[predicted_class]

    return jsonify({'prediction': predicted_label})

if __name__ == '__main__':
    app.run(host='0.0.0.0', port=5000, debug=True)
The above code accepts image data from the browser, preprocesses it, predicts the gesture, and sends back the prediction as JSON.
Step 6: Running the Web App
1. Now that we have built the Flask backend and front-end interface, let’s run the application and test the real-time sign language recognition system.
python3 app.pyThis will start the Flask server on port 5000, and you should see output like:
 * Running on http://0.0.0.0:5000/ (Press CTRL+C to quit)
 * Restarting with stat
2. If you’re running this on a remote server, use SSH port forwarding so you can access it locally.
ssh -N -f -L 5000:localhost:5000 root@your-server-ip3. Open your web browser and access the Flask App using the URL http://localhost:5000.
4. The browser will prompt you for camera access permission. Click “Allow” to let the app use your webcam.
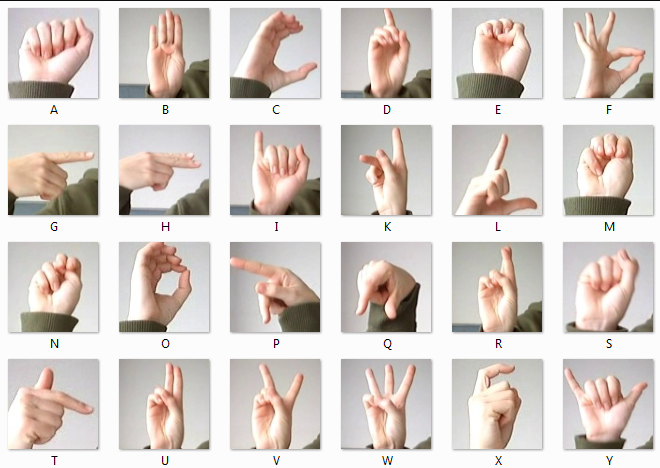
5. Once the webcam feed is running, choose one of the ASL signs, such as the letters A, B, or C, from the image below.
6. Hold your hand steady and clearly within the webcam’s field of view.
7. The app will capture frames every 1 second and send them to the backend for prediction. The predicted letter or gesture will appear in real-time below the video feed.
Conclusion
In this tutorial, you built a real-time American Sign Language (ASL) recognition system using machine learning on an Ubuntu 24.04 GPU server. You set up the development environment, downloaded and prepared the ASL Alphabet dataset from Kaggle, and built a Convolutional Neural Network (CNN) that classifies American Sign Language (ASL) hand gestures. After training and evaluating the model, you integrated it into a Flask web application that allows real-time interaction using a webcam.
* This post is for informational purposes only and does not constitute professional, legal, financial, or technical advice. Each situation is unique and may require guidance from a qualified professional.
Readers should conduct their own due diligence before making any decisions.