Introduction
IPv6 (Internet Protocol version 6) is the most recent version of the Internet Protocol (IP) that provides an identification and location system for computers on networks and routes traffic across the Internet.
IPv6 was developed to deal with the problem of running out of available IPv4 address space and is intended to replace IPv4 (IPv6 is 7.9×1028 times bigger than the 4.3 billion addresses provided by IPv4!).
IPv6 addresses are represented as eight groups of four hexadecimal (0-9, a-f) characters with the groups being separated by colons, for example:
2607:f170:0054:0012:0000:0000:0000:0bf0
Luckily, IPv6 addresses can and should be written in simplified form (abbreviated/compressed), which is faster and easier to read.
Taking the example above we can strip out all leading zeros and abbreviate consecutive groups of zeros with double colons. Much easier to read.
2607:f170:54:12::bf0
How do I enable IPv6 for a Cloud Server
You have two options to enable IPv6 for a Cloud Server; either during server creation or from the server details page. Both options will allocate 16 IPv6 addresses for use on that particular Cloud Server with no reboot necessary.
The 16 IPv6 address range will be presented to users in our Cloud Portal like this:
2607:f170:54:12::bf0 – 2607:f170:54:12::bff
You’ll notice that only the last character changed, we did this to try to simplify things for our users (taking advantage of the hexidecimal range of 16 characters: 0-9, a-f).
Here is the whole list of 16 IPv6 addresses from the above example:
2607:f170:54:12::bf0
2607:f170:54:12::bf1
2607:f170:54:12::bf2
2607:f170:54:12::bf3
2607:f170:54:12::bf4
2607:f170:54:12::bf5
2607:f170:54:12::bf6
2607:f170:54:12::bf7
2607:f170:54:12::bf8
2607:f170:54:12::bf9
2607:f170:54:12::bfa
2607:f170:54:12::bfb
2607:f170:54:12::bfc
2607:f170:54:12::bfd
2607:f170:54:12::bfe
2607:f170:54:12::bff
Options to enable IPv6 on a Cloud Server:
1) While creating a Cloud Server, check the “Enable IPv6” box and your Cloud Server will:
– have 16 IPv6 addresses allocated for use on that Cloud Server
– configure the first IPv6 address on that Cloud Server

2) From the Cloud Server details page, click the “Enable IPv6” and your Cloud Server will:
– have 16 IPv6 addresses allocated for use on that Cloud Server, but you will have to manually configure your Cloud Server’s network settings to use the IPv6 addresses.
![]()
How to configure IPv6 on a Server
If you selected “Enable IPv6” when your Cloud Server was created then your first IPv6 address will already have been configured for you. If you would like to configure an IPv6 address for a Cloud Server that you enabled IPv6 for after it was originally created or would like to configure additional IPv6 address for your Cloud Server, the below examples will show you how to do so for various operating systems. After configuring the changes it is recommended that you reboot your server to ensure the changes take full effect.
First, visit your Cloud Server details page to get the IPv6 information for your server

Ubuntu 14.04, 16.04
Edit your /etc/network/interfaces configuration file to add the appropriate information using the below sample as a reference.
root@ubuntu:~# cat /etc/network/interfaces

# This file describes the network interfaces available on your system
# and how to activate them. For more information, see interfaces(5).

# The loopback network interface
auto lo
iface lo inet loopback

# The primary network interface
auto eth0
iface eth0 inet static
        hwaddress ether 00:00:d0:75:57:99
        address 208.117.87.153
        netmask 255.255.255.0
        gateway 208.117.87.1

# dns-* options are implemented by the resolvconf package, if installed
    dns-nameservers 209.208.127.65 209.208.25.18


# Primary IPv6 Address
iface eth0 inet6 static
        address 2607:f170:54:12::bf0/64
        gateway 2607:F170:54:12::1
        dns-nameservers 2001:4860:4860::8888 2001:4860:4860::8844

# Additional IPv6 Address
iface eth0 inet6 static
        address 2607:f170:54:12::bf1/64
Ubuntu 18.04
Edit your /etc/netplan/01-netcfg.yaml configuration file to add the appropriate information using the below sample as a reference.
root@ubuntu:~# cat /etc/netplan/01-netcfg.yaml

# This file describes the network interfaces available on your system
# For more information, see netplan(5).

network:
  version: 2
  renderer: networkd
  ethernets:
    eth0:
      addresses:
        - 208.117.87.153/24
        - 2607:f170:54:12::bf0/64  # IPv6 Primary Address
        - 2607:f170:54:12::bf1/64  # Additional IPv6 Address
      gateway4: 208.117.87.1
      gateway6: 2607:F170:54:12::1  # IPv6 Gateway
      nameservers:
        addresses:
          - 209.208.127.65
          - 209.208.25.18
          - 2001:4860:4860::8888  # IPv6 DNS Address
          - 2001:4860:4860::8844  # IPv6 DNS Address
CentOS, Fedora
Edit your /etc/sysconfig/network-scripts/ifcfg-eth0 configuration file to add the appropriate information using the below sample as a reference.
[root@CentOS ~]# cat /etc/sysconfig/network-scripts/ifcfg-eth0

# Virtio Network Device Public Interface
DEVICE=eth0
BOOTPROTO=static
HWADDR=00:00:d0:75:57:99
ONBOOT=yes
IPADDR=208.117.87.153
NETMASK=255.255.255.0
GATEWAY=208.117.87.1
DNS1=209.208.127.65
DNS2=209.208.25.18

#IPv6 Configuration
IPV6INIT=yes
IPV6ADDR=2607:f170:54:12::bf0/64
IPV6_DEFAULTGW=2607:F170:54:12::1
DNS1=2001:4860:4860::8888
DNS2=2001:4860:4860::8844

# Additional IPv6 Addresses separated by spaces
IPV6ADDR_SECONDARIES="2607:f170:54:12::bf1/64 2607:f170:54:12::bf2/64"
Debian
Edit your /etc/network/interfaces configuration file to add the appropriate information using the below sample as a reference.
root@Debian:~# cat /etc/network/interfaces

# This file describes the network interfaces available on your system
# and how to activate them. For more information, see interfaces(5).

source /etc/network/interfaces.d/*

# The loopback network interface
auto lo
iface lo inet loopback

# The primary network interface
auto eth0
iface eth0 inet static
        hwaddress ether 00:00:d0:75:57:99
        address 208.117.87.153
        netmask 255.255.255.0
        gateway 208.117.87.1

# Primary IPv6 Address
iface eth0 inet6 static
        address 2607:f170:54:12::bf0/64
        gateway 2607:F170:54:12::1
        dns-nameservers 2001:4860:4860::8888 2001:4860:4860::8844

# Additional IPv6 Address
iface eth0 inet6 static
        address 2607:f170:54:12::bf1/64
FreeBSD
Edit your /etc/rc.conf configuration file to add the appropriate information using the below sample as a reference.
root@FreeBSD:~ # cat /etc/rc.conf

# Disable crash dumps by default
dumpdev="NO"

# Public Networking
hostname="FreeBSD"
ifconfig_vtnet0="inet 208.117.87.153 netmask 255.255.255.0"
defaultrouter="208.117.87.1"

# IPv6 Networking
ipv6_activate_all_interfaces="yes"
ifconfig_vtnet0_ipv6="inet6 2607:f170:54:12::bf0 prefixlen 64" # Primary IPv6 Address
ifconfig_vtnet0_alias1_ipv6="inet6 2607:f170:54:12::bf1 prefixlen 64" # Additional IPv6 Address
ipv6_defaultrouter="2607:F170:54:12::1"

# Private Networking (Please check the Cloud Control Panel for information on your Private IP range)
#ifconfig_vtnet1="inet <private-ip-addres> netmask <private-netmask>"
#static_routes="net1"
#route_net1="-net <private-network> <private-gateway>"

# System Configuration
sshd_enable="YES"
ntpd_enable="YES"
Arch Linux
Edit your /etc/netctl/eth0 configuration file to add the appropriate information using the below sample as a reference.
[root@Arch ~]# cat /etc/netctl/eth0

Description='Public ethernet connection'
Interface=eth0
Connection=ethernet
IP=static
Address=('208.117.87.153/24')
Gateway='208.117.87.1'
DNS=('209.208.127.65' '209.208.25.18')

## For IPv6 static address configuration
IP6=static
# Primary IPv6 Address and Additional IPv6 Addresses separated by spaces
Address6=('2607:f170:54:12::bf0/64' '2607:f170:54:12::bf1/64')
Gateway6='2607:F170:54:12::1'
Windows Server
Open the Network Settings for your Main Ethernet Adapter
Windows Server 2008
– Right-click on the Network Icon in the bottom right tray of your Windows Server
– Click “Open Network and Sharing Center”
– Click “Local Area Connection”
– Click “Properties”
Windows Server 2012 and 2016
– Right-click on the Network Icon in the bottom right tray of your Windows Server
– Click “Open Network and Sharing Center”
– Click “Ethernet”
– Click “Properties”
Windows 2019
– Right-click on the Network Icon in the bottom right tray of your Windows Server
– Click “Open Network & Internet Settings”
– Click on “Change Adapter Options”
– Right-click on Ethernet
– Click “Properties”
Configure the Primary IPv6 Address
Select “Internet Protocol Version 6 (TCP/IPv6) and click “Properties”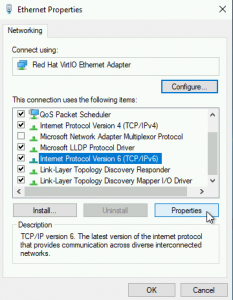
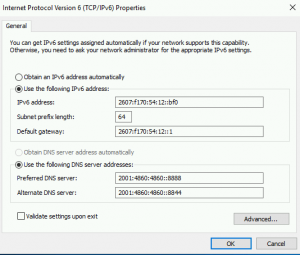
Configure the Primary IPv6 Address and DNS and click “OK”, “OK”
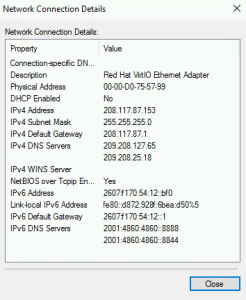
You can now check your settings by clicking “Details…”

Configure Additional IPv6 Addresses
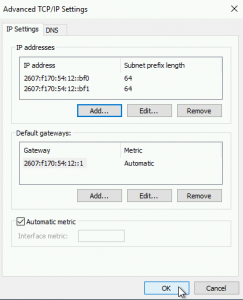
Click “Advanced…” to configure Additional IPv6 Addresses
Click “Add…” under the “IP Addresses” section
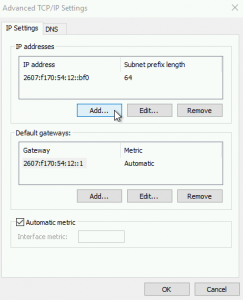
Configure the Additional IPv6 Address and click “Add” and then “OK”
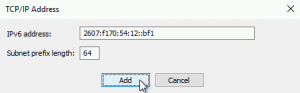
Click “OK”, “OK” and “OK” again
You can now check your settings by clicking “Details…”
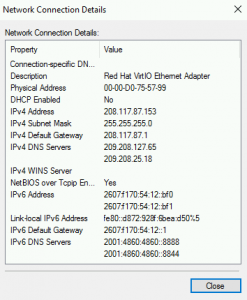
You should now have your IPv6 addresses configured as desired.
* This post is for informational purposes only and does not constitute professional, legal, financial, or technical advice. Each situation is unique and may require guidance from a qualified professional.
Readers should conduct their own due diligence before making any decisions.