Caddy is a free, open-source, lightweight, modern web server written in the Go language. You can use Caddy as a file server, dynamic server, and scalable reverse proxy. You can extend the server functionality via plugins. Caddy comes with a wide range of features, some of which are listed below:
- Virtual hosting
- Automatic HTTPS via Let’s Encrypt
- Support HTTP/2
- Extensible with plugins
- Runs without any external dependencies
In this post, we will show you how to install the Caddy web server with PHP support on Rocky Linux. This procedure is compatible with Rocky Linux 8 and Rocky Linux 9.
Step 1 – Install Caddy Web Server
By default, the Caddy package is not included in the Rocky Linux 8 default repo, so you will need to enable the special repository in your system.
dnf install 'dnf-command(copr)'
dnf copr enable @caddy/caddy
Once the repository is enabled, you can install the Caddy web server with the following command:
dnf install caddy -y
Once the Caddy is installed, verify the Caddy version using the following command:
caddy version
Sample output:
v2.4.6 h1:HGkGICFGvyrodcqOOclHKfvJC0qTU7vny/7FhYp9hNw=
Next, start the Caddy service and enable it to start at system reboot:
systemctl start caddy
systemctl enable caddy
Now, open your web browser and access the Caddy web server using the URL http://your-server-ip. You should see the Caddy test page on the following screen:
Step 2 – Create a New Site On Caddy
First, create a directory structure for the new website using the following command:
mkdir -p /var/www/example.com
mkdir /var/log/caddy
Next, set proper ownership on the new website:
chown caddy:caddy /var/www/example.com
chown caddy:caddy /var/log/caddy
Next, create an index.html page for the new website:
nano /var/www/example.com/index.html
Add the following lines:
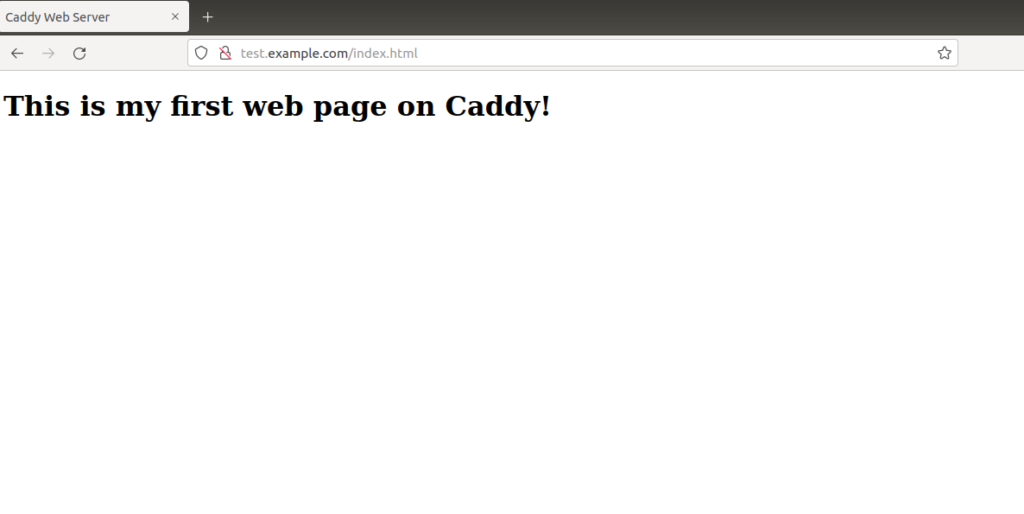
<!DOCTYPE html>
<html>
<head>
<title>Caddy Web Server</title>
</head>
<body>
<h1>This is my first web page on Caddy!</h1>
</body>
</html>
Save and close the file when you are finished.
Step 3 – Create a Virtual Host Configuration File
Next, you will need to edit the Caddy configuration file to host the new website. You can edit it with the following command:
nano /etc/caddy/Caddyfile
Remove all lines and add the following lines:
test.example.com:80 {
        root * /var/www/example.com
        file_server
        encode gzip

        log {
             	output file /var/log/caddy/example.access.log
        }

	@static {
                file
                path *.ico *.css *.js *.gif *.jpg *.jpeg *.png *.svg *.woff *.pdf *.webp
        }
	header @static Cache-Control max-age=5184000

}
Save and close the file when you are finished. Next, validate the Caddy configuration file:
caddy validate --adapter caddyfile --config /etc/caddy/Caddyfile
You should see the following output:
2021/11/17 09:59:04.997	INFO	using provided configuration	{"config_file": "/etc/caddy/Caddyfile", "config_adapter": "caddyfile"}
2021/11/17 09:59:05.000	WARN	input is not formatted with 'caddy fmt'	{"adapter": "caddyfile", "file": "/etc/caddy/Caddyfile", "line": 27}
2021/11/17 09:59:05.000	INFO	http	server is listening only on the HTTPS port but has no TLS connection policies; adding one to enable TLS	{"server_name": "srv0", "https_port": 443}
2021/11/17 09:59:05.001	INFO	http	enabling automatic HTTP->HTTPS redirects	{"server_name": "srv0"}
2021/11/17 09:59:05.001	INFO	tls.cache.maintenance	started background certificate maintenance	{"cache": "0xc00057a8c0"}
2021/11/17 09:59:05.001	INFO	tls.cache.maintenance	stopped background certificate maintenance	{"cache": "0xc00057a8c0"}
Valid configuration
Next, restart the Caddy service to apply the changes:
systemctl restart caddy
You can also check the Caddy service using the following command:
systemctl status caddy
You will get the following output:
● caddy.service - Caddy
   Loaded: loaded (/usr/lib/systemd/system/caddy.service; disabled; vendor preset: disabled)
   Active: active (running) since Wed 2021-11-17 10:00:23 UTC; 4s ago
     Docs: https://caddyserver.com/docs/
 Main PID: 20077 (caddy)
    Tasks: 6 (limit: 11411)
   Memory: 24.9M
   CGroup: /system.slice/caddy.service
           └─20077 /usr/bin/caddy run --environ --config /etc/caddy/Caddyfile

Nov 17 10:00:23 rockylinux systemd[1]: Started Caddy.
Nov 17 10:00:23 rockylinux caddy[20077]: {"level":"info","ts":1637143223.8054335,"logger":"tls.cache.maintenance","msg":"started background c>
Nov 17 10:00:23 rockylinux caddy[20077]: {"level":"info","ts":1637143223.8054764,"logger":"tls","msg":"cleaning storage unit","description":">
Nov 17 10:00:23 rockylinux caddy[20077]: {"level":"info","ts":1637143223.8055048,"logger":"tls","msg":"finished cleaning storage units"}
Nov 17 10:00:23 rockylinux caddy[20077]: {"level":"info","ts":1637143223.8060036,"logger":"tls.obtain","msg":"lock acquired","identifier":"ex>
Nov 17 10:00:24 rockylinux caddy[20077]: {"level":"error","ts":1637143224.0880945,"logger":"tls.obtain","msg":"could not get certificate from>
Nov 17 10:00:24 rockylinux caddy[20077]: {"level":"info","ts":1637143224.4512274,"logger":"tls.issuance.zerossl","msg":"generated EAB credent>
Nov 17 10:00:25 rockylinux caddy[20077]: {"level":"info","ts":1637143225.7558215,"logger":"tls.issuance.acme","msg":"waiting on internal rate>
Nov 17 10:00:25 rockylinux caddy[20077]: {"level":"info","ts":1637143225.755876,"logger":"tls.issuance.acme","msg":"done waiting on internal >
Nov 17 10:00:27 rockylinux caddy[20077]: {"level":"info","ts":1637143227.8956456,"logger":"tls.issuance.acme.acme_client","msg":"trying to so
Now, open your web browser and access the Caddy website using the URL http://test.example.com. You should see your website on the following screen:
Step 4 – Enable PHP Support on Caddy Web Server
First, you will need to install PHP and other required extensions to your server. You can install all of them with the following command:
dnf install php-fpm php-cli php-gd -y
Once all the packages are installed, edit the Caddy configuration file:
nano /etc/caddy/Caddyfile
Define the php_fastcgi location as shown below:
test.example.com:80 {
        root * /var/www/example.com
	php_fastcgi unix//run/php-fpm/www.sock
        file_server
        encode gzip

        log {
             	output file /var/log/caddy/example.access.log
        }

	@static {
                file
                path *.ico *.css *.js *.gif *.jpg *.jpeg *.png *.svg *.woff *.pdf *.webp
        }
	header @static Cache-Control max-age=5184000

}
Save and close the file, then edit the PHP-FPM file:
nano /etc/php-fpm.d/www.conf
Change the following lines:
user = caddy
group = caddy
listen.acl_users = apache,nginx,caddy
Save and close the file, then start the PHP-FPM service and enable it to start at system reboot:
systemctl start php-fpm
systemctl enable php-fpm
Next, create a sample info.php page:
nano /var/www/example.com/info.php
Add the following line:
<?php phpinfo();
?>
Save and close the file, then open your web browser and access the info.php page using the URL http://test.example.com/info.php. You will get the following page:

Conclusion
In the above guide, we explained how to install Caddy with PHP on Rocky Linux 8. Caddy is a very good alternative to Apache and Nginx. You should try it in the production environment – get started on your virtual private server from Atlantic.Net!