Apt-Cacher NG is a caching proxy server for Debian-based Linux distributions including Ubuntu, Debian, Linux Mint, etc. It creates a local cache of the Debian mirrors and other Linux distributions. When you use the apt command to install any package, the package is pulled from the official repositories, and the APT cache server caches that package in the system. When you install the same package again, it will download that package from the local caching server. This will save you a lot of time and internet bandwidth.
In this post, we will explain how to set up an APT-Caching server using Apt-Cacher NG on Ubuntu. This procedure is compatible with Ubuntu 22.04 and Ubuntu 24.04.
Step 1 – Install Apt-Cacher-NG
By default, the Apt-Cacher-NG package is included in the Ubuntu default repository. You can install it using the following command:
apt-get update -y
apt-get install apt-cacher-ng -y
Once the Apt-Cacher-NG package is installed, start the Apt-Cacher-NG service and enable it to start at system reboot:
systemctl start apt-cacher-ng
systemctl enable apt-cacher-ng
You can check the status of Apt-Cacher-NG with the following command:
systemctl status apt-cacher-ng
Sample output:
● apt-cacher-ng.service - Apt-Cacher NG software download proxy
     Loaded: loaded (/usr/lib/systemd/system/apt-cacher-ng.service; enabled; preset: enabled)
     Active: active (running) since Sat 2025-05-24 06:30:37 AST; 10s ago
   Main PID: 490755 (apt-cacher-ng)
      Tasks: 1 (limit: 4609)
     Memory: 2.1M (peak: 2.3M)
        CPU: 17ms
     CGroup: /system.slice/apt-cacher-ng.service
             └─490755 /usr/sbin/apt-cacher-ng -c /etc/apt-cacher-ng ForeGround=1
By default, Apt-Cacher-NG listens on port 3142. You can check it with the following command:
ss -altnp | grep apt
Sample output:
LISTEN    0         250                0.0.0.0:3142             0.0.0.0:*        users:(("apt-cacher-ng",pid=3748,fd=10))
LISTEN    0         250                   [::]:3142                [::]:*        users:(("apt-cacher-ng",pid=3748,fd=11))
Step 2 – Configure Apt-Cacher-NG
By default, Apt-Cacher NG does not serve HTTPS repositories, so you will need to enable it. To do so edit the Apt-Cacher-NG default configuration file:
nano /etc/apt-cacher-ng/acng.conf
Uncomment the following line:
PassThroughPattern: .*
Save and close the file, then restart the Apt-Cacher-NG service to apply the changes:
systemctl restart apt-cacher-ng
Step 3 – Configure Client System to use Apt-Cacher NG
By default, all Ubuntu system uses Ubuntu repository to download and install packages, so you will need to configure your client system to use Apt-Cacher NG for package installation.
To do so, create a new proxy configuration file:
nano /etc/apt/apt.conf.d/00aptproxy
Add the following line:
Acquire::http::Proxy "http://your-server-ip:3142";
Save and close the file when you are finished.
Step 4 – Verify APT-Cacher NG
Now, let’s try to install the Apache package on the Client system using the following command:
apt-get install apache2 -y
The above command will find, download, and install an Apache package from the Apt-Cache NG server.
You can check it using the following command on the server system:
tail -f /var/log/apt-cacher-ng/apt-cacher.log
Sample output:
1629012079|I|91694|69.87.221.199|uburep/pool/main/a/apr/libapr1_1.6.5-1ubuntu1_amd64.deb
1629012079|O|91685|69.87.221.199|uburep/pool/main/a/apr/libapr1_1.6.5-1ubuntu1_amd64.deb
1629012079|I|85057|69.87.221.199|uburep/pool/main/a/apr-util/libaprutil1_1.6.1-4ubuntu2_amd64.deb
1629012079|O|85058|69.87.221.199|uburep/pool/main/a/apr-util/libaprutil1_1.6.1-4ubuntu2_amd64.deb
1629012079|I|10880|69.87.221.199|uburep/pool/main/a/apr-util/libaprutil1-dbd-sqlite3_1.6.1-4ubuntu2_amd64.deb
1629012079|O|10894|69.87.221.199|uburep/pool/main/a/apr-util/libaprutil1-dbd-sqlite3_1.6.1-4ubuntu2_amd64.deb
1629012079|I|9071|69.87.221.199|uburep/pool/main/a/apr-util/libaprutil1-ldap_1.6.1-4ubuntu2_amd64.deb
1629012079|O|9078|69.87.221.199|uburep/pool/main/a/apr-util/libaprutil1-ldap_1.6.1-4ubuntu2_amd64.deb
1629012079|I|29280|69.87.221.199|uburep/pool/main/j/jansson/libjansson4_2.12-1build1_amd64.deb
1629012079|O|29279|69.87.221.199|uburep/pool/main/j/jansson/libjansson4_2.12-1build1_amd64.deb
1629012079|I|1180480|69.87.221.199|uburep/pool/main/a/apache2/apache2-bin_2.4.41-4ubuntu3.4_amd64.deb
1629012079|O|1180482|69.87.221.199|uburep/pool/main/a/apache2/apache2-bin_2.4.41-4ubuntu3.4_amd64.deb
1629012079|I|158846|69.87.221.199|uburep/pool/main/a/apache2/apache2-data_2.4.41-4ubuntu3.4_all.deb
1629012079|O|158848|69.87.221.199|uburep/pool/main/a/apache2/apache2-data_2.4.41-4ubuntu3.4_all.deb
1629012079|I|84349|69.87.221.199|uburep/pool/main/a/apache2/apache2-utils_2.4.41-4ubuntu3.4_amd64.deb
1629012079|O|84354|69.87.221.199|uburep/pool/main/a/apache2/apache2-utils_2.4.41-4ubuntu3.4_amd64.deb
1629012079|I|95853|69.87.221.199|uburep/pool/main/a/apache2/apache2_2.4.41-4ubuntu3.4_amd64.deb
1629012079|O|95852|69.87.221.199|uburep/pool/main/a/apache2/apache2_2.4.41-4ubuntu3.4_amd64.deb
1629012079|I|17288|69.87.221.199|uburep/pool/main/s/ssl-cert/ssl-cert_1.0.39_all.deb
1629012079|O|17277|69.87.221.199|uburep/pool/main/s/ssl-cert/ssl-cert_1.0.39_all.deb
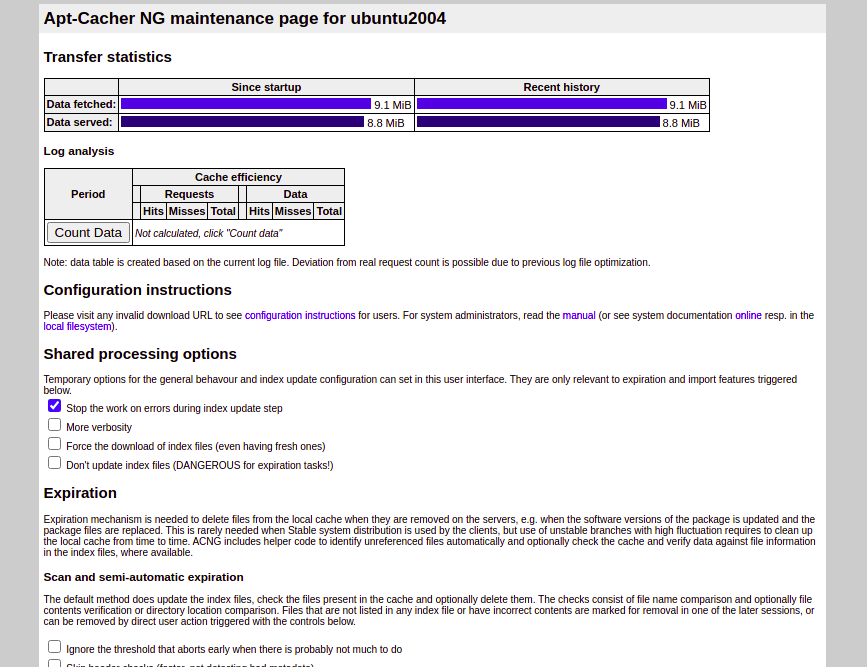
Apt-Cache NG also provides a web-based interface to display all reports. You can access it using the URL
http://your-server-ip:3142/acng-report.html. You should see the following screen:
Step 5 – Control Apt-Cacher NG Usage
You can also set up access control for Apt-Cache NG so that only authenticated hosts can download the package from the Apt-Cacher NG server.
You can use the /etc/hosts.allow and /etc/hosts.deny for controling access.
For example, to allow 192.168.0.10 and 192.168.0.11 to use Apt-Cacher NG server, edit the /etc/hosts.allow file:
nano /etc/hosts.allow
Add the following line:
apt-cacher-ng : 192.168.0.10 192.168.0.11
Save and close the file when you are finished.
If you want to block the host 192.168.1.100 to use Apt-Cacher NG server, edit the /etc/hosts.deny file:
nano /etc/hosts.deny
Add the following line:
apt-cacher-ng : 192.168.1.100
Save and close the file when you are finished.
Conclusion
In the above guide, we explained how to install and use Apt-Cache NG server on Ubuntu 24.04 server. You can now set up Apt-Cache NG in your local network to save a lot of internet bandwidth – try it on VPS hosting from Atlantic.Net!