Lighttpd is a free, open-source, and high-performance web server designed for speed-critical environments. It is lightweight, secure, fast, and consumes very few resources compared to other web servers. Lighttpd also supports FastCGI, CGI, Output-Compression, Auth and URL-Rewriting, which makes it the perfect web server. Lighttpd can handle up to 10000 connections in parallel on a single server.
If you are looking for a fast, efficient, and secure web server, then Lighttpd is the best choice for you.
In this tutorial, we will explain how to install Lighttpd web server with PHP and PHP-FPM support on Ubuntu 18.04.
Step 1 – Installing Lighttpd
By default, Lighttpd is available in the Ubuntu 18.04 default repository. You can install it by just running the following command:
apt-get install lighttpd -y
Once the installation is completed, check the status of Lighttpd with the following command:
systemctl status lighttpd
If everything goes fine, you should get the following output:
● lighttpd.service - Lighttpd Daemon
   Loaded: loaded (/lib/systemd/system/lighttpd.service; enabled; vendor preset: enabled)
   Active: active (running) since Sat 2019-05-25 09:18:47 UTC; 20s ago
 Main PID: 1860 (lighttpd)
    Tasks: 1 (limit: 1114)
   CGroup: /system.slice/lighttpd.service
           └─1860 /usr/sbin/lighttpd -D -f /etc/lighttpd/lighttpd.conf

May 25 09:18:47 ubuntu1804 systemd[1]: Starting Lighttpd Daemon...
May 25 09:18:47 ubuntu1804 systemd[1]: Started Lighttpd Daemon.
You can check the version of the Lighttpd installed on your server with the following command:
lighttpd -version
You should see the following output:
lighttpd/1.4.45 (ssl) - a light and fast webserver
Build-Date: Feb  6 2018 12:41:51
You can also check Lighttpd by visiting the URL http://your-server-ip on your web browser. You should see the Lighttpd default page per the following screen:

The main configuration file for Lighttpd is located at /etc/lighttpd/lighttpd.conf.
cat /etc/lighttpd/lighttpd.conf
Output:
server.modules = (
            "mod_access",
            "mod_alias",
            "mod_compress",
            "mod_redirect",
)

server.document-root        = "/var/www/html"
server.upload-dirs          = ( "/var/cache/lighttpd/uploads" )
server.errorlog             = "/var/log/lighttpd/error.log"
server.pid-file             = "/var/run/lighttpd.pid"
server.username             = "www-data"
server.groupname            = "www-data"
server.port                 = 80

index-file.names            = ( "index.php", "index.html", "index.lighttpd.html" )
url.access-deny             = ( "~", ".inc" )
static-file.exclude-extensions = ( ".php", ".pl", ".fcgi" )

compress.cache-dir          = "/var/cache/lighttpd/compress/"
compress.filetype           = ( "application/javascript", "text/css", "text/html", "text/plain" )

# default listening port for IPv6 falls back to the IPv4 port
## Use ipv6 if available
#include_shell "/usr/share/lighttpd/use-ipv6.pl " + server.port
include_shell "/usr/share/lighttpd/create-mime.assign.pl"
include_shell "/usr/share/lighttpd/include-conf-enabled.pl"
This is the main configuration file from where you can change default document root, port, and index file, and enable/disable any modules per your requirements.
You can also see all the configuration files using the tree command. First, install the tree package with the following command:
apt-get install tree -y
Once installed, you can see all the configuration files as shown below:
tree /etc/lighttpd/
You should see the following output:
/etc/lighttpd/
├── conf-available
│   ├── 05-auth.conf
│   ├── 10-accesslog.conf
│   ├── 10-cgi.conf
│   ├── 10-dir-listing.conf
│   ├── 10-evasive.conf
│   ├── 10-evhost.conf
│   ├── 10-expire.conf
│   ├── 10-fastcgi.conf
│   ├── 10-flv-streaming.conf
│   ├── 10-no-www.conf
│   ├── 10-proxy.conf
│   ├── 10-rewrite.conf
│   ├── 10-rrdtool.conf
│   ├── 10-simple-vhost.conf
│   ├── 10-ssi.conf
│   ├── 10-ssl.conf
│   ├── 10-status.conf
│   ├── 10-userdir.conf
│   ├── 10-usertrack.conf
│   ├── 11-extforward.conf
│   ├── 15-fastcgi-php.conf
│   ├── 90-debian-doc.conf
│   └── README
├── conf-enabled
└── lighttpd.conf
Once you have finished, you can proceed to the next step.
Step 2 – Enable PHP and PHP-FPM Support
By default, Lighttpd does not support PHP. You will need to install PHP with PHP-FPM to work with Lighttpd. PHP-FPM stands for “FastCGI Process Manager” and is an alternative PHP FastCGI implementation with some additional features that can be used for sites of any size.
You can install them by simply running the following command:
apt-get install php php-cgi php-fpm -y
Note: In Ubuntu 18.04, the default PHP version is 7.2. You can replace php7.2 with the PHP version installed on your operating system.
Once the installation is completed, the Apache web server also installed automatically along with PHP. So, you will need to remove the Apache package from your system.
First, stop the Apache service with the following command:
systemctl stop apache2
systemctl disable apache2
Next, remove the Apache package with the following command:
apt-get remove apache2 -y
Next, you will need to configure PHP-FPM to run a FastCGI server on port 9000. By default, PHP listens on the UNIX socket /run/php/php7.2-fpm.sock. Edit the file /etc/php/7.2/fpm/pool.d/www.conf as shown below:
nano /etc/php/7.2/fpm/pool.d/www.conf
Find the following line:
listen = /run/php/php7.2-fpm.sock
And replace it with the following line:
listen = 127.0.0.1:9000
Save the file then restart PHP-FPM service to apply the changes:
systemctl restart php7.2-fpm
Next, you will also need to configure PHP to work with Lighttpd. You can do it by editing the php.ini file:
nano /etc/php/7.2/fpm/php.ini
Find and uncomment the following line:
cgi.fix_pathinfo=1
Save the file when you are finished.
Next, configure PHP-FPM to run a FastCGI server on port 9000. You can do this by editing the file 15-fastcgi-php.conf:
nano /etc/lighttpd/conf-available/15-fastcgi-php.conf
Find the following lines:
"bin-path" => "/usr/bin/php-cgi",
"socket" => "/var/run/lighttpd/php.socket",
Replace them with the following lines:
"host" => "127.0.0.1",
"port" => "9000",
Save the file. Then, enable FastCGI and FastCGI-PHP modules using the following command:
lighty-enable-mod fastcgi
lighty-enable-mod fastcgi-php
Next, reload the Lighttpd service the enable the changes:
service lighttpd force-reload
Step 3 – Testing Lighttpd
At this point, Lighttpd is configured to work with PHP and PHP-FPM. It’s time to test it.
First, create a sample info.php file in the Lighttpd default document root directory:
nano /var/www/html/info.php
Add the following lines:
<?php
phpinfo();
?>
Save and close the file. Then, change the ownership of the info.php file to www-data:
chown www-data:www-data /var/www/html/info.php
Now, open your web browser and visit the URL http://your-server-ip/info.php. You will be redirected to the following page:
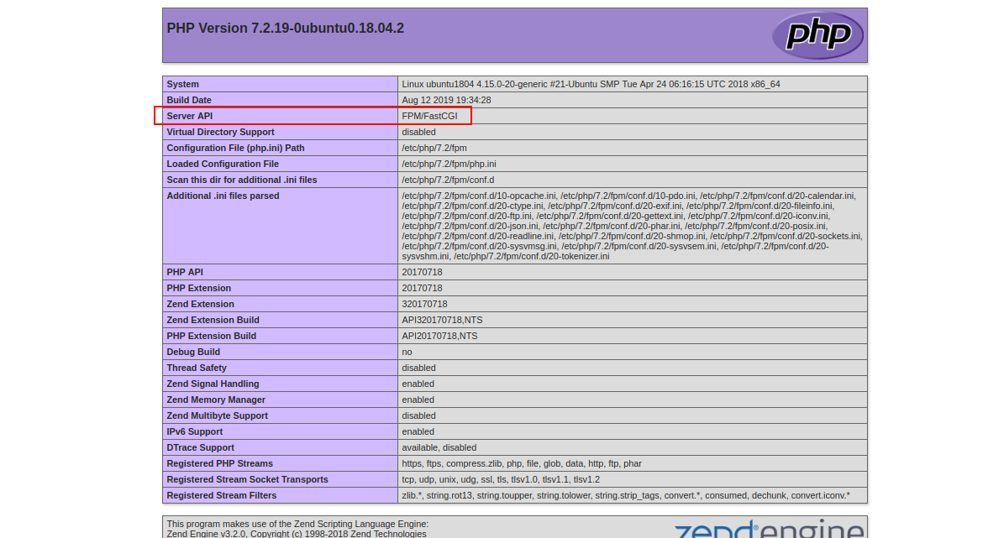
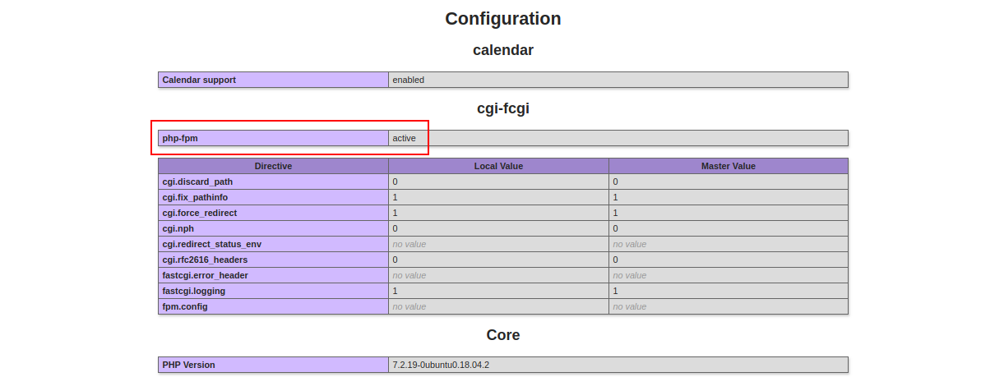
That means PHP is working well with Lighttpd.
Note : Don’t forget to remove the file /var/www/html/info.php after testing.
rm -rf /var/www/html/info.php
Conclusion
Congratulations! You have successfully installed and configured Lighttpd on an Ubuntu 18.04 server. I hope you have now enough knowledge to deploy PHP applications with Lighttpd and PHP-FPM. Get started with Lighttpd today with a VPS hosting plan from Atlantic.Net.
* This post is for informational purposes only and does not constitute professional, legal, financial, or technical advice. Each situation is unique and may require guidance from a qualified professional.
Readers should conduct their own due diligence before making any decisions.