Flectra is free and open-source ERP and CRM software ideal for small to large size companies. Flectra combines the capabilities of both CRM and ERP systems into a single and powerful package. It is a fork of Odoo Community Edition, and it aims replicate many of the features in Odoo Enterprise. This simple, feature-rich, and cost-effective ERP system will likely fulfill all your business needs.
Features
- CRM, HR and & Payroll
- Accounting and Financial Management
- Business Intelligence
- eCommerce – Online Store
- Inventory and Production Management
- BoM and Vendor Management
In this tutorial, we will explain how to install Flectra community edition on Debian 10.
Step 1 – Install PostgreSQL
Flectra uses PostgreSQL as a database backend, so you will need to install it in your server. You can install it with the following command:
apt-get install postgresql -y
After installing Flectra, you will need to create a new user for Flectra. You can create it with the following command:
su - postgres -c "createuser -s flectra"
Step 2 – Install Flectra Dependencies
Next, you will need to install all dependencies required for Flectra. You can install them with the following command:
apt-get install node-less gcc python3-venv build-essential python3-pillow python3-wheel python3-lxml python3-dev python3-pip python3-setuptools npm nodejs git gdebi libldap2-dev libsasl2-dev libxml2-dev libxslt1-dev libjpeg-dev libpq-dev -y
Once all the dependencies are installed, you will need to install the wkhtmltopdf tool in your system. The wkhtmltopdf is a command line toolset to render HTML into PDFs and various image formats. You can install it with the following command:
wget https://github.com/wkhtmltopdf/packaging/releases/download/0.12.6-1/wkhtmltox_0.12.6-1.buster_amd64.deb
dpkg -i wkhtmltox_0.12.6-1.buster_amd64.deb
apt-get install -f
Step 3 – Install Flectra
First, you will need to create a new system user to run Flectra. You can create it with the following command:
useradd -m -U -r -d /opt/flectra -s /bin/bash flectra
Note: The name of this user should be the same as your PostgreSQL user.
After creating Flectra user, switch user to flectra and download the latest version of Flectra with the following command:
su - flectra
git clone --depth=1 --branch=1.0 https://gitlab.com/flectra-hq/flectra.git flectra
Next, create a Python virtual environment for Flectra using the following command:
python3 -m venv flectra-venv
Next, run the following command to activate the virtual environment.
source flectra-venv/bin/activate
Next, you will need to edit the file requirements.txt and make some changes.
nano flectra/requirements.txt
Find the following lines:
psycopg2==2.7.3.1; sys_platform != 'win32'
psycopg2==2.8.3; sys_platform == 'win32'
And replace them with the following lines:
psycopg2==2.8.5; sys_platform != 'win32'
psycopg2==2.8.5; sys_platform == 'win32'
Save the file then install the required modules with the following command:
pip3 install -r flectra/requirements.txt
After installing all modules, deactivate from the virtual environment and exit from the flectra user with the following command:
deactivate
exit
Step 4 – Configure Flectra
First, you will need to create some directories to store Flectra files, logs and addons. You can create them with the following command:
mkdir -p /opt/flectra/flectra-custom-addons /var/log/flectra /etc/flectra
touch /var/log/flectra/flectra.log
Next, provide proper ownership to the above directories with the following command:
chown -R flectra:flectra /opt/flectra/flectra-custom-addons /var/log/flectra /etc/flectra
Next, create a Flectra main configuration file using the following command:
nano /etc/flectra/flectra.conf
Add the following lines:
[options]
admin_passwd = flectra-master-password
db_host = False
db_port = False
db_user = flectra
db_password = False
logfile = /var/log/flectra/flectra.log
logrotate = True
proxy_mode = True
addons_path = /opt/flectra/flectra/addons, /opt/flectra/flectra-custom-addons
Save and close the file.
Step 5 – Create a Systemd Service File for Flectra
Next, you will need to create a Flectra service file to manage the Flectra service. You can create it with the following command:
nano /etc/systemd/system/flectra.service
Add the following lines:
[Unit]
Description=flectra

[Service]
Type=simple
SyslogIdentifier=flectra
PermissionsStartOnly=true
User=flectra
Group=flectra
ExecStart=/opt/flectra/flectra-venv/bin/python3 /opt/flectra/flectra/flectra-bin -c /etc/flectra/flectra.conf
StandardOutput=journal+console

[Install]
WantedBy=multi-user.target
Save the file, then reload the systemd daemon with the following command:
systemctl daemon-reload
Next, start the Flectra service and enable it to start at system reboot with the following command:
systemctl start flectra
systemctl enable flectra
At this point, Flectra is started and listening on port 7073.
Step 6 – Access the Flectra Dashboard
Now, open your web browser and access the Flectra dashboard using the URL http://your-server-ip:7073. You should get the following screen:
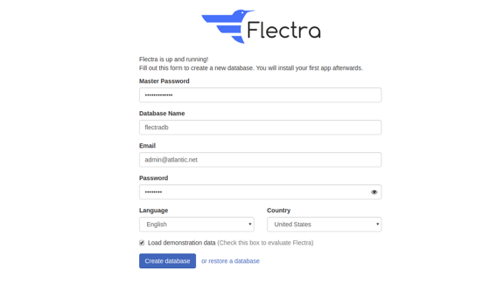
Provide your Flectra master password that you previously defined in Flectra configuration file, database, email, password, and click on the Create database button. You should see the Flectra dashboard in the following screen:

Conclusion
In the above guide, you learned how to install Flectra in Python virtual environment on Debian 10. You can now use Flectra as an ERP or CRM system for your business needs; use Flectra on your VPS Hosting account from Atlantic.Net!