HAProxy stands for High Availability Proxy. Written in C, it is a free and open-source TCP/HTTP Load Balancer and proxying solution for TCP and HTTP-based applications. HAProxy is used to improve the performance of a server environment by distributing the workload across multiple servers.
HAProxy allows an application to restart automatically or reroute work to another server in the event of a failure. This powerful, high performance, reliable, and secure load balancer is the most widely used and was specially designed for very high traffic web sites.
In this tutorial, we will show you how to set up a high availability load balancer with HAProxy on CentOS 8.
Prerequisites
For this tutorial, we will use the following setup:
HAProxy Server:– hostname : haproxy IP: 192.168.0.10
Web Server 1:- hostname : web1 IP: 192.168.0.11
Web Server 2:- hostname : web2 IP: 192.168.0.12
Step 1 – Create an Atlantic.Net Cloud Server
First, log in to your Atlantic.Net Cloud Server. Create a new server, choosing CentOS 8 as the operating system with at least 1GB RAM. Connect to your Cloud Server via SSH and log in using the credentials highlighted at the top of the page.
Once you are logged in to your CentOS 8 server, run the following command to update your base system with the latest available packages.
dnf update -y
Step 2 – Install and Configure Nginx
Note: Complete this step on WebServer 1 and WebServer2
First, you will need to install the Nginx web server on web1 and web2 instances.
You can install Nginx by running the following command:
dnf install nginx -y
Once Nginx has been installed, start the Nginx service and enable it to start at boot on both instances:
systemctl start nginx
systemctl enable nginx
Next, modify the index.html file on each instance.
Modify index.html file on web1 instance with the following command:
echo "This is My First Nginx Web Server" > /usr/share/nginx/html/index.html
Modify index.html file on web2 instance with the following command:
echo "This is My Second Nginx Web Server" > /usr/share/nginx/html/index.html
Save and close the file when you are finished.
Step 3 – Install and Configure HAProxy
Note: Complete this step on HAProxy Server
First, install HAProxy on the haproxy server instance with the following command:
dnf install haproxy -y
Once the installation is completed, backup the haproxy default configuration file:
mv /etc/haproxy/haproxy.cfg /etc/haproxy/haproxy.cfg-bak
The configuration file is divided into four major sections.
- global settings: Used to set process-wide parameters.
- defaults: Used to set default parameters for all other sections.
- frontend: Used to define how HAProxy is externally accessed to enable access to the backend.
- backend: Used to define a set of servers to which the proxy will connect to forward incoming connections.
Next, create a new haproxy configuration file using the following command:
nano /etc/haproxy/haproxy.cfg
Add the following lines that match with your infrastructure:
#———————————————————————
global
log 127.0.0.1 local2
chroot /var/lib/haproxy
pidfile /var/run/haproxy.pid
maxconn 4000
user haproxy
group haproxy
daemon
# turn on stats unix socket
stats socket /var/lib/haproxy/stats
# utilize system-wide crypto-policies
ssl-default-bind-ciphers PROFILE=SYSTEM
ssl-default-server-ciphers PROFILE=SYSTEM
#———————————————————————
defaults
mode http
log global
option httplog
option dontlognull
option http-server-close
option forwardfor except 127.0.0.0/8
option redispatch
retries 3
timeout http-request 10s
timeout queue 1m
timeout connect 10s
timeout client 1m
timeout server 1m
timeout http-keep-alive 10s
timeout check 10s
maxconn 3000
#———————————————————————
# main frontend which proxys to the backends
#———————————————————————
frontend haproxy_balancer # define the name of the frontend.
bind 192.168.0.10:80 # IP address of HAProxy server
option http-server-close
option forwardfor
stats uri /haproxy?stats # Specify the HAProxy status page.
default_backend webservers
#———————————————————————
# round robin balancing between the various backends
#———————————————————————
backend webservers # Specify a name for identifying an application
mode http
balance roundrobin # defines the roundrobin load balancer scheduling algorithm
option httpchk HEAD / HTTP/1.1\r\nHost:\ localhost
server nginx-web1 192.168.0.11:80 check # IP address of the first backend server
server nginx-web2 192.168.0.12:80 check # IP address of the second backend server
Note: Ensure you amend the IP address above with the IP relevant to your server setup
Save and close the file when you are finished. Then, check the haproxy configuration file for any errors with the following command:
haproxy -c -f /etc/haproxy/haproxy.cfg
You should get the following output:
Configuration file is valid
Finally, start the haproxy service and enable it to start at boot with the following command:
systemctl start haproxy
systemctl enable haproxy
You can also verify haproxy with the following command:
systemctl status haproxy
You should get the following output:
-
haproxy.service - HAProxy Load Balancer
Loaded: loaded (/usr/lib/systemd/system/haproxy.service; disabled; vendor preset: disabled)
Active: active (running) since Fri 2020-04-24 02:14:55 EDT; 5min ago
Process: 1371 ExecStartPre=/usr/sbin/haproxy -f $CONFIG -c -q (code=exited, status=0/SUCCESS)
Main PID: 1373 (haproxy)
Tasks: 2 (limit: 6087)
Memory: 2.8M
CGroup: /system.slice/haproxy.service
├─1373 /usr/sbin/haproxy -Ws -f /etc/haproxy/haproxy.cfg -p /run/haproxy.pid
└─1374 /usr/sbin/haproxy -Ws -f /etc/haproxy/haproxy.cfg -p /run/haproxy.pid

Apr 24 02:14:55 haproxy systemd[1]: Starting HAProxy Load Balancer...
Apr 24 02:14:55 haproxy systemd[1]: Started HAProxy Load Balancer.
Step 4 – Configure HAProxy Logging
HAProxy logging allows you to see statistics of each connection to your backend web servers.
You can configure rsyslog by editing the file /etc/rsyslog.conf:
nano /etc/rsyslog.conf
Uncomment the following line:
module(load="imudp")
input(type="imudp" port="514")
Save and close the file when you are finished. Next, you will need to configure a rsyslog server to receive and process HAProxy log messages.
To do so, create a new haproxy.conf configuration file:
nano /etc/rsyslog.d/haproxy.conf
Add the following lines:
local2.=info /var/log/haproxy-access.log
local2.notice /var/log/haproxy-info.log
Save and close the file when you are finished. Then, restart rsyslog service and enable it to start at boot with the following command:
systemctl restart rsyslog
systemctl enable rsyslog
Step 5 – Test HAProxy Load Balancing
At this point, HAProxy is installed and configured. It’s time to test whether the load balancing is working or not.
Open your web browser and type your HAProxy IP http://192.168.0.10. You should see the content of your first Nginx web server in the following screen:

Next, refresh the webpage. You should see the content of your second Nginx web server in the following screen:

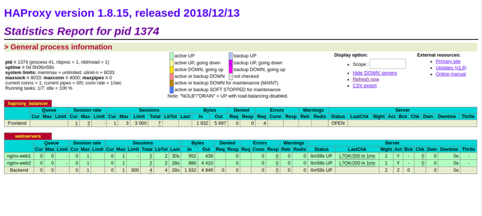
You can view the status of haproxy using the URL http://192.168.0.10/haproxy?stats. You should see the health of your servers, current request rates, response times and other metrics in the following screen:
Conclusion
In the above guide, we learned how to set up a high availability load balancer with HAProxy on CentOS 8. You can now easily design and configure load balancing to suit your IT infrastructure and application’s requirements; try it out on VPS Hosting from Atlantic.Net.
* This post is for informational purposes only and does not constitute professional, legal, financial, or technical advice. Each situation is unique and may require guidance from a qualified professional.
Readers should conduct their own due diligence before making any decisions.