Jitsi is a free, open-source, multiplatform video conferencing and instant messaging application for web & mobile. It works on Linux, macOS, Windows, iOS and Android, and you can use it as a standalone app or embed it in your web application. Jitsi Meet Audio/Video Chat is fully encrypted and supports several protocols including SIP, XMPP/Jabber, ICQ/AIM, Yahoo!, GTalk/Hangouts extensions, and ZRTP.
With Jitsi Meet, you can share your desktop & presentations, invite users to a conference via a simple URL, edit documents with Etherpad, and pick fun meeting URLs for every meeting.
In this tutorial, we will explain how to install Jitsi Meet Video Conferencing Server on Ubuntu 20.04.
Step 1 – Install Jitsi Meet
Before starting, you will need to install the required dependencies in your server. You can install them by running the following command:
apt-get update -y
apt-get install apt-transport-https software-properties-common -y
Once installed, download and add the Jitsi GPG key with the following command:
wget -qO - https://download.jitsi.org/jitsi-key.gpg.key | apt-key add -
Next, add the Jitsi repository using the following command:
echo 'deb https://download.jitsi.org stable/' | tee /etc/apt/sources.list.d/jitsi-stable.list
Next, update the repository and install the Jitsi Meet with the following command:
apt-get update -y
apt-get install jitsi-meet
During the installation, you will need to provide a valid domain name as shown below:
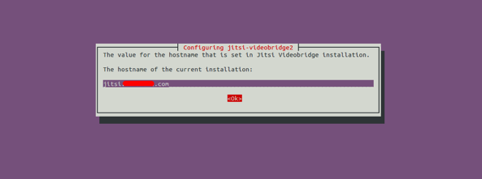
Provide your domain name and click on the Ok button. You will be asked to generate a new self-signed TLS certificate so that later you can obtain and install a trusted Let’s Encrypt certificate, as shown below:
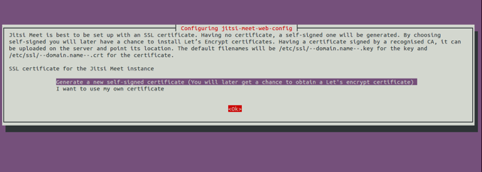
Select the first option and hit Enter to start the installation. Once the installation has been completed successfully, you can verify the status of Jitsi service with the following command:
systemctl status jitsi-videobridge2
You should get the following output:

Step 2 – Secure Jitsi Meet with a Let’s Encrypt Certificate
Before starting, you will need to install the Certbot client in your server to install and manage the Let’s Encrypt Certificate.
First, add the Certbot repository with the following command:
add-apt-repository ppa:ahasenack/certbot-tlssni01-1875471
sudo add-apt-repository ppa:certbot/certbot
Next, update the repository and install the Certbot client with the following command:
apt-get update -y
apt-get install certbot python3-certbot-nginx -y
The Jitsi Let’s Encrypt installation script expects certbot in /usr/local/sbin directory while Ubuntu installs it in /usr/bin, so create a symbolic link of the script with the following command:
ln -s /usr/bin/certbot /usr/local/sbin/certbot
Next, update install-letsencrypt-cert.sh to use certbot instead of certbot-auto.
sed -i 's/\.\/certbot-auto/certbot/g' /usr/share/jitsi-meet/scripts/install-letsencrypt-cert.sh
Next, run the install-letsencrypt-cert.sh script to secure Jitsi Meet with Let’s Encrypt SSL:
/usr/share/jitsi-meet/scripts/install-letsencrypt-cert.sh
You will be asked to provide your email address and accept the terms of service as shown below:
————————————————————————-
This script will:
- Need a working DNS record pointing to this machine(for domain jitsi.example.com)
- Download certbot-auto from https://dl.eff.org to /usr/local/sbin
- Install additional dependencies in order to request Let’s Encrypt certificate
- If running with jetty serving web content, will stop Jitsi Videobridge
- Configure and reload nginx or apache2, whichever is used
- Configure the coturn server to use Let's Encrypt certificate and add required deploy hooks
- Add command in weekly cron job to renew certificates regularly

You need to agree to the ACME server's Subscriber Agreement (https://letsencrypt.org/documents/LE-SA-v1.1.1-August-1-2016.pdf)
by providing an email address for important account notifications
Enter your email and press [ENTER]: admin@example.com
Provide your valid email address and hit Enter. Once the installation is finished, you should see the following output:
Saving debug log to /var/log/letsencrypt/letsencrypt.log
Plugins selected: Authenticator webroot, Installer None
Obtaining a new certificate
Performing the following challenges:
http-01 challenge for jitsi.example.com
Using the webroot path /usr/share/jitsi-meet for all unmatched domains.
Waiting for verification...
Cleaning up challenges
Running deploy-hook command: /etc/letsencrypt/renewal-hooks/deploy/0000-coturn-certbot-deploy.sh
Output from deploy-hook command 0000-coturn-certbot-deploy.sh:
Configuring turnserver
IMPORTANT NOTES:
- Congratulations! Your certificate and chain have been saved at:
/etc/letsencrypt/live/jitsi.example.com/fullchain.pem
Your key file has been saved at:
/etc/letsencrypt/live/jitsi.example.com/privkey.pem
Your cert will expire on 2020-08-31. To obtain a new or tweaked
version of this certificate in the future, simply run certbot
again. To non-interactively renew *all* of your certificates, run
"certbot renew"
- Your account credentials have been saved in your Certbot
configuration directory at /etc/letsencrypt. You should make a
secure backup of this folder now. This configuration directory will
also contain certificates and private keys obtained by Certbot so
making regular backups of this folder is ideal.
- If you like Certbot, please consider supporting our work by:

Donating to ISRG / Let's Encrypt: https://letsencrypt.org/donate
Donating to EFF: https://eff.org/donate-le
Step 3 – Access Jitsi Meet
Now, open your web browser and type the URL https://jitsi.example.com. You will be redirected to the following page:
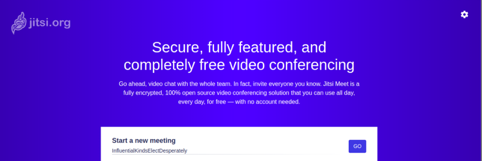
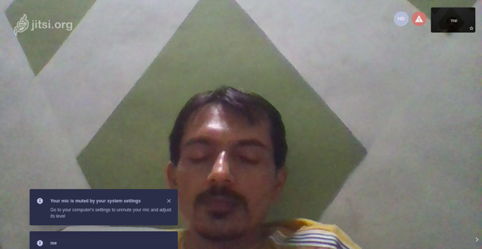
Type your meeting a name and click the Go button. Once the meeting is started, you should see the following screen:
Conclusion
Congratulations! you have successfully deployed a Jitsi Meet Video Conferencing server on Ubuntu 20.04. You can now install the Jitsi client app in your mobile device and start exploring Jitsi. Try out Jitsi on VPS Hosting from Atlantic.Net and visit the Jitsi documentation for more information.
* This post is for informational purposes only and does not constitute professional, legal, financial, or technical advice. Each situation is unique and may require guidance from a qualified professional.
Readers should conduct their own due diligence before making any decisions.