Apache Spark is a data processing framework used for executing data engineering, data science, and machine learning on single-node machines or clusters. It is designed for fast computation and used in big data workloads to quickly perform processing tasks. It provides high-level APIs in Scala, Java, Python, and R, and an optimized engine that supports general computation graphs for data analysis.
In this tutorial, we will explain how to install Apache Spark on Arch Linux.
Step 1 – Configure Repository
By default, the default repository is outdated in Arch Linux, so you will need to modify the default mirror list. You can do it by editing the mirror list configuration file:
nano /etc/pacman.d/mirrorlist
Remove all lines and add the following lines:
## Score: 0.7, United States
Server = http://mirror.us.leaseweb.net/archlinux/$repo/os/$arch
## Score: 0.8, United States
Server = http://lug.mtu.edu/archlinux/$repo/os/$arch
Server = http://mirror.nl.leaseweb.net/archlinux/$repo/os/$arch
## Score: 0.9, United Kingdom
Server = http://mirror.bytemark.co.uk/archlinux/$repo/os/$arch
## Score: 1.5, United Kingdom
Server = http://mirrors.manchester.m247.com/arch-linux/$repo/os/$arch
Server = http://archlinux.dcc.fc.up.pt/$repo/os/$arch
## Score: 6.6, United States
Server = http://mirror.cs.pitt.edu/archlinux/$repo/os/$arch
## Score: 6.7, United States
Server = http://mirrors.acm.wpi.edu/archlinux/$repo/os/$arch
## Score: 6.8, United States
Server = http://ftp.osuosl.org/pub/archlinux/$repo/os/$arch
## Score: 7.1, India
Server = http://mirror.cse.iitk.ac.in/archlinux/$repo/os/$arch
## Score: 10.1, United States
Server = http://mirrors.xmission.com/archlinux/$repo/os/$arch
Save and close the file then update all the package indexes with the following command:
pacman -Syu
Step 2 – Install Java
Apache Spark is based on Java, so you will need to install Java JDK on your server. Run the following command to install Java:
pacman -S jre17-openjdk
Once installed, you can verify the Java installation using the following command.
java --version
You will get the following output.
openjdk 17.0.6 2023-01-17
OpenJDK Runtime Environment (build 17.0.6+10)
OpenJDK 64-Bit Server VM (build 17.0.6+10, mixed mode)
Step 3 – Install Scala
You will also need to install Scala on your server. You can install it using the following command.
pacman -S scala
After the installation, verify the Scala version:
scala --version
Sample output.
Scala code runner version 2.13.8-20220325-005602-unknown -- Copyright 2002-2021, LAMP/EPFL and Lightbend, Inc.
To connect to the Scala console, run the following command.
scala
You will get the following console.
Welcome to Scala 2.13.8-20220325-005602-unknown (OpenJDK 64-Bit Server VM, Java 17.0.6).
Type in expressions for evaluation. Or try :help.
Verify Scala using the following command.
scala> println("Testing")
Sample output.
Testing
Step 4 – Install Apache Spark
First, visit the Apache Spark download page, pick the download URL, and download it with the following command.
wget https://archive.apache.org/dist/spark/spark-3.3.1/spark-3.3.1-bin-hadoop3.tgz
Once the download is completed, extract the downloaded file using the following command.
tar -xzf spark-3.3.1-bin-hadoop3.tgz
Next, move the extracted directory to /mnt.
mv spark-3.3.1-bin-hadoop3 /mnt/spark
Next, create a ~/.bashrc file and define your Apache Spark path.
nano ~/.bashrc
Add the following lines:
export SPARK_HOME=/mnt/spark
export PATH=$PATH:$SPARK_HOME/bin:$SPARK_HOME/sbin
Next, activate the environment variable using the following command.
source ~/.bashrc
Step 5 – Start Spark Master and Worker Node
At this point, Apache Spark is installed on your server. You can now start the Spark master with the following command.
start-master.sh
Sample output.
starting org.apache.spark.deploy.master.Master, logging to /mnt/spark/logs/spark-root-org.apache.spark.deploy.master.Master-1-archlinux.out
By default, Spark master listens on port 8080. You can check it with the following command.
ss -tpln | grep 8080
Sample output.
LISTEN 0 0 *:8080 *:* users:(("java",pid=57901,fd=265))
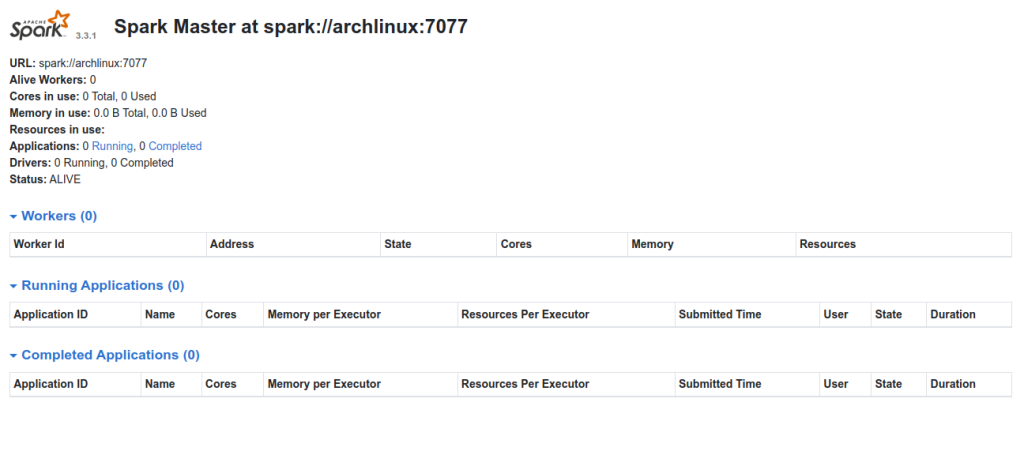
Now, open your web browser and access the Spark master using the URL http://your-server-ip:8080. You should see the following screen.
Next, start the Spark Worker using the following command.
start-worker.sh spark://your-server-ip:7077
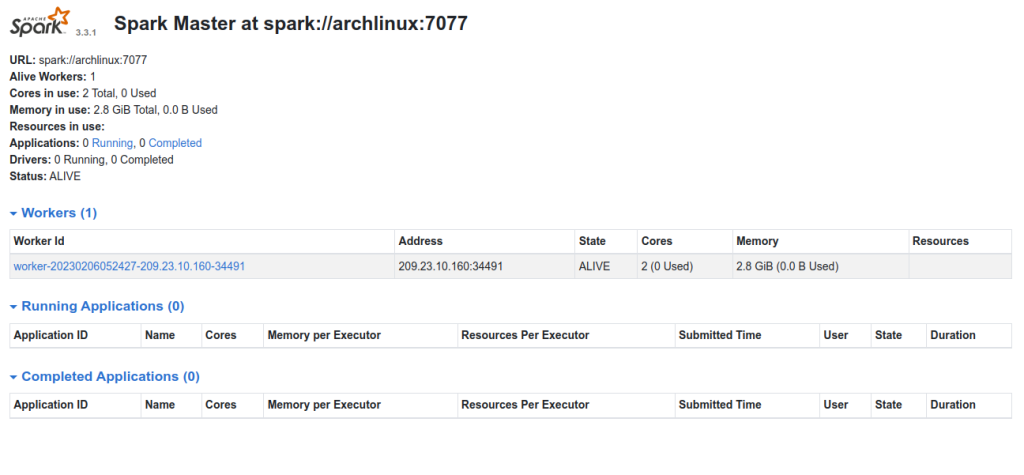
Now, go back to the Spark master web interface and reload the page. You should see the added worker on the following screen.
Step 6 – Create a Systemd Service File for Apache Spark
Before creating systemd service file, stop both the worker and master service using the following command.
stop-worker.sh
stop-master.sh
Next, create a Spark master service using the following command.
nano /etc/systemd/system/spark-master.service
Add the following configuration.
[Unit]
Description=Apache Spark Master
After=network.target

[Service]
Type=forking
User=root
Group=root
ExecStart=/mnt/spark/sbin/start-master.sh
ExecStop=/mnt/spark/sbin/stop-master.sh

[Install]
WantedBy=multi-user.target
Next, create a Spark worker service file.
nano /etc/systemd/system/spark-worker.service
Add the following configuration.
[Unit]

Description=Apache Spark Worker

After=network.target

[Service]
Type=forking
User=root
Group=root
ExecStart=/mnt/spark/sbin/start-slave.sh spark://your-server-ip:7077
ExecStop=/mnt/spark/sbin/stop-slave.sh

[Install]
WantedBy=multi-user.target
Save and close the file, then reload the systemd daemon to apply the changes.
systemctl daemon-reload
Next, start both the Master and Worker services using the following command.
systemctl start spark-master spark-worker
You can check the status of both services using the following command.
systemctl status spark-master spark-worker
You should see the following output.
● spark-master.service - Apache Spark Master
     Loaded: loaded (/etc/systemd/system/spark-master.service; disabled; preset: disabled)
     Active: active (running) since Mon 2023-02-06 05:28:09 UTC; 19s ago
    Process: 58118 ExecStart=/mnt/spark/sbin/start-master.sh (code=exited, status=0/SUCCESS)
   Main PID: 58151 (java)
      Tasks: 34 (limit: 4700)
     Memory: 159.2M
     CGroup: /system.slice/spark-master.service
             └─58151 /usr/lib/jvm/java-17-openjdk/bin/java -cp "/mnt/spark/conf/:/mnt/spark/jars/*" -Xmx1g org.apache.spark.deploy.master.Mas>

Feb 06 05:28:06 archlinux systemd[1]: Starting Apache Spark Master...
Feb 06 05:28:06 archlinux start-master.sh[58131]: starting org.apache.spark.deploy.master.Master, logging to /mnt/spark/logs/spark-root-org.a>
Feb 06 05:28:09 archlinux systemd[1]: Started Apache Spark Master.

● spark-worker.service - Apache Spark Worker
     Loaded: loaded (/etc/systemd/system/spark-worker.service; disabled; preset: disabled)
     Active: active (running) since Mon 2023-02-06 05:28:09 UTC; 19s ago
    Process: 58119 ExecStart=/mnt/spark/sbin/start-slave.sh spark://your-server-ip:7077 (code=exited, status=0/SUCCESS)
   Main PID: 58157 (java)
      Tasks: 40 (limit: 4700)
     Memory: 170.5M
     CGroup: /system.slice/spark-worker.service
             └─58157 /usr/lib/jvm/java-17-openjdk/bin/java -cp "/mnt/spark/conf/:/mnt/spark/jars/*" -Xmx1g org.apache.spark.deploy.worker.Wor>

Feb 06 05:28:06 archlinux systemd[1]: Starting Apache Spark Worker...
Feb 06 05:28:06 archlinux start-slave.sh[58119]: This script is deprecated, use start-worker.sh
Feb 06 05:28:06 archlinux start-slave.sh[58133]: starting org.apache.spark.deploy.worker.Worker, logging to /mnt/spark/logs/spark-root-org.ap>
Feb 06 05:28:09 archlinux systemd[1]: Started Apache Spark Worker.
Conclusion
In this post, you learned how to install Apache Spark on Arch Linux. You can now use Apache Spark in data science, and machine learning project to handle high workloads. You can try to install the Apache Spark server on dedicated server hosting from Atlantic.Net!