OpenNMS is a free, open-source, self-hosted network monitoring and network management solution developed by OpenNMS Group. It helps you to visualize and monitor everything on your local and remote networks. OpenNMS can be integrated with business applications and workflows to monitor your networks. It comes with a web-based interface that allows you to monitor everything from a central place.
In this post, we will show you how to install the OpenNMS monitoring tool with Docker on Arch Linux.
Step 1 – Configure Repository
By default, the default repository is outdated in Arch Linux, so you will need to modify the default mirror list. You can do it by editing the mirror list configuration file:
nano /etc/pacman.d/mirrorlist
Remove all lines and add the following lines:
## Score: 0.7, United States
Server = http://mirror.us.leaseweb.net/archlinux/$repo/os/$arch
## Score: 0.8, United States
Server = http://lug.mtu.edu/archlinux/$repo/os/$arch
Server = http://mirror.nl.leaseweb.net/archlinux/$repo/os/$arch
## Score: 0.9, United Kingdom
Server = http://mirror.bytemark.co.uk/archlinux/$repo/os/$arch
## Score: 1.5, United Kingdom
Server = http://mirrors.manchester.m247.com/arch-linux/$repo/os/$arch
Server = http://archlinux.dcc.fc.up.pt/$repo/os/$arch
## Score: 6.6, United States
Server = http://mirror.cs.pitt.edu/archlinux/$repo/os/$arch
## Score: 6.7, United States
Server = http://mirrors.acm.wpi.edu/archlinux/$repo/os/$arch
## Score: 6.8, United States
Server = http://ftp.osuosl.org/pub/archlinux/$repo/os/$arch
## Score: 7.1, India
Server = http://mirror.cse.iitk.ac.in/archlinux/$repo/os/$arch
## Score: 10.1, United States
Server = http://mirrors.xmission.com/archlinux/$repo/os/$arch
Save and close the file, then update all the package indexes with the following command:
pacman -Syu
Step 2 – Install Docker
First, you will need to install Docker and Docker Compose on your server. You can install both packages with the following command.
pacman -S docker docker-compose
Once the Docker is installed, enable the Docker service to start at system reboot.
systemctl enable docker
Next, restart your system to apply the system.
reboot
Step 3 – Create a Docker Compose File for OpenNMS
First, create a directory to store OpenNMS configurations.
mkdir opennms
Next, navigate to the OpenNMS directory and create a docker-compose.yml file.
cd opennms
nano docker-compose.yml
Add the following configuration.
version: '3'

volumes:
  data-postgres: {}
  data-opennms: {}

services:
  database:
    image: postgres:12
    container_name: database
    environment:
      - TZ=Europe/Berlin
      - POSTGRES_USER=postgres
      - POSTGRES_PASSWORD=postgres
    volumes:
      - data-postgres:/var/lib/postgresql/data
    healthcheck:
      test: [ "CMD-SHELL", "pg_isready -U postgres" ]
      interval: 10s
      timeout: 30s
      retries: 3

  horizon:
    image: opennms/horizon:27.1.1
    container_name: horizon
    environment:
      - TZ=Europe/Berlin
      - POSTGRES_HOST=database
      - POSTGRES_PORT=5432
      - POSTGRES_USER=postgres
      - POSTGRES_PASSWORD=postgres
      - OPENNMS_DBNAME=opennms
      - OPENNMS_DBUSER=opennms
      - OPENNMS_DBPASS=opennms
    volumes:
      - data-opennms:/opt/opennms/share/rrd
      - ./overlay:/opt/opennms-overlay
    command: ["-s"]
    ports:
      - "8980:8980/tcp"
      - "8101:8101/tcp"
      - "61616:61616/tcp"
    healthcheck:
      test: [ "CMD", "curl", "-f", "-I", "http://localhost:8980/opennms/login.jsp" ]
      interval: 1m
      timeout: 5s
      retries: 3
Save and close the file when you are done.
Step 4 – Create OpenNMS Container
Your docker-compose.yml file for OpenNMS is now ready to deploy OpenNMS. Run the following command inside the netbox directory to launch the Netbox container.
docker-compose up -d
If everything is fine, you will get the following output.
✔ horizon 12 layers [⣿⣿⣿⣿⣿⣿⣿⣿⣿⣿⣿⣿] 0B/0B Pulled 116.7s
✔ 7a0437f04f83 Pull complete 16.2s
✔ 14e88814ab83 Pull complete 17.1s
✔ 15d4a57fa9b3 Pull complete 38.0s
✔ 48f60c15ef49 Pull complete 39.0s
✔ 40326c4bdfdf Pull complete 80.7s
✔ 8fe30d1fc55f Pull complete 80.9s
✔ a0a9efee3070 Pull complete 81.1s
✔ 736b43559f0f Pull complete 81.2s
✔ fc4845e5d963 Pull complete 81.4s
✔ 0be5443a0ce9 Pull complete 115.5s
✔ bb3010fe38e5 Pull complete 115.6s
✔ 570c6a68cf58 Pull complete 115.7s
✔ database 13 layers [⣿⣿⣿⣿⣿⣿⣿⣿⣿⣿⣿⣿⣿] 0B/0B Pulled 40.3s
✔ f1f26f570256 Pull complete 18.1s
✔ 1c04f8741265 Pull complete 19.4s
✔ dffc353b86eb Pull complete 19.7s
✔ 18c4a9e6c414 Pull complete 20.6s
✔ 81f47e7b3852 Pull complete 23.7s
✔ 5e26c947960d Pull complete 24.5s
✔ a2c3dc85e8c3 Pull complete 24.8s
✔ 17df73636f01 Pull complete 25.1s
✔ 05add2dd64c8 Pull complete 37.9s
✔ f8eca8be8b3c Pull complete 38.2s
✔ cdf9a1dad65d Pull complete 38.4s
✔ 194ad2944d69 Pull complete 38.8s
✔ 66763d72b3d4 Pull complete 39.0s
[+] Running 5/5
✔ Network opennms_default Created 0.1s
✔ Volume "opennms_data-postgres" Created 0.0s
✔ Volume "opennms_data-opennms" Created 0.0s
✔ Container horizon Started 1.5s
✔ Container database Started 1.3s
You can also verify the Netbox container using the following command.
docker-compose ps
You will get the following output.
NAME IMAGE COMMAND SERVICE CREATED STATUS PORTS
database postgres:12 "docker-entrypoint.s…" database 21 seconds ago Up 19 seconds (healthy) 5432/tcp
horizon opennms/horizon:27.1.1 "/entrypoint.sh -s" horizon 21 seconds ago Up 18 seconds (health: starting) 0.0.0.0:8101->8101/tcp, :::8101->8101/tcp, 1162/udp, 0.0.0.0:8980->8980/tcp, :::8980->8980/tcp, 10514/udp, 0.0.0.0:61616->61616/tcp, :::61616->61616/tcp
Step 5 – Access OpenNMS Web Interface
At this point, OpenNMS is started and listens on port 8980. Now, open your web browser and access OpenNMS using the URL http://your-server-ip:8980. You should see the OpenNMS login page.
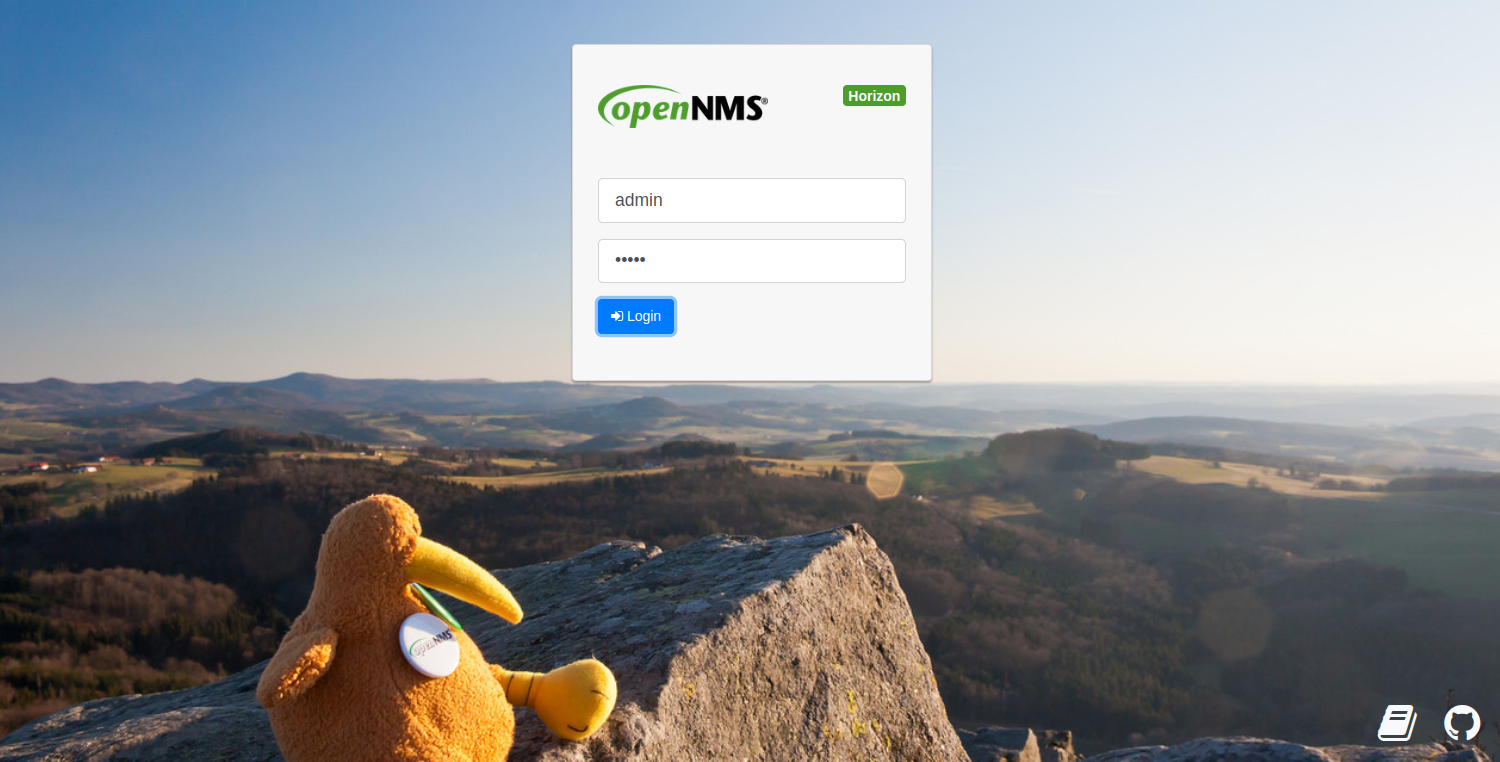
Provide the OpenNMS default admin username and password as admin/admin then click on the Login button. You should see the OpenNMS dashboard on the following page.

Conclusion
Congratulations! You have successfully installed OpenNMS with Docker on Arch Linux. You can now start monitoring your local and remote networks from a central location. You can also try to deploy the OpenNMS monitoring solution on dedicated server hosting from Atlantic.Net!