Table of Contents
Verified and Tested 03/24/2015
Introduction
In this tutorial, we will be going over a basic way to transfer your SSL from one CentOS 6 x86_64 server running Tomcat to another CentOS 6 x86_64 server running Tomcat. This has been tested on Java 6 and Tomcat 6, as well as Java 8 and Tomcat 8. For the ease of this tutorial, the original server with the SSL will be Server A. The new server that we are transferring to will be Server B.
Prerequisites
You will need two servers with CentOS 6 x86_64 installed, and both servers need to have Java and Tomcat installed. One of the servers has to have an SSL already installed onto it. If you do not have a new CentOS server, you can get a virtual private server from Atlantic.Net.
Tomcat to Tomcat SSL Transfer on CentOS
The easiest way to transfer your certificate between servers is to create a pkcs12 file out of it. Assuming you have the .pem of your certificate, this can be quite easy. If you do not have the .pem, you will need to create one. You can see the Creating a pem for your SSL page for this.
You can copy the key file you generated for the SSL initially into a separate key.pem if it is not a .pem already. In our example, we have done this and have also stripped out the password for the key. To do this, you may view the How to Remove the Password From Your SSL Key page.
We are now ready to export the SSL to a .pkcs12 file. To do this, on Server A you just run:
openssl pkcs12 –export –name NAME –in certificate.pem –inkey key.pem –out keystore.p12
The keystore.p12 will ask you for a password. Please use a secure password you will remember. For NAME, you will want to use a name you will not forget. It would be best to use your domain name without the .tld (so no .com, .org, etc.) The certificate.pem would be the SSL .pem file you have or just created. The key.pem would be your SSL key in .pem format and they keystore.p12 is what we will be transferring to the new server. You can name all these files as you please. Just make sure you are keeping track of them.
You may transfer the keystore.p12 to Server B using whatever method you would like. In our example, we use rsync.
rsync keystore.p12 username@IPADDR_of_Server_B:/directory/to/copy/to
Once copied, you can move the keystore.p12 to your SSL directory of Server B if you did not copy it there to begin with. We will now want to load the keystore.p12 with java’s keytool on Server B.
/path/to/java/keytool –importkeystore –destkeystore /path/to/ssl/directory/keystore.jks –srckeystore /path/to/ssl/directory/keystore.p12 –srcstoretype pkcs12 –alias NAME
It should prompt for a new password for the keystore (you may use the same password or create a new one) and the password you created for keystore.p12. NAME should be the same NAME you utilized in the keystore.p12 generation.
Once this keystore is created, the hard work is done. To finish this off, you need to edit the Tomcat server.xml on Server B to use this keystore.jks and the passphrase, and you will be good to go.
Inside the Tomcat server.xml, you will want to find the section with: “<Connector port=”8443“.” This is where we would uncomment (remove the “<!–“ and “–>” that section is surrounded in) and add in at the end (before “/>”):
keystoreFile=”/path/to/keystore.jks” keystorePass="PASSWORD"
Where keystore.jks is the keystore.jks we made, and the PASSWORD is the password you created for the keystore. After this is added, you can restart Tomcat, and your SSL will be in use for Tomcat.
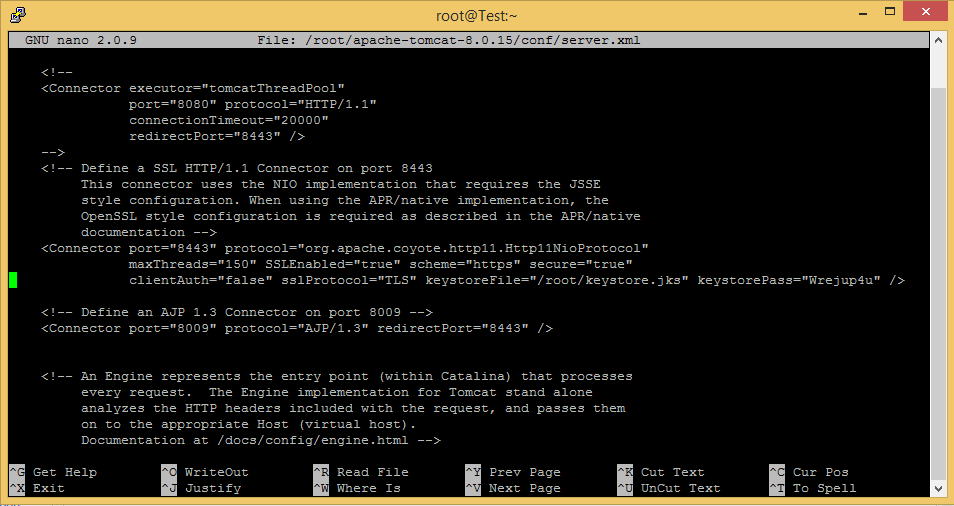 An example of a tomcat config with the new SSL
You will need further configuration for 8443 to be in use, but the SSL will be transferred, and if you log into your manager for Tomcat and check the SSL configuration, you should see that SSLs for 8443 is enabled.
Learn more about our VPS hosting services and VPS hosting price.