Jitsi Meet is a free and open-source video-conferencing application that allows you to host your own video conferencing server without any subscription. It provides multi-person video conference rooms and allows you to access them from your web browser. It provides end-to-end TLS encryption so that no one can snoop on the call. Deploying Jitsi meet in the Docker container will save you a lot of time.
In this post, we will show you how to Deploy Jitsi Meet with Docker and Docker Compose on Ubuntu 20.04.
Step 1 – Install Docker and Docker Compose
First, you will need to install some required dependencies on your server. You can install them with the following commands:
apt-get update -y
apt-get install git apt-transport-https ca-certificates curl gnupg-agent software-properties-common -y
After installing all of them, add the Docker repository with the following command:
curl -fsSL https://download.docker.com/linux/ubuntu/gpg | apt-key add -
add-apt-repository "deb [arch=amd64] https://download.docker.com/linux/ubuntu $(lsb_release -cs) stable"
Once the repository is added, install Docker and Docker Compose with the following command:
apt-get install docker-ce docker-compose -y
After installing both packages, you can proceed to the next step.
Step 2 – Download and Configure Jitsi Meet
Next, you will need to download Jitsi Meet for Docker from the Git repository. You can download it with the following command:
git clone https://github.com/jitsi/docker-jitsi-meet.git
Once the download is completed, change the directory to the downloaded directory and copy the sample environment file.
cd docker-jitsi-meet
cp env.example .env
Next, edit the .env file and define your server IP, ports, domain, and email address.
nano .env
Change the following lines:
HTTP_PORT=80
HTTPS_PORT=443
TZ=UTC
PUBLIC_URL="https://jitsi.linuxbuz.com"
DOCKER_HOST_ADDRESS=your-server-ip
ENABLE_HTTP_REDIRECT=1
ENABLE_LETSENCRYPT=1
LETSENCRYPT_DOMAIN=jitsi.linuxbuz.com
[email protected]
Save and close the file when you are finished.
Step 3 – Launch the Jitsi Meet Container
You can now launch the Jitsi Meet container with the following command:
docker-compose up -d
You should see the following output:
Status: Downloaded newer image for jitsi/jvb:latest
Creating docker-jitsi-meet_web_1     ... done
Creating docker-jitsi-meet_prosody_1 ... done
Creating docker-jitsi-meet_jvb_1     ... done
Creating docker-jitsi-meet_jicofo_1  ... done
You can now check the running container with the following command:
docker-compose ps
You should get the following output:
           Name               Command   State                                           Ports
--------------------------------------------------------------------------------------------------------------------------------------
docker-jitsi-meet_jicofo_1    /init     Up
docker-jitsi-meet_jvb_1       /init     Up      0.0.0.0:10000->10000/udp,:::10000->10000/udp, 0.0.0.0:4443->4443/tcp,:::4443->4443/tcp
docker-jitsi-meet_prosody_1   /init     Up      5222/tcp, 5280/tcp, 5347/tcp
docker-jitsi-meet_web_1       /init     Up      0.0.0.0:443->443/tcp,:::443->443/tcp, 0.0.0.0:80->80/tcp,:::80->80/tcp
As you can see, the Jitsi Meet container is started and listen on ports 80 and 443.
Step 4 – Access Jitsi Meet Web UI
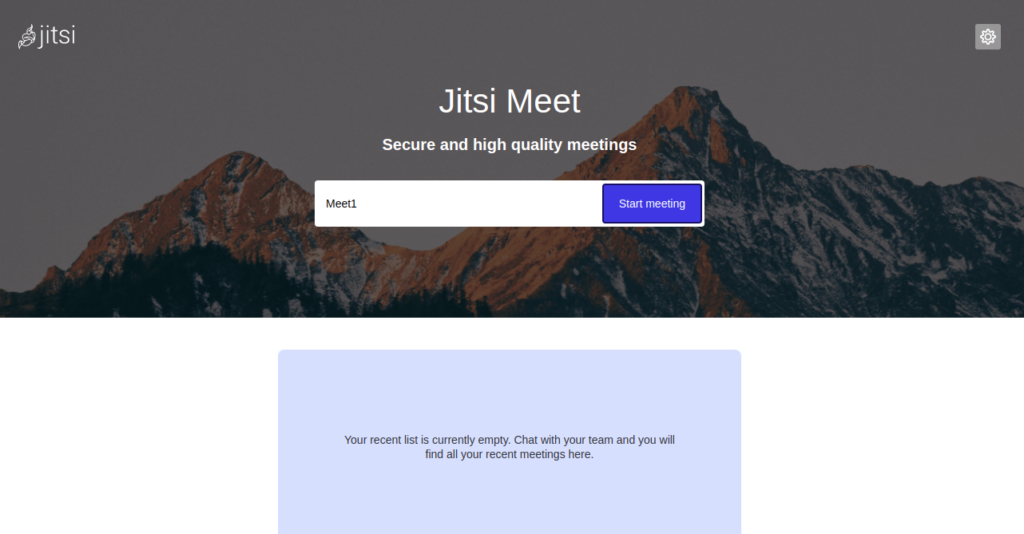
Now, you can access the Jitsi Meet web interface using the URL https://your-domain-name. You should see the Jitsi Meed dashboard on the following page:
Conclusion
Congratulations! You have successfully deployed Jitsi Meet with Docker on Ubuntu 20.04. Docker makes your job easier when it comes to deploying an application within a minute – get started on dedicated hosting from Atlantic.Net.
