LEMP is a group of open-source software stacks used for developing and deploying highly-scaled applications across the web. In a LEMP stack, L stands for Linux, E is for Nginx, M is for MariaDB or MySQL, and P stands for PHP, Perl, or Python. With the LEMP stack, you can host websites and web applications, especially small to medium-sized sites on the web.
In this post, we will show you how to install a LEMP stack on Arch Linux.
Step 1 – Configure Repository
By default, the default repository is outdated in Arch Linux, so you will need to modify the default mirror list. You can do it by editing the mirrorlist configuration file:
nano /etc/pacman.d/mirrorlist
Remove all lines and add the following lines:
## Score: 0.7, United States
Server = http://mirror.us.leaseweb.net/archlinux/$repo/os/$arch
## Score: 0.8, United States
Server = http://lug.mtu.edu/archlinux/$repo/os/$arch
Server = http://mirror.nl.leaseweb.net/archlinux/$repo/os/$arch
## Score: 0.9, United Kingdom
Server = http://mirror.bytemark.co.uk/archlinux/$repo/os/$arch
## Score: 1.5, United Kingdom
Server = http://mirrors.manchester.m247.com/arch-linux/$repo/os/$arch
Server = http://archlinux.dcc.fc.up.pt/$repo/os/$arch
## Score: 6.6, United States
Server = http://mirror.cs.pitt.edu/archlinux/$repo/os/$arch
## Score: 6.7, United States
Server = http://mirrors.acm.wpi.edu/archlinux/$repo/os/$arch
## Score: 6.8, United States
Server = http://ftp.osuosl.org/pub/archlinux/$repo/os/$arch
## Score: 7.1, India
Server = http://mirror.cse.iitk.ac.in/archlinux/$repo/os/$arch
## Score: 10.1, United States
Server = http://mirrors.xmission.com/archlinux/$repo/os/$arch
Save and close the file, then update all the package indexes with the following command:
pacman -Syu
Step 2 – Install Nginx Web Server
First, install the latest version of Nginx using the following command:
pacman -S nginx-mainline
Once Nginx is installed, start and enable the Nginx service using the following command:
systemctl start nginx
systemctl enable nginx
Next, check the status of Nginx with the following command:
systemctl status nginx
You should get the following output:
● nginx.service - A high performance web server and a reverse proxy server
     Loaded: loaded (/usr/lib/systemd/system/nginx.service; disabled; preset: disabled)
     Active: active (running) since Tue 2022-09-27 04:50:37 UTC; 45s ago
    Process: 54810 ExecStart=/usr/bin/nginx -g pid /run/nginx.pid; error_log stderr; (code=exited, status=0/SUCCESS)
   Main PID: 54813 (nginx)
      Tasks: 2 (limit: 2362)
     Memory: 2.1M
     CGroup: /system.slice/nginx.service
             ├─54813 "nginx: master process /usr/bin/nginx -g pid /run/nginx.pid; error_log stderr;"
             └─54814 "nginx: worker process"

Sep 27 04:50:36 archlinux systemd[1]: Starting A high performance web server and a reverse proxy server...
Step 3 – Install MariaDB Database Server
You can install the MariaDB database server using the following command:
pacman -S mariadb
Once MariaDB is installed, initialize the database with the following command:
mysql_install_db --user=mysql --basedir=/usr --datadir=/var/lib/mysql
Next, start the MariaDB service and enable it to start at system reboot with the following command:
systemctl start mysqld
systemctl enable mysqld
You can check the MariaDB service status using the following command:
systemctl status mysqld
You should see the following output:
● mariadb.service - MariaDB 10.9.3 database server
     Loaded: loaded (/usr/lib/systemd/system/mariadb.service; disabled; preset: disabled)
     Active: active (running) since Tue 2022-09-27 04:52:59 UTC; 5s ago
       Docs: man:mariadbd(8)
             https://mariadb.com/kb/en/library/systemd/
    Process: 54951 ExecStartPre=/bin/sh -c systemctl unset-environment _WSREP_START_POSITION (code=exited, status=0/SUCCESS)
    Process: 54952 ExecStartPre=/bin/sh -c [ ! -e /usr/bin/galera_recovery ] && VAR= ||   VAR=`cd /usr/bin/..; /usr/bin/galera_recovery`; [ $>
    Process: 54989 ExecStartPost=/bin/sh -c systemctl unset-environment _WSREP_START_POSITION (code=exited, status=0/SUCCESS)
   Main PID: 54978 (mariadbd)
     Status: "Taking your SQL requests now..."
      Tasks: 11 (limit: 2362)
     Memory: 77.1M
     CGroup: /system.slice/mariadb.service
             └─54978 /usr/bin/mariadbd
Next, secure the MariaDB installation using the following command:
mysql_secure_installation
Answer all the questions as shown below:
Switch to unix_socket authentication [Y/n] Y
Change the root password? [Y/n] Y
New password:
Re-enter new password:
Remove anonymous users? [Y/n] Y
Disallow root login remotely? [Y/n] Y
Remove test database and access to it? [Y/n] Y
Reload privilege tables now? [Y/n] Y
Step 4 – Install PHP and PHP-FPM
You can install PHP and PHP-FPM using the following command:
pacman -S php php-fpm
Next, start and enable the PHP-FPM service:
systemctl start php-fpm
systemctl enable php-fpm
Next, edit the Nginx main configuration file:
nano /etc/nginx/nginx.conf
Add the following line below http{:
server_names_hash_bucket_size 64;
include sites-enabled/*;
Save and close the file when you are done.
Step 5 – Verify PHP
First, create a directory for Nginx virtual host with the following command:
mkdir /etc/nginx/sites-enabled
Next, create an Nginx virtual host file:
nano /etc/nginx/sites-enabled/example.com
Add the following code:
server {
    listen 80;
    server_name test.example.com;
error_log /var/log/nginx/error.log warn;
    location / {
        root /usr/share/nginx/html/;
        index  index.php index.html index.htm;
}
    location ~ \.php$ {
   fastcgi_pass unix:/var/run/php-fpm/php-fpm.sock;
   fastcgi_index index.php;
   root /usr/share/nginx/html;
   include fastcgi.conf;

    }
}
Save and close the file, then create an index.php file:
nano /usr/share/nginx/html/index.php
Add the following code:
<?php
 phpinfo();
?>
Finally, restart the Nginx service to apply the changes:
systemctl restart nginx
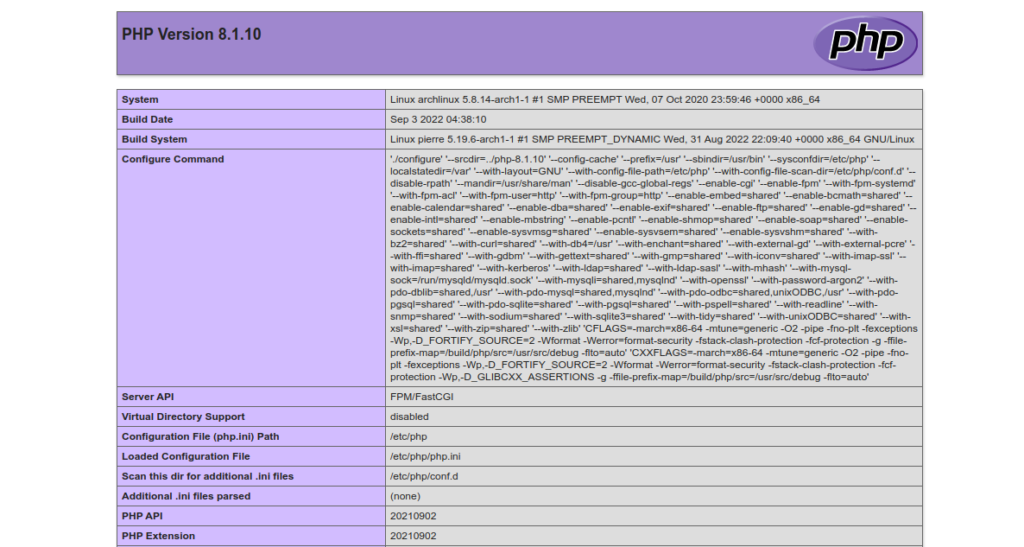
Now, open your web browser and verify PHP using the URL http://test.example.com. You should see the PHP information page on the following screen:
Conclusion
In this post, we explained how to install a LEMP server on Arch Linux. You can now use the LEMP stack in the production environment and start developing and deploying high-performance web applications on the internet. Try to install LEMP on dedicated hosting from Atlantic.Net!

