DokuWiki is a free and open-source Wiki software tool written in PHP language. It does not require any database to store its content. It is highly versatile and has a clean and readable syntax. It allows users to create, edit and delete web pages via a web-based dashboard. DokuWiki has built-in authentication extensions that allow users to store user IDs and passwords using various methods.
In this post, we will show you how to install DokuWiki on Arch Linux.
Step 1 – Configure Repository
By default, the default repository is outdated in Arch Linux, so you will need to modify the default mirror list. You can do it by editing the mirror list configuration file:
nano /etc/pacman.d/mirrorlist
Remove all lines and add the following lines:
## Score: 0.7, United States
Server = http://mirror.us.leaseweb.net/archlinux/$repo/os/$arch
## Score: 0.8, United States
Server = http://lug.mtu.edu/archlinux/$repo/os/$arch
Server = http://mirror.nl.leaseweb.net/archlinux/$repo/os/$arch
## Score: 0.9, United Kingdom
Server = http://mirror.bytemark.co.uk/archlinux/$repo/os/$arch
## Score: 1.5, United Kingdom
Server = http://mirrors.manchester.m247.com/arch-linux/$repo/os/$arch
Server = http://archlinux.dcc.fc.up.pt/$repo/os/$arch
## Score: 6.6, United States
Server = http://mirror.cs.pitt.edu/archlinux/$repo/os/$arch
## Score: 6.7, United States
Server = http://mirrors.acm.wpi.edu/archlinux/$repo/os/$arch
## Score: 6.8, United States
Server = http://ftp.osuosl.org/pub/archlinux/$repo/os/$arch
## Score: 7.1, India
Server = http://mirror.cse.iitk.ac.in/archlinux/$repo/os/$arch
## Score: 10.1, United States
Server = http://mirrors.xmission.com/archlinux/$repo/os/$arch
Save and close the file, then update all the package indexes with the following command:
pacman -Syu
Step 2 – Install Nginx
First, you will need to install the Nginx web server on your system. You can install it with the following command.
pacman -S nginx-mainline
Next, start and enable the Nginx service with the following command.
systemctl start nginx
systemctl enable nginx
Step 3 – Install and Configure PHP
First, install the PHP and other PHP extensions using the following command.
pacman -S php php-fpm php-gd
After successful installation, edit the PHP configuration file.
nano /etc/php/php.ini
Add/modify the following lines:
extension=gd
extension=json
extension=xml
extension=ldap
extension=mysqli
Save and close the file, then start the PHP-FPM service and enable it to start at system reboot.
systemctl start php-fpm
systemctl enable php-fpm
Step 4 – Install DokuWiki
First, download the latest version of DokuWiki from their official download page.
wget https://download.dokuwiki.org/src/dokuwiki/dokuwiki-stable.tgz
Once the download is completed, create a directory for DokuWiki and extract the downloaded file.
mkdir -p  /var/www/html/dokuwiki
tar xzf dokuwiki-stable.tgz -C /var/www/html/dokuwiki/ --strip-components=1
Next, change the ownership of the DokuWiki directory.
chown -R http:http /var/www/html/dokuwiki/
Step 5 – Configure Nginx for DokuWiki
First, create a directory to store Nginx virtual host.
mkdir /etc/nginx/sites-enabled
Next, create an Nginx configuration file for DokuWiki.
nano /etc/nginx/sites-enabled/dokuwiki.conf
Add the following configurations.
server {
  server_name dokuwiki.example.com;
  root /var/www/html/dokuwiki;

  location / {
    index doku.php;
    try_files $uri $uri/ @dokuwiki;
  }

  location ~ ^/lib.*\.(gif|png|ico|jpg)$ {
    expires 30d;
  }

  location ^~ /conf/ { return 403; }
  location ^~ /data/ { return 403; }

  location @dokuwiki {
    rewrite ^/_media/(.*) /lib/exe/fetch.php?media=$1 last;
    rewrite ^/_detail/(.*) /lib/exe/detail.php?media=$1 last;
    rewrite ^/_export/([^/]+)/(.*) /doku.php?do=export_$1&id=$2 last;
    rewrite ^/(.*) /doku.php?id=$1 last;
  }

  location ~ \.php$ {
    fastcgi_split_path_info ^(.+\.php)(/.+)$;
    fastcgi_pass unix:/var/run/php-fpm/php-fpm.sock;
    fastcgi_index index.php;
    include fastcgi_params;
    fastcgi_param SCRIPT_FILENAME $document_root$fastcgi_script_name;
    fastcgi_intercept_errors off;
    fastcgi_buffer_size 16k;
    fastcgi_buffers 4 16k;
  }
}
Save the file, then edit the Nginx main configuration file.
nano /etc/nginx/nginx.conf
Add the following lines after http{:
server_names_hash_bucket_size 64;
include sites-enabled/*;
Save the file, then verify the Nginx configuration.
nginx -t
You will get the following output.
nginx: the configuration file /etc/nginx/nginx.conf syntax is ok
nginx: configuration file /etc/nginx/nginx.conf test is successful
Finally, restart the Nginx service to apply the changes.
systemctl restart nginx
Step 6 – Access DokuWiki
Now, open your web browser and access the DokuWiki using the URL https://dokuwiki.example.com/install.php. You should see the following screen.
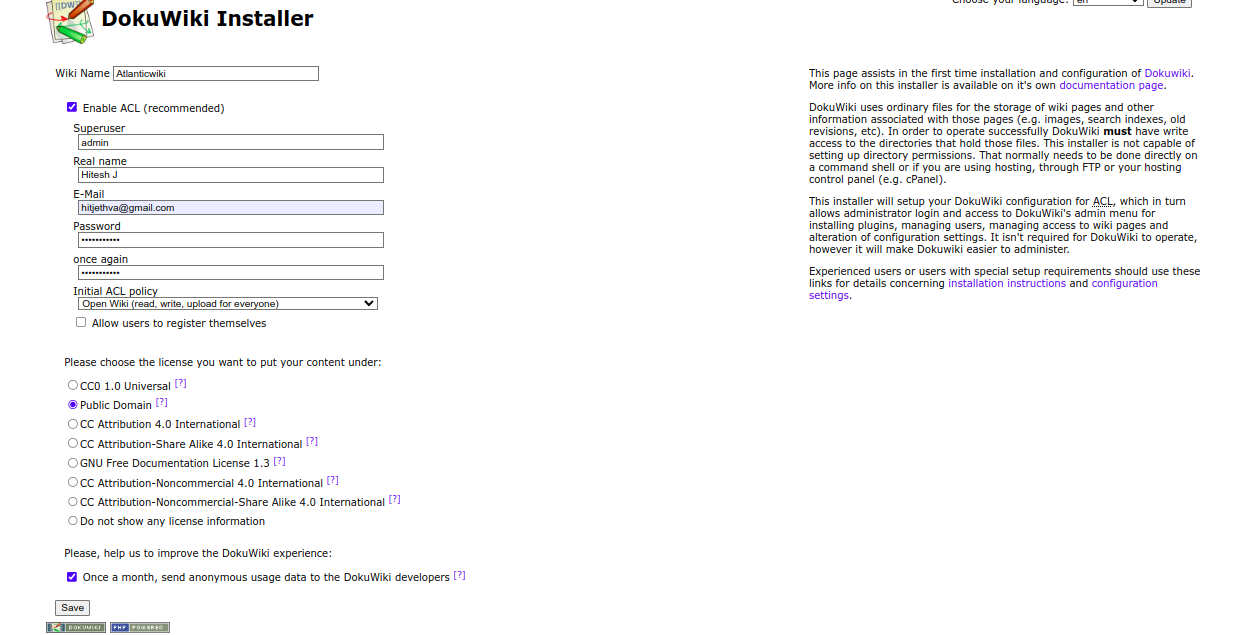
Provide all necessary information and click on the Save button to save the information. You should see the DokuWiki dashboard on the following screen.

You will also need to remove the install.php file from your server.
rm -f /var/www/html/dokuwiki/install.php
Conclusion
Congratulations! You have successfully installed DokuWiki with Nginx on Arch Linux. You can now deploy your own Wiki website using DokuWiki. You can now install DokuWiki on dedicated server hosting from Atlantic.Net!
* This post is for informational purposes only and does not constitute professional, legal, financial, or technical advice. Each situation is unique and may require guidance from a qualified professional.
Readers should conduct their own due diligence before making any decisions.