Introduction
There are two standard types of installations, JRE (Java Runtime Environment) and JDK (Java Development Kit).
As the base model, JRE enables the ability to create Java Applications for different types of deployments using minimal core tools to accomplish the task. JDK is a fully loaded Development Kit that has everything that JRE has, plus additional resources to create/secure Applications and Applets.
This how-to will take you through the installation of JRE and JDK on CentOS 7.
Installing Java on CentOS 7
Before we begin, let’s make sure that the server is fully updated with the following command:
sudo yum update
In this tutorial, we will be using the wget command, so let us install this now to facilitate the process later on.
sudo yum insatal wget
Installing Java JRE on CentOS 7
Select one of the following versions of Java JRE, version 8 being the latest:
sudo yum install java-1.8.0-openjdk
sudo yum install java-1.7.0-openjdk
sudo yum install java-1.6.0-openjdk
Installing Java JDK on CentOS 7
Select one of the following versions of Java JDK, version 8 being the latest:
sudo yum install java-1.8.0-openjdk-devel
sudo yum install java-1.7.0-openjdk-devel
sudo yum install java-1.6.0-openjdk-devel
Installing Oracle Java JRE on CentOS 7
Another alternative Java install is with Oracle. However, we would need to download the file from the Oracle site. To keep things in order an prepare for the download, let us change the directory to /opt.
cd /opt
With the following command, you can download the latest version of Java Oracle JRE 8.51 from the Java site.
sudo wget --no-cookies --no-check-certificate --header "Cookie: gpw_e24=http%3A%2F%2Fwww.oracle.com%2F; oraclelicense=accept-securebackup-cookie" \
"http://download.oracle.com/otn-pub/java/jdk/8u51-b16/jre-8u51-linux-x64.tar.gz"
With the file downloaded to the /opt directory, We must extract the files with the following command:
sudo tar xvf jre-8u51-linux-x64.tar.gz
Now, to clean things as we go. Since we just extracted the file, we can go ahead and remove the download file with the following command:
sudo rm /opt/jre-8u25-linux-x64.tar.gz
Furthermore, we will change the ownership permissions of the extracted files with the following:
sudo chown -R root: jre1.8.0_51
Finally, we will then be using the “Alternatives” commands to create symbolic links from the /opt location to the /usr/bin/java. This can be accomplished with the following command:
sudo alternatives --install /usr/bin/java java /opt/jre1.8.0_51/bin/java 1
Note: Older versions of Oracle Java JRE can be installed by the previous steps and with the correct version links from the Java Website.
Installing Oracle Java JDK on CentOS 7
To download the Java Oracle JDK file from the website, let us keep things in order and prepare for the download. Once you are ready to get started, change your directory to /opt with the following command:
cd /opt
With the following command, you can download the latest version of Java Oracle JDK 8.51 from the Java site.
sudo wget --no-cookies --no-check-certificate --header "Cookie: gpw_e24=http%3A%2F%2Fwww.oracle.com%2F; oraclelicense=accept-securebackup-cookie" \
"http://download.oracle.com/otn-pub/java/jdk/8u51-b16/jdk-8u51-linux-x64.tar.gz"
With the file downloaded to the /opt directory, We must extract the files with the following command:
sudo tar xvf jdk-8u51-linux-x64.tar.gz
Now, to clean things as we go. Since we just extracted the file, we can go ahead and remove the download file with the following command:
sudo rm /opt/jdk-8u51-linux-x64.tar.gz
Furthermore, we will change the ownership permissions of the extracted files with the following:
sudo chown -R root: jdk1.8.0_51
Finally, we will then be using the “Alternatives” commands to create symbolic links from the /opt location to the /usr/bin/java. This can be accomplished with the following command:
sudo alternatives --install /usr/bin/java java /opt/jdk1.8.0_51/bin/java 1
Note: Older versions of Oracle Java JDK can be installed by the previous steps and with the correct version links from the Java Website.
Select your default Java Version on CentOS 7
If you have multiple versions of Java installed on your server, then you have the ability to select a default version. Check your alternatives with the following command:
sudo update-alternatives --config java
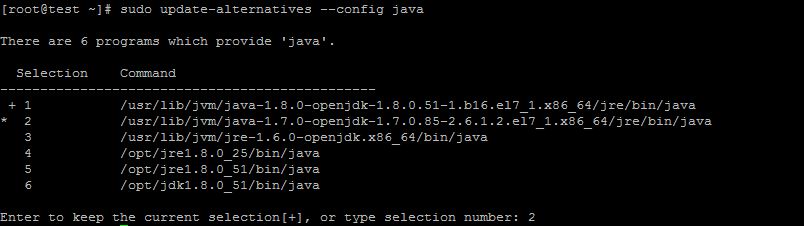
This is the output after running the Java Alternative script on CentOS 7
Once you have viewed your alternatives, choose the version that you want by selecting the assigned number and then hit enter.
Setup JAVA_HOME on CentOS 7
Since many programs nowadays need a JAVA_HOME environment variable to work properly. We will need to find the appropriate path to make these changes. With the following command, you can view your installs and their path:
sudo update-alternatives --config java
A directory path listing for each installation is below:
/usr/lib/jvm/java-1.8.0-openjdk-1.8.0.51-1.b16.el7_1.x86_64
/usr/lib/jvm/java-1.7.0-openjdk-1.7.0.85-2.6.1.2.el7_1.x86_64
/usr/lib/jvm/jre-1.6.0-openjdk.x86_64
To edit the environment file use your text editor and edit the following file:
sudo nano /etc/profile
Now that you are in the user profile file, add the following code, along with the Path of your installation from the previous step, to the bottom. ( Example: JAVA_HOME=”YOUR_PATH”)
export JAVA_HOME="/usr/lib/jvm/java-1.8.0-openjdk-1.8.0.51-1.b16.el7_1.x86_64"
Reload the file so all your changes could take effect with the following command:
source /etc/profile
Verify that your implementations are correct with the following command. Confirm :
echo $JAVA_HOME
What Next?
Congratulations! You now have a successfully installed Java on your CentOS 7 server. Thank you for following along and feel free to check out our blog for further updates or take a look at the many services we offer such as dedicated server hosting.
* This post is for informational purposes only and does not constitute professional, legal, financial, or technical advice. Each situation is unique and may require guidance from a qualified professional.
Readers should conduct their own due diligence before making any decisions.