Odoo is an open-source ERP (Enterprise Resource Planning) system used for managing business processes. It comes with a suite of software tools including billing, accounting, eCommerce, CRM, warehouse, project management, and inventory management. Odoo is designed for small and medium businesses and is available in the cloud or on-premise. There are different apps available that can be installed and used to fit your business requirements. Odoo provides a user-friendly, scalable, customizable, and flexible dashboard that helps you manage businesses and organizations via a web browser.
In this post, we will show you how to install Odoo 14 in Oracle Linux 8.
Step 1 – Install Dependencies
Before starting, you will need to install some dependencies required to install Odoo. First, install the EPEL repository using the following command:
dnf update -y
dnf install epel-release -y
Once the EPEL is installed, run the following command to install Python and Odoo dependencies:
dnf install python3 python3-devel git gcc git redhat-rpm-config libxslt-devel bzip2-devel openldap-devel libjpeg-devel freetype-devel -y
Next, install wkhtmltox to render HTML into PDF using the following command:
dnf install https://github.com/wkhtmltopdf/wkhtmltopdf/releases/download/0.12.5/wkhtmltox-0.12.5-1.centos8.x86_64.rpm
Step 2 – Install PostgreSQL Server
Odoo uses PostgreSQL as a database backend, so you will need to install it on your server.
First, add the PostgreSQL repo using the following command:
dnf install https://download.postgresql.org/pub/repos/yum/reporpms/EL-8-x86_64/pgdg-redhat-repo-latest.noarch.rpm
Next, disable the default PostgreSQL module and install PostgreSQL 14 using the following command:
dnf -qy module disable postgresql
dnf install postgresql14 postgresql14-server -y
Once the installation is finished, initialized the PostgreSQL database with the following command:
/usr/pgsql-14/bin/postgresql-14-setup initdb
Next, start the PostgreSQL service and enable it to start at system reboot:
systemctl start postgresql-14
systemctl enable postgresql-14
Next, create a user for Odoo with the following command:
su - postgres -c "createuser -s odoo14"
Also Read
How to Install and Secure PostgreSQL Server on Oracle Linux 8
Step 3 – Install Odoo 14
It is recommended to add a dedicated odoo user to run the Odoo service. You can add it using the following command:
useradd -m -U -r -d /opt/odoo14 -s /bin/bash odoo14
Next, log in with the odoo user and download the Odoo version 14 using the following command:
su - odoo14
git clone https://www.github.com/odoo/odoo --depth 1 --branch 14.0 /opt/odoo14/odoo
Next, change the directory to /opt/odoo14 and create a Python virtual environment:
cd /opt/odoo14
python3 -m venv odooenv
Next, activate the virtual environment:
source odooenv/bin/activate
Next, install the required dependencies using the following command:
pip3 install --upgrade pip
export PATH=/usr/pgsql-14/bin/:$PATH

pip3 install -r odoo/requirements.txt
Next, deactivate the virtual environment with the following command:
deactivate
Next, create an addons directory and exit from the odoo user with the following command:
mkdir /opt/odoo14/odoo-custom-addons
exit
Next, create an Odoo configuration file using the following command:
nano /etc/odoo14.conf
Add the following lines:
[options]
admin_passwd = odoomasterpassword
db_host = False
db_port = False
db_user = odoo14
db_password = False
addons_path = /opt/odoo14/odoo/addons, /opt/odoo14/odoo-custom-addons
Save and close the file.
Step 4 – Create an Odoo Systemd Service File
Next, you will need to create a systemd service file to manage the Odoo service. You can create it using the following command:
nano /etc/systemd/system/odoo.service
Add the following lines:
[Unit]
Description=Odoo14
Requires=postgresql-14.service
After=network.target postgresql-14.service

[Service]
Type=simple
SyslogIdentifier=odoo14
PermissionsStartOnly=true
User=odoo14
Group=odoo14
ExecStart=/opt/odoo14/odooenv/bin/python3 /opt/odoo14/odoo/odoo-bin -c /etc/odoo14.conf
StandardOutput=journal+console

[Install]
WantedBy=multi-user.target
Save and close the file, then reload the systemd daemon with the following command:
systemctl daemon-reload
Next, start the enable the Odoo service using the following command:
systemctl enable --now odoo
You can check the status of the Odoo service using the following command:
systemctl status odoo
Sample output:
● odoo.service
   Loaded: loaded (/etc/systemd/system/odoo.service; enabled; vendor preset: disabled)
   Active: active (running) since Thu 2022-05-19 01:14:24 EDT; 7s ago
 Main PID: 23674 (python3)
    Tasks: 4 (limit: 23694)
   Memory: 61.6M
   CGroup: /system.slice/odoo.service
           └─23674 /opt/odoo14/odooenv/bin/python3 /opt/odoo14/odoo/odoo-bin -c /etc/odoo14.conf

May 19 01:14:24 oraclelinux systemd[1]: Started odoo.service.
May 19 01:14:25 oraclelinux odoo14[23674]: /opt/odoo14/odooenv/lib64/python3.6/site-packages/psycopg2/__init__.py:144: UserWarning: The psyco>
May 19 01:14:25 oraclelinux odoo14[23674]:   """)
May 19 01:14:25 oraclelinux odoo14[23674]: 2022-05-19 05:14:25,570 23674 INFO ? odoo: Odoo version 14.0
May 19 01:14:25 oraclelinux odoo14[23674]: 2022-05-19 05:14:25,571 23674 INFO ? odoo: Using configuration file at /etc/odoo14.conf
May 19 01:14:25 oraclelinux odoo14[23674]: 2022-05-19 05:14:25,571 23674 INFO ? odoo: addons paths: ['/opt/odoo14/odoo/odoo/addons', '/opt/od>
May 19 01:14:25 oraclelinux odoo14[23674]: 2022-05-19 05:14:25,571 23674 INFO ? odoo: database: odoo14@default:default
May 19 01:14:25 oraclelinux odoo14[23674]: 2022-05-19 05:14:25,856 23674 INFO ? odoo.addons.base.models.ir_actions_report: Will use the Wkhtm>
May 19 01:14:26 oraclelinux odoo14[23674]: 2022-05-19 05:14:26,253 23674 INFO ? odoo.service.server: HTTP service (werkzeug) running on oracl>
Also Read
How to Backup and Restore PostgreSQL in Linux
Step 5 – Configure Firewall
If you are using firewalld, then you will need to allow Odoo port 8069 through the firewall. You can allow this using the following command:
firewall-cmd --permanent --add-port=8069
Next, reload firewalld to apply the changes:
firewall-cmd --reload
Step 6 – Access Odoo 14 Web UI
At this point, Odoo 14 is started and listening on port 8069. You can check the Odoo listening port using the following command:
ss -antpl | grep 8069
Sample output:
LISTEN 0 128 0.0.0.0:8069 0.0.0.0:* users:(("python3",pid=23674,fd=3))
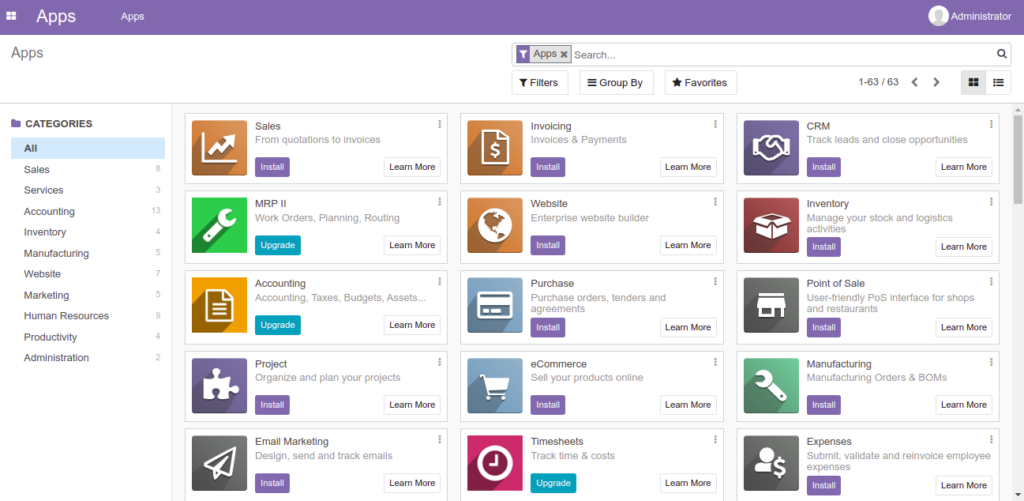
You can now access the Odoo 14 web interface using the URL http://your-server-ip:8069. You should see the following page:

Provide your master admin password, email, and password, and click on the “Create database” button. You will be redirected to the Odoo15 dashboard as shown below:
Conclusion
In this post, we explained how to install Odoo 14 on Oracle Linux 8. You can now host Odoo in your organization and start managing your business using the Odoo ERP. Get started on dedicated hosting from Atlantic.Net.
* This post is for informational purposes only and does not constitute professional, legal, financial, or technical advice. Each situation is unique and may require guidance from a qualified professional.
Readers should conduct their own due diligence before making any decisions.