Strapi is a free, open-source, and headless content management system built with JavaScript. Compared to other CMS, Strapi doesn’t provide a front-end. You will need to rely on API to design your content structure. Strapi provides an easier way to build your website, integrating with popular frameworks like React and Next.js.
This post will show you how to install the Strapi App on Arch Linux.
Prerequisites
- An IPV6 IP address associated with your instance
Step 1 – Configure Repository
By default, the default repository is outdated in Arch Linux, so you will need to modify the default mirror list. You can do it by editing the mirror list configuration file:
nano /etc/pacman.d/mirrorlist
Remove all lines and add the following lines:
## Score: 0.7, United States
Server = http://mirror.us.leaseweb.net/archlinux/$repo/os/$arch
## Score: 0.8, United States
Server = http://lug.mtu.edu/archlinux/$repo/os/$arch
Server = http://mirror.nl.leaseweb.net/archlinux/$repo/os/$arch
## Score: 0.9, United Kingdom
Server = http://mirror.bytemark.co.uk/archlinux/$repo/os/$arch
## Score: 1.5, United Kingdom
Server = http://mirrors.manchester.m247.com/arch-linux/$repo/os/$arch
Server = http://archlinux.dcc.fc.up.pt/$repo/os/$arch
## Score: 6.6, United States
Server = http://mirror.cs.pitt.edu/archlinux/$repo/os/$arch
## Score: 6.7, United States
Server = http://mirrors.acm.wpi.edu/archlinux/$repo/os/$arch
## Score: 6.8, United States
Server = http://ftp.osuosl.org/pub/archlinux/$repo/os/$arch
## Score: 7.1, India
Server = http://mirror.cse.iitk.ac.in/archlinux/$repo/os/$arch
## Score: 10.1, United States
Server = http://mirrors.xmission.com/archlinux/$repo/os/$arch
Save and close the file, then update all the package indexes with the following command:
pacman -Syu
Step 2 – Install Node.js
Before starting, you will need to install Node.js on your server. First, install NVM with the following command.
curl -o- https://raw.githubusercontent.com/nvm-sh/nvm/v0.39.2/install.sh | bash
Once NVM is installed, you should see the following output.
export NVM_DIR="$HOME/.nvm"
[ -s "$NVM_DIR/nvm.sh" ] && \. "$NVM_DIR/nvm.sh"  # This loads nvm

=> Close and reopen your terminal to start using nvm or run the following to use it now:
Next, activate the NVM environment variable using the following command.
export NVM_DIR="$HOME/.nvm"
[ -s "$NVM_DIR/nvm.sh" ] && \. "$NVM_DIR/nvm.sh"  # This loads nvm
Now, install the latest version of Node.js with the following command.
nvm install --lts
You will get the following output.
Installing latest LTS version.
Downloading and installing node v18.14.2...
Downloading https://nodejs.org/dist/v18.14.2/node-v18.14.2-linux-x64.tar.xz...
####################################################################################################################################### 100.0%
Computing checksum with sha256sum
Checksums matched!
Now using node v18.14.2 (npm v9.5.0)
Creating default alias: default -> lts/* (-> v18.14.2)
Next, find the location of Node.js with the following command.
which node
Output.
/root/.nvm/versions/node/v18.14.2/bin/node
Next, create a symbolic link of Node.js with the following command.
ln -s /root/.nvm/versions/node/v18.14.2/bin/node /usr/bin/node
Step 3 – Install and Configure PostgreSQL
If you want to use a database for the Strapi, you will need to install PostgreSQL on your server. You can install it with the following command.
pacman -S postgresql
Next, initialize the PostgreSQL database with the following command.
sudo -u postgres initdb --locale en_US.UTF-8 -D /var/lib/postgres/data
Next, start and enable the PostgreSQL service with the following command.
systemctl start postgresql
systemctl enable postgresql
Next, connect to the PostgreSQL shell:
sudo -u postgres psql
Next, set the Postgres password and create a database with the following command.
ALTER USER postgres PASSWORD 'password';
create database project;
Finally, exit from the PostgreSQL shell with the following command.
\q
Step 4 – Install Strapi
You can use the npx command line tool to install Strapi on your server.
npx create-strapi-app@latest project --no-run
You will be asked to select the installation type:
? Choose your installation type (Use arrow keys)
❯ Quickstart (recommended)
  Custom (manual settings)
Select your installation type and press the Enter key to finish the installation.
? Choose your installation type Quickstart (recommended)
Creating a quickstart project.
Creating a new Strapi application at /root/project.
Creating files.
Dependencies installed successfully.

Your application was created at /root/project.

Available commands in your project:

  npm run develop
  Start Strapi in watch mode. (Changes in Strapi project files will trigger a server restart)

  npm run start
  Start Strapi without watch mode.

  npm run build
  Build Strapi admin panel.

  npm run strapi
  Display all available commands.

You can start by doing:

  npm run develop
  cd /root/project
Next, navigate to your project directory and build your application with the following command.
cd project
npm run build
You will get the following output.
> project@0.1.0 build
> strapi build

Building your admin UI with development configuration...

✔ Webpack
  Compiled successfully in 25.78s

Admin UI built successfully
Next, edit the server.js file.
nano ./config/server.js
Make the following changes.
module.exports = ({ env }) => ({
host: env('HOST', '0.0.0.0'),
port: env.int('PORT', 1337),
url: 'http://app.example.com',
app: {
keys: env.array('APP_KEYS'),
},
});
Save and close the file, then run your Strapi app with the following command.
npm run develop
You should see the following output.
[2023-02-24 09:25:18.097] info: The Users & Permissions plugin automatically generated a jwt secret and stored it in .env under the name JWT_SECRET.

 Project information

┌────────────────────┬──────────────────────────────────────────────────┐
│ Time               │ Fri Feb 24 2023 09:25:19 GMT+0000 (Coordinated … │
│ Launched in        │ 2503 ms                                          │
│ Environment        │ development                                      │
│ Process PID        │ 76628                                            │
│ Version            │ 4.6.2 (node v18.14.2)                            │
│ Edition            │ Community                                        │
│ Database           │ sqlite                                           │
└────────────────────┴──────────────────────────────────────────────────┘

 Actions available

One more thing...
Create your first administrator 💻 by going to the administration panel at:

┌──────────────────────────────┐
│ http://app.example.com/admin │
└──────────────────────────────┘
Press the CTRL+C to stop the application.
Step 5 – Create a Systemd Service File for Strapi
Next, you must create a systemd file to manage the Strapi service. You can create it with the following command.
nano /etc/systemd/system/strapi.service
Add the following configuration.
[Unit]
Description=Strapi Project
After=network.target
[Service]
Type=simple
WorkingDirectory=/root/project
User=root
ExecStart=/usr/bin/node /root/project/node_modules/.bin/strapi develop
[Install]
WantedBy=multi-user.target
Save and close the file, then reload the systemd daemon to apply the changes.
systemctl daemon-reload
Next, start and enable the Strapi service with the following command.
systemctl start strapi
systemctl enable strapi
You can check the status of the Strapi service with the following command.
systemctl status strapi
You should see the following output.
● strapi.service - Strapi Project
     Loaded: loaded (/etc/systemd/system/strapi.service; disabled; preset: disabled)
     Active: active (running) since Fri 2023-02-24 09:33:23 UTC; 59s ago
   Main PID: 76830 (node)
      Tasks: 18 (limit: 4700)
     Memory: 235.3M
     CGroup: /system.slice/strapi.service
             ├─76830 /usr/bin/node /root/project/node_modules/.bin/strapi develop
             └─76837 /root/.nvm/versions/node/v18.14.2/bin/node /root/project/node_modules/.bin/strapi develop

Feb 24 09:33:30 archlinux node[76837]: │ Version            │ 4.6.2 (node v18.14.2)                            │
Feb 24 09:33:30 archlinux node[76837]: │ Edition            │ Community                                        │
Feb 24 09:33:30 archlinux node[76837]: │ Database           │ sqlite                                           │
Feb 24 09:33:30 archlinux node[76837]: └────────────────────┴──────────────────────────────────────────────────┘
Feb 24 09:33:30 archlinux node[76837]:  Actions available
Feb 24 09:33:30 archlinux node[76837]: One more thing...
Feb 24 09:33:30 archlinux node[76837]: Create your first administrator 💻 by going to the administration panel at:
Feb 24 09:33:30 archlinux node[76837]: ┌──────────────────────────────┐
Feb 24 09:33:30 archlinux node[76837]: │ http://app.example.com/admin │
Feb 24 09:33:30 archlinux node[76837]: └──────────────────────────────┘
Step 6 – Configure Nginx for Strapi App
Next, you must install and configure Nginx as a reverse proxy for Strapi App. First, install the Nginx package with the following command.
pacman -S nginx-mainline
After the successful installation, create a directory to store Nginx virtual host files.
mkdir /etc/nginx/sites-enabled
Next, create a Strapi virtual host configuration file.
nano /etc/nginx/sites-enabled/strapi.conf
Add the following configuration.
# Strapi server
upstream strapi {
server 127.0.0.1:1337;
}
server {
listen 80;
server_name app.example.com;
# Proxy Config
location / {
proxy_pass http://strapi;
proxy_http_version 1.1;
proxy_set_header X-Forwarded-Host $host;
proxy_set_header X-Forwarded-Server $host;
proxy_set_header X-Real-IP $remote_addr;
proxy_set_header X-Forwarded-For $proxy_add_x_forwarded_for;
proxy_set_header X-Forwarded-Proto $scheme;
proxy_set_header Host $http_host;
proxy_set_header Upgrade $http_upgrade;
proxy_set_header Connection "Upgrade";
proxy_pass_request_headers on;
}
}
Save and close the file, then edit the Nginx main configuration file.
nano /etc/nginx/nginx.conf
Add the following lines after http{:
server_names_hash_bucket_size 64;
include sites-enabled/*;
Save and close the file, then verify the Nginx configuration using the following command.
nginx -t
You should see the following output.
nginx: the configuration file /etc/nginx/nginx.conf syntax is ok
nginx: configuration file /etc/nginx/nginx.conf test is successful
Finally, restart Nginx to apply the changes.
systemctl restart nginx
Step 7 – Access Strapi Web Interface
Now, open your web browser and access the Strapi web UI using the URL http://app.example.com/admin. You should see the Strapi default page on the following screen.
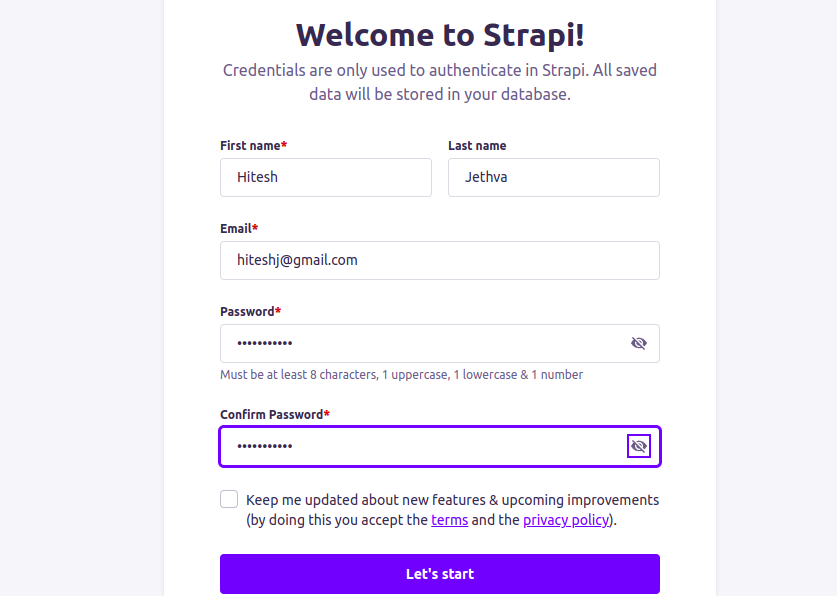
Provide your name, email, and password then click on the Let’s start button. You should see the Strapi dashboard on the following screen.

Conclusion
In this post, you learned how to install the Strapi on Arch Linux. You also learned how to use Nginx as a reverse proxy for the Strapi. You can now create your own application using Strapi and deploy it on the live server. You can now try to deploy Strapi on dedicated server hosting from Atlantic.Net!
* This post is for informational purposes only and does not constitute professional, legal, financial, or technical advice. Each situation is unique and may require guidance from a qualified professional.
Readers should conduct their own due diligence before making any decisions.